Table of Contents
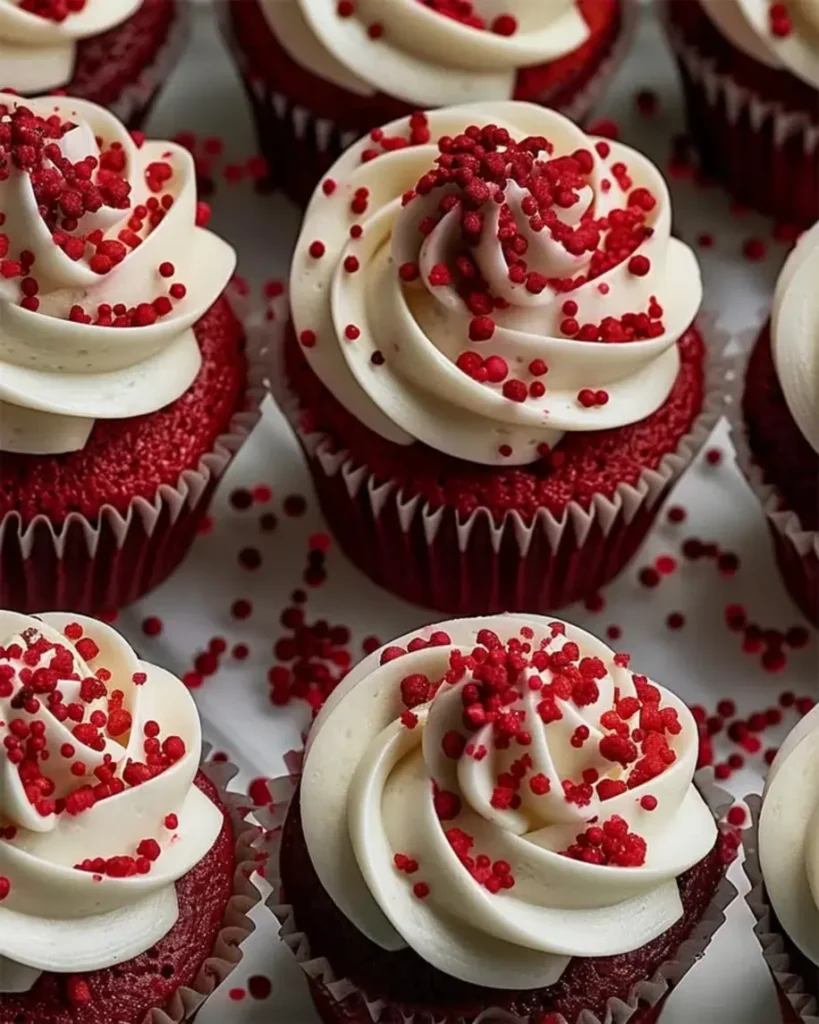
Classic Red Velvet Cupcakes: The Only Recipe You’ll Ever Need
Imagine sinking your teeth into a batch of classic red velvet cupcakes that are not just visually stunning but also incredibly moist and fluffy, with that signature cocoa hint that elevates every bite. If you’ve ever struggled with dry cupcakes or uneven baking, this classic red velvet cupcakes recipe from cookinwithlalyta.com is your ultimate solution. Drawing from Chef Lalybeth’s expertise, our unique angle focuses on achieving ultra-moist results through a precise blend of buttermilk and oil, ensuring bakery-quality treats right at home. Whether you’re baking for a special occasion or a weeknight dessert, these cupcakes promise to impress with their vibrant red hue and creamy frosting.
Picture the delight of biting into one of these classic red velvet cupcakes: the soft, velvety crumb melts in your mouth, offering a perfect balance of subtle chocolate notes from the cocoa powder and a tangy undertone from the buttermilk. The texture is dreamily fluffy, with just the right amount of density to hold up under a generous swirl of cream cheese frosting—rich, creamy, and slightly tangy, creating a harmonious contrast. The aroma while baking fills your kitchen with a warm, inviting scent of vanilla and chocolate, building anticipation for that first irresistible taste. Every element combines to make this recipe a sensory masterpiece.
What sets this classic red velvet cupcakes version apart on cookinwithlalyta.com is its foolproof execution, honed through extensive testing in our kitchen. Chef Lalybeth’s secret lies in the meticulous balance of ingredients and techniques that guarantee success for novice and expert bakers alike. You’ll learn insider tips on achieving that ultra-moist texture, avoiding common pitfalls, and even making substitutions without compromising flavor. By the end of this post, you’ll feel empowered to create these show-stopping desserts that have wowed families and parties for generations.
Why This Classic Red Velvet Cupcakes Recipe is a Game-Changer
The Chef’s Secret: What makes this classic red velvet cupcakes recipe truly stand out is our emphasis on achieving ultra-moist results through a strategic combination of buttermilk and vegetable oil. Unlike traditional recipes that might rely solely on butter, this method incorporates oil for better moisture retention and buttermilk for its subtle acidity, which reacts with the baking soda to create a lighter, more tender crumb. This technique ensures your cupcakes remain fresh and flavorful, even a day later, setting it apart from standard versions that often turn dry.
Unbeatable Texture: The science behind the ultra-moist and fluffy texture lies in the emulsion formed by the oil and buttermilk with the dry ingredients. The oil coats the flour particles, preventing gluten development that could make the cupcakes tough, while the buttermilk’s acidity activates the baking soda for a gentle rise. This results in a cupcake that’s perfectly springy and soft, with a fine crumb that holds the frosting beautifully—thanks to the cocoa powder adding just enough structure without overwhelming the batter.
Foolproof for a Reason: This recipe has been tested multiple times in our kitchen to ensure consistent results, making it incredibly reliable for home cooks. From precise measurements to step-by-step guidance, we’ve eliminated guesswork, so you can confidently whip up classic red velvet cupcakes that turn out perfectly every time, regardless of your baking experience.
Ingredient Spotlight: Quality Makes the Difference
All-purpose flour is the foundation of these classic red velvet cupcakes, providing the structure that holds everything together. Using high-quality, unbleached flour ensures a tender crumb without excess density, as lower-protein varieties prevent toughness. Opt for a reputable brand to avoid inconsistencies; if you’re gluten-sensitive, a 1:1 gluten-free flour blend can substitute, but it may slightly alter the texture.
Granulated sugar not only sweetens the batter but also contributes to the moistness by dissolving into the wet ingredients, creating a syrupy effect during baking. Choose pure cane sugar for the best flavor profile; if you need a lower-calorie option, swap with a cup-for-cup sugar alternative, though it might make the cupcakes less fluffy.
Baking soda acts as the leavening agent in this classic red velvet cupcakes recipe, reacting with the acidic buttermilk and vinegar for a reliable rise. Fresh baking soda is crucial—check the expiration date to ensure potency; if unavailable, substitute with an equal amount of baking powder, but adjust the acidity in the recipe for balanced results.
Salt enhances the overall flavor, balancing the sweetness and highlighting the cocoa’s subtle notes in these classic red velvet cupcakes. Use fine sea salt for even distribution; in a pinch, kosher salt works, but measure carefully as it can affect the taste if overused.
Cocoa powder adds that distinctive chocolate undertone without overpowering the vanilla and red coloring. Natural cocoa is ideal here for its authentic flavor; Dutch-processed can substitute for a milder taste, but it won’t react as well with the baking soda, potentially impacting the rise.
Vegetable oil is key to the ultra-moist texture, providing fat that keeps the cupcakes from drying out. A neutral oil like canola works best; for a healthier twist, use melted coconut oil, but note it might impart a subtle flavor.
Buttermilk contributes tanginess and tenderness, reacting with baking soda for lift and moisture. If you don’t have it, a DIY substitute of milk with lemon juice works wonders; this is essential for maintaining the classic red velvet cupcakes’ signature softness.
Eggs bind the ingredients and add richness; large, fresh eggs ensure the best results. For vegan baking, flax eggs can replace them, though the texture might be denser.
Red food coloring creates the iconic vibrant hue; gel-based is preferred for intensity without watering down the batter. For a natural alternative, beet juice can substitute, but it may lighten the color.
Vanilla extract infuses warm aroma and depth; pure extract is superior to imitation for authentic flavor. If allergic, use almond extract as a swap, adjusting to taste.
White distilled vinegar boosts the reaction for fluffiness; it’s subtle but vital. Apple cider vinegar can replace it, offering a similar acidity with a hint of fruitiness.
For the frosting, cream cheese provides creamy tang; full-fat versions yield the best consistency. A dairy-free alternative like vegan cream cheese works for substitutions.
Butter in the frosting adds richness and structure; softened, high-quality butter ensures smoothness. Use a plant-based butter for vegan options.
Confectioners’ sugar sweetens and thickens the frosting; sifting prevents lumps. Powdered erythritol can substitute for a sugar-free version.
Step-by-Step Instructions
Step 1: Preheating the Oven and Preparing the Pans
Start by preheating your oven to 350 degrees F and lining 2 (12-cup) muffin pans with cupcake papers to ensure even baking and easy removal. This step sets the foundation for perfectly risen cupcakes.
Pro Tip: Use high-quality cupcake liners to prevent sticking and maintain moisture; invest in silicone ones for reusability.
Step 2: Sifting the Dry Ingredients
In a medium mixing bowl, sift together the 2 1/2 cups all-purpose flour, 1 1/2 cups granulated sugar, 1 teaspoon baking soda, 1 teaspoon salt, and 1 teaspoon cocoa powder. Sifting removes lumps and aerates the mixture for a lighter batter.
Common Mistake to Avoid: Don’t skip sifting, as clumps can lead to uneven texture; always use a fine-mesh sieve for the best results.
Step 3: Mixing the Wet Ingredients
In a large bowl, gently beat together the 1 1/2 cups vegetable oil, 1 cup buttermilk, 2 large eggs, 2 tablespoons red food coloring, 1 teaspoon vanilla extract, and 1 teaspoon white distilled vinegar until just combined, avoiding overmixing to preserve airiness.
Pro Tip: Bring all wet ingredients to room temperature first for better emulsification, enhancing the ultra-moist quality of your classic red velvet cupcakes.
Step 4: Combining Wet and Dry Mixtures
Gradually add the sifted dry ingredients to the wet mixture, stirring until smooth and fully combined. This creates a uniform batter that’s easy to portion.
Common Mistake to Avoid: Overmixing at this stage can develop gluten, making the cupcakes tough; stop as soon as the batter is homogeneous.
Step 5: Filling the Cupcake Tins
Divide the batter evenly among the cupcake tins, filling each about 2/3 full to allow for proper rising without overflow.
Pro Tip: Use an ice cream scoop for precise measurement, ensuring uniform size and baking for professional-looking classic red velvet cupcakes.
Step 6: Baking the Cupcakes
Bake in the preheated oven for 20 to 22 minutes, rotating the pans halfway through for even heat distribution. Check for doneness by inserting a toothpick into the center—it should come out clean.
Common Mistake to Avoid: Opening the oven door too early can cause the cupcakes to sink; wait until the minimum bake time before checking.
Step 7: Cooling the Cupcakes
Remove the cupcakes from the oven and let them cool completely in the pans for about 10 minutes before transferring to a wire rack. This prevents the frosting from melting.
Pro Tip: Place them on a wire rack to promote air circulation, locking in that ultra-moist texture for your classic red velvet cupcakes.
Step 8: Preparing the Frosting
In a large mixing bowl, beat the 1 pound softened cream cheese, 2 sticks softened butter, and 1 teaspoon vanilla extract until smooth. Gradually add 4 cups sifted confectioners’ sugar, starting on low speed and increasing to high for a fluffy consistency.
Common Mistake to Avoid: Ensure all frosting ingredients are at room temperature to avoid lumps; beat until light and airy for the perfect topping.
Step 9: Frosting the Cupcakes
Once cooled, generously frost the classic red velvet cupcakes with the prepared cream cheese frosting using a piping bag or spatula for an elegant finish.
Pro Tip: Chill the frosting briefly for easier application, enhancing the overall presentation of your baked treats.
Serving & Presentation
Elevate your classic red velvet cupcakes by presenting them on a tiered stand for a stunning visual appeal, garnished with edible flowers or a light dusting of cocoa powder to highlight their vibrant red color. The creamy cream cheese frosting pairs beautifully with the moist crumb, making these cupcakes a standalone dessert, but they also complement a coffee break or afternoon tea. For a full spread, serve alongside fresh berries to balance the richness or pair with vanilla ice cream for a decadent twist, turning any gathering into a memorable event.
Make-Ahead & Storage Solutions
Make-Ahead Strategy: Prepare the batter up to 24 hours in advance and store it covered in the fridge; for the frosting, mix it a day ahead and keep it chilled, allowing you to assemble classic red velvet cupcakes quickly. You can also bake the cupcakes up to 3 days ahead, unfrosted, and store them as described below.
Storing Leftovers: To maintain freshness, store frosted cupcakes in an airtight container in the refrigerator for up to 3 days, or freeze unfrosted ones in a freezer-safe bag for up to 2 months. This prevents drying out and preserves that ultra-moist texture.
The Best Way to Reheat: For refrigerated cupcakes, let them sit at room temperature for 30 minutes; if frozen, thaw overnight in the fridge and warm gently in a 300 degrees F oven for 5 minutes to restore the original fluffy consistency without melting the frosting.
Frequently Asked Questions (FAQ)

How do you make red velvet cupcakes moist and fluffy?
To achieve moist and fluffy classic red velvet cupcakes, focus on using a combination of buttermilk and vegetable oil in the batter, as they provide acidity and fat that enhance tenderness. Ensure not to overmix the ingredients and bake at the correct temperature for even rising; our recipe’s unique angle emphasizes this for ultra-moist results every time.
What can I substitute for buttermilk in red velvet cupcakes?
If buttermilk is unavailable, substitute with a mixture of 1 cup milk and 1 tablespoon lemon juice or white vinegar; let it sit for 5 minutes to curdle. This maintains the acidity needed for the reaction with baking soda, ensuring your classic red velvet cupcakes remain tender and flavorful.
How long does it take to bake red velvet cupcakes?
Baking classic red velvet cupcakes typically takes 20 to 22 minutes at 350 degrees F, depending on your oven. Always perform the toothpick test for doneness to avoid overbaking, which can dry them out—our step-by-step instructions guarantee perfect timing.
What are the best ways to frost and serve red velvet cupcakes?
The best way to frost classic red velvet cupcakes is with a creamy cream cheese frosting applied via piping bag for a professional look; chill the frosting for easier handling. Serve them at room temperature on a decorative platter, perhaps with fresh mint or chocolate shavings, to enhance their visual appeal and complement their rich flavor.
Can these cupcakes be made ahead for events?
Absolutely, you can bake classic red velvet cupcakes up to 3 days in advance; store them unfrosted in an airtight container. Frost just before serving to keep the texture fresh and the frosting intact, making them ideal for events.
Is there a way to make this recipe gluten-free?
Yes, substitute the all-purpose flour with a 1:1 gluten-free flour blend, ensuring it contains xanthan gum for structure. This adjustment works well in our classic red velvet cupcakes recipe, though you may need to extend baking time slightly for the best results.
Can I make this recipe vegan?
To make these classic red velvet cupcakes vegan, replace eggs with flax eggs (1 tablespoon ground flaxseed mixed with 3 tablespoons water per egg), use plant-based milk with vinegar for buttermilk, and opt for vegan cream cheese and butter in the frosting. These swaps maintain the ultra-moist quality while accommodating dietary needs.
Tried This Recipe? Leave a Comment!
Did you make this recipe? I’d love to hear how it turned out! Please leave a comment and a rating below. Your feedback helps other home cooks and supports cookinwithlalyta!
For more delicious inspiration, follow me on Pinterest!

Classic Red Velvet Cupcakes
- Total Time: 40 minutes
- Yield: 24 1x
Description
These classic red velvet cupcakes are soft, moist, and topped with creamy cream cheese frosting, featuring a hint of cocoa and vibrant red color.
Ingredients
- 2 1/2 cups all-purpose flour
- 1 1/2 cups granulated sugar
- 1 teaspoon baking soda
- 1 teaspoon salt
- 1 teaspoon cocoa powder
- 1 1/2 cups vegetable oil
- 1 cup buttermilk
- 2 large eggs
- 2 tablespoons red food coloring
- 1 teaspoon vanilla extract
- 1 teaspoon white distilled vinegar
- 1 pound cream cheese, softened (for frosting)
- 2 sticks butter, softened (for frosting)
- 1 teaspoon vanilla extract (for frosting)
- 4 cups sifted confectioners' sugar (for frosting)
Instructions
- Preheat the oven to 350 degrees F. Line 2 (12-cup) muffin pans with cupcake papers.
- In a medium mixing bowl, sift together the flour, sugar, baking soda, salt, and cocoa powder.
- In a large bowl, gently beat together the oil, buttermilk, eggs, food coloring, vanilla, and vinegar.
- Add the sifted dry ingredients to the wet mixture and mix until smooth and combined.
- Divide the batter evenly among the cupcake tins, filling about 2/3 full.
- Bake in the oven for about 20 to 22 minutes, turning the pans once halfway through.
- Test the cupcakes with a toothpick for doneness. Remove from oven and cool completely before frosting.
- For the frosting: In a large mixing bowl, beat the cream cheese, butter, and vanilla together until smooth.
- Add the sugar and beat on low speed until incorporated, then increase to high speed and mix until very light and fluffy.
Notes
Ensure to use gel food coloring for a vibrant red hue; store cupcakes in an airtight container for up to 3 days.
- Prep Time: 20 minutes
- Cook Time: 20 minutes
- Method: Dessert
- Cuisine: American
Nutrition
- Calories: 250
- Sugar: 25g
- Fat: 12g
- Carbohydrates: 35g
- Protein: 4g
Conclusion
Classic Red Velvet Cupcakes are a timeless treat that combine a moist, velvety crumb with a subtle chocolate flavor and that iconic red hue, making them perfect for holidays, birthdays, or any special occasion. Their creamy cream cheese frosting adds a delightful tang that balances the sweetness, ensuring every bite is irresistibly satisfying. For a fun serving tip, pair them with a fresh cup of coffee or tea, or try a variation by incorporating chopped nuts into the batter for added texture and crunch.