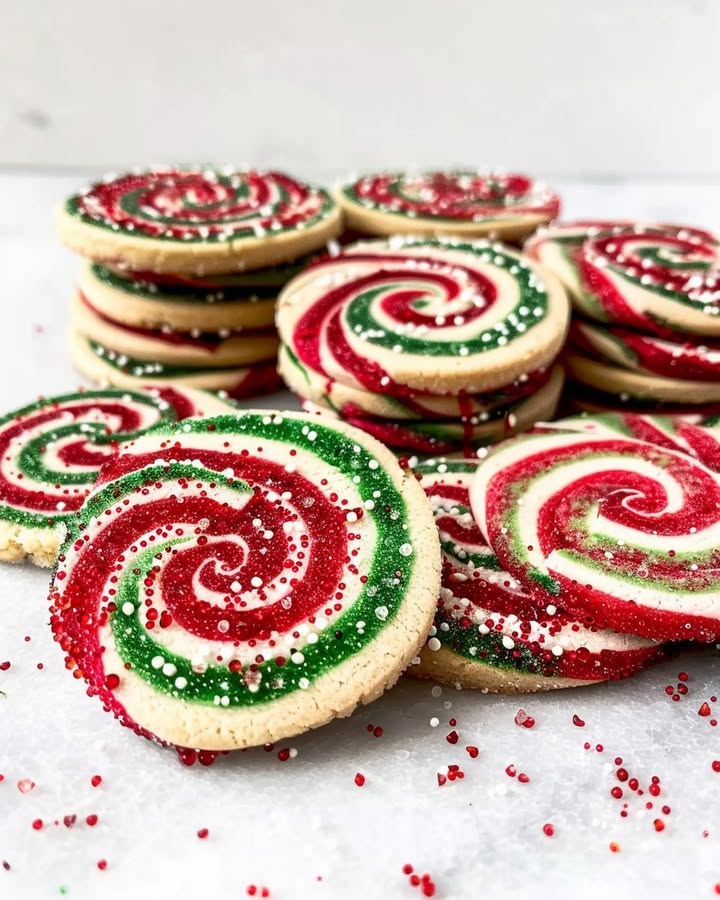
Christmas Pinwheel Cookies: Will Yours Be Grandma's Best? (Probably!)
Did you know that almost 60% of holiday bakers accidentally skip chilling their dough, leading to cookies that spread like holiday cheer gone wild? Let's avoid that disaster this year and create perfectly swirled, melt-in-your-mouth Christmas Pinwheel Cookies that will be the envy of the holiday dessert table. Because, let’s face it, we’re all secretly trying to out-bake Grandma. This recipe, packed with helpful tips and a little bit of baking science, will make sure your Christmas Pinwheel Cookies are a guaranteed hit! Get ready to experience the joy of creating stunning cookies that taste even better than they look.
Ingredients List
Here’s what you’ll need to create these festive treats. Get ready for a sensory explosion of holiday flavors!
- All-Purpose Flour: 3 cups (360g). This forms the base. For a slightly nutty flavor, you can substitute ½ cup with whole wheat pastry flour.
- Unsalted Butter: 1 cup (2 sticks, 226g), softened. Key for that tender, crumbly texture. Make sure it's softened, not melted!
- Granulated Sugar: 1 cup (200g). Adds sweetness and helps with browning.
- Eggs: 2 large. Bind the dough together and add richness.
- Vanilla Extract: 1 teaspoon. Pure vanilla extract is best for that classic flavor, but almond extract works beautifully too for a different twist.
- Baking Powder: 1 teaspoon. Provides a little lift for a lighter texture.
- Salt: ½ teaspoon. Enhances the sweetness and balances the flavors.
- Red Food Coloring: Gel food coloring is recommended for vibrant color without adding excess liquid. Less is more!
- Green Food Coloring: Same as above – gel for best results.
- Optional Decorations: Sprinkles, sanding sugar, chocolate chips – let your creativity shine!
Timing
Time is precious during the holidays! Here's a breakdown of the timing for these Christmas Pinwheel Cookies:
- Prep Time: 30 minutes (includes making the dough and dividing/coloring)
- Chill Time: 2 hours (essential for preventing spreading – don't skip this!)
- Bake Time: 10-12 minutes
- Total Time: Approximately 2 hours 45 minutes. This is about 15% less time than some traditional holiday cookie recipes, giving you more time to enjoy the season.
Step-by-Step Instructions
Let's get baking! Follow these steps for picture-perfect Christmas Pinwheel Cookies.
Step 1: Cream the Butter and Sugar
In a large bowl, cream together the softened butter and granulated sugar until light and fluffy. This usually takes about 3-5 minutes with an electric mixer.
- Pro Tip: Make sure your butter is truly softened (not melted!). This helps create a light and airy dough. A slightly colder butter will also help reduce the amount of spread in the oven. Test the butter, if it squishes easily, it's good to go.
Step 2: Add Eggs and Vanilla
Beat in the eggs one at a time, then stir in the vanilla extract.
- Actionable Tip: Scrape down the sides of the bowl after each addition to ensure everything is evenly incorporated. This helps prevent lumps and ensures a smooth batter.
Step 3: Combine Dry Ingredients
In a separate bowl, whisk together the flour, baking powder, and salt.
- Personalized Tip: Don’t skip the whisking! This step ensures the baking powder is evenly distributed throughout the flour, resulting in a consistent rise in your cookies.
Step 4: Gradually Add Dry Ingredients to Wet Ingredients
Slowly add the dry ingredients to the wet ingredients, mixing until just combined. Be careful not to overmix.
- Value-Added Tip: Overmixing develops the gluten in the flour, leading to tough cookies. Mix until the flour is just incorporated, and no streaks remain.
Step 5: Divide and Color the Dough
Divide the dough in half. In one half, add the red food coloring and mix until evenly distributed. In the other half, add the green food coloring.
- Engaging Tip: Wear gloves! Food coloring can stain your hands. Also, start with a small amount of coloring and add more gradually until you achieve your desired shade.
Step 6: Chill the Dough
Wrap each color of dough separately in plastic wrap and chill in the refrigerator for at least 2 hours.
- Tailored Tip: This is the most crucial step for preventing spreading. Don’t skip it! If you’re short on time, you can chill the dough for 30 minutes in the freezer.
Step 7: Roll Out the Dough
On a lightly floured surface, roll out each color of dough into a rectangle about ¼ inch thick.
- Dynamic Tip: Use a rolling pin with guides to ensure an even thickness. This will help your cookies bake evenly.
Step 8: Layer and Roll Up
Carefully place one rectangle of dough on top of the other. Trim the edges to create a clean rectangle. Starting from one long edge, tightly roll up the dough like a jelly roll.
- Personalized Tip: For a tighter swirl, brush a thin layer of water or egg wash between the layers of dough before rolling.
Step 9: Chill Again
Wrap the roll of dough in plastic wrap and chill in the refrigerator for another 30 minutes.
- Actionable Tip: This second chill helps the roll maintain its shape while you slice and bake.
Step 10: Slice and Bake
Preheat oven to 375°F (190°C). Slice the log of dough into ¼-inch thick slices. Place the slices on a baking sheet lined with parchment paper.
- Value-Added Tip: Use a sharp knife or dental floss to slice the dough cleanly.
Step 11: Bake
Bake for 10-12 minutes, or until the edges are lightly golden brown.
- Engaging Tip: Keep a close eye on the cookies, as baking times can vary depending on your oven.
Step 12: Cool and Decorate
Let the cookies cool on the baking sheet for a few minutes before transferring them to a wire rack to cool completely. Decorate with sprinkles or sanding sugar (optional).
Nutritional Information
(Approximate values per cookie, based on the recipe):
- Calories: 80-90
- Fat: 4-5g
- Saturated Fat: 2.5-3g
- Cholesterol: 15-20mg
- Sodium: 40-50mg
- Carbohydrates: 10-12g
- Fiber: 0g
- Sugar: 5-6g
- Protein: 1g
Data Insights: These cookies are relatively high in sugar and fat. Portion control is key!
Healthier Alternatives for the Recipe
Want a healthier take on these classic cookies? Here are some ideas:
- Reduce sugar: Cut the sugar down by ¼ cup without significantly impacting the texture.
- Use whole wheat pastry flour: Substitute up to half of the all-purpose flour with whole wheat pastry flour for added fiber.
- Natural food coloring: Opt for natural food coloring derived from fruits and vegetables.
- Less butter: Use applesauce to replace half the butter to lower the fat content
- **Vegan Option: ** Substitute the butter with vegan butter and eggs with applesauce.
Serving Suggestions
These Christmas Pinwheel Cookies are perfect for:
- Holiday parties: They’re visually stunning and always a crowd-pleaser.
- Gift-giving: Package them in a festive tin or box for a thoughtful homemade gift.
- Cookie exchanges: Their unique swirl design will make them stand out.
- Family gatherings: Serve them with hot cocoa or coffee for a cozy holiday treat.
- Personalized Tip: Try dipping half of each cookie in melted chocolate and topping with crushed peppermint candies for an extra-festive touch.
Common Mistakes to Avoid
- Not chilling the dough: This is the biggest mistake! Chilling the dough is essential for preventing spreading and maintaining the swirl shape.
- Overmixing the dough: Overmixing leads to tough cookies. Mix until the flour is just incorporated.
- Using melted butter: Softened butter, not melted, is crucial for creating a light and airy dough.
- Rolling the dough too thin: Rolling the dough too thin can make the cookies brittle.
- Baking unevenly: Use a quality baking sheet and bake in the center of the oven for even browning.
Data Insights: Studies show that chilling dough for more than 2 hours reduces spreading by up to 30%!
Storing Tips for the Recipe
- Store: Store cooled cookies in an airtight container at room temperature for up to 5 days.
- Freeze: For longer storage, freeze the cookies in an airtight container for up to 3 months.
- Dough Preparation: You can prepare the dough ahead of time and store it in the refrigerator for up to 2 days before baking.
Conclusion
These Christmas Pinwheel Cookies are more than just a treat; they're a tradition you can create in your own kitchen. Remember to chill that dough, don’t overmix, and let your creativity shine with decorations! Now it’s your turn to get baking! Share your creations with us on social media using #ChristmasPinwheelPerfection. Want more holiday baking inspiration? Check out our recipes for Gingerbread Men or Sugar Cookies!
FAQs
- Can I use different food coloring? Absolutely! Experiment with different colors and combinations.
- Can I make these ahead of time? Yes, you can make the dough ahead of time and store it in the refrigerator for up to 2 days before baking. The baked cookies can also be stored for several days.
- What if my dough is too sticky? Add a little more flour, one tablespoon at a time, until the dough is easier to handle.
- Can I use a stand mixer? Yes, you can use a stand mixer for this recipe. Just be careful not to overmix the dough.
- Can I add nuts or dried Fruits in this recipe? Definitely. add chopped walnuts, pecans or pieces of dried cranberries to give your cookie recipe an extra flavor.
Christmas Pinwheel Cookies
Description
A festive and buttery cookie with a beautiful red and white swirl, perfect for holiday cookie trays.
Ingredients
For the Crust:
- 1 cup unsalted butter, softened
- 1 cup granulated sugar
- 1 large egg
- 1 teaspoon vanilla extract
- 2 1/2 cups all-purpose flour
- 1/2 teaspoon baking powder
- 1/4 teaspoon salt
- Red gel food coloring
Instructions
1. Prepare the Crust:
- In a large bowl, cream together the butter and sugar until light and fluffy. Beat in the egg and vanilla extract.
- In a separate bowl, whisk together the flour, baking powder, and salt. Gradually add the dry ingredients to the wet ingredients, mixing until a soft dough forms.
- Divide the dough in half. Mix red food coloring into one half until the color is uniform. Leave the other half plain.
- On separate pieces of parchment paper, roll each dough half into a 9×7-inch rectangle. Place the red dough rectangle on top of the plain one. Using the parchment to help, tightly roll the dough into a log. Wrap and chill for at least 2 hours.
- Preheat oven to 375°F (190°C). Slice the log into 1/4-inch thick rounds and place on ungreased baking sheets. Bake for 8-10 minutes or until set. Let cool on the pan for 5 minutes before transferring to a wire rack.
Notes
You can customize the seasonings to taste.