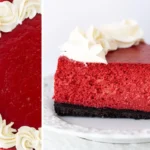
Smooth and Creamy Red Velvet Cheesecake: The Only Recipe You’ll Ever Need
Imagine transforming a classic celebration dessert into an ultra-luxurious treat that wows your guests every time—this smooth and creamy red velvet cheesecake is the answer to your baking dreams. As a home cook, you know how frustrating it can be to deal with cracked cheesecakes that don’t turn out picture-perfect, but this recipe, crafted by Chef Lalybeth, eliminates that worry with its foolproof method for achieving an impeccable, silky finish. Within the first few bites, you’ll experience the magic of layers of moist red velvet cake intertwined with rich, velvety cheesecake, all topped with a luscious cream cheese frosting. This smooth and creamy red velvet cheesecake recipe stands out as the ultimate guide, drawing from time-tested techniques to ensure your dessert is not only stunning but also irresistibly delicious for any occasion.
The allure of this smooth and creamy red velvet cheesecake lies in its sensory symphony that tantalizes the palate and elevates your dessert game. Picture the vibrant red hues of the cake layer contrasting with the pale, creamy cheesecake, creating a visual feast before you even take a bite. The texture is nothing short of divine—each forkful delivers a harmonious blend of tender, moist red velvet that melts into the ultra-smooth, velvety cheesecake base, with just the right amount of tang from the cream cheese and a subtle sweetness that lingers. Aromas of vanilla and a hint of cocoa waft through your kitchen as it bakes, building anticipation for that first decadent taste, where the slight richness from the sour cream enhances the overall creaminess without overwhelming the palate.
What makes this smooth and creamy red velvet cheesecake recipe from cookinwithlalyta.com the single best resource online is its blend of simplicity, reliability, and expert insights straight from Chef Lalybeth’s kitchen. We’ve perfected every detail through rigorous testing to guarantee a flawless result, even for novice bakers. In this comprehensive guide, you’ll discover the Chef’s Secret to achieving that extra creamy texture while preventing common pitfalls like cracks. From ingredient spotlights to step-by-step instructions, we’ll equip you with everything needed to master this dessert and impress at your next gathering, turning you into a confident cheesecake connoisseur.
Why This Smooth and Creamy Red Velvet Cheesecake Recipe is a Game-Changer
The Chef’s Secret to this smooth and creamy red velvet cheesecake lies in the strategic use of sour cream and flour, which not only enhances the extra creamy texture but also acts as a buffer against cracks during baking. By incorporating sour cream into the batter, we create a moisture-rich environment that keeps the cheesecake luxuriously soft and prevents it from drying out, while the flour helps stabilize the structure without altering the flavor. This technique, honed through multiple trials, ensures your dessert emerges from the oven with a flawless, silky finish that sets it apart from ordinary recipes.
Unbeatable Texture: The science behind this extra creamy red velvet cheesecake involves the careful balance of fats and acids in the ingredients. Cream cheese provides the base fat for smoothness, but adding sour cream introduces lactic acid that tenderizes the mixture, resulting in a velvety consistency. When baked at the precise temperature, the proteins in the eggs and cream cheese set gently, avoiding the overcooking that leads to cracks and ensuring a uniform, melt-in-your-mouth texture.
Foolproof for a Reason: This recipe has been tested extensively in our kitchen to guarantee success, with adjustments made for common variables like oven differences. Whether you’re a beginner or a seasoned baker, the straightforward instructions and tips minimize errors, making this smooth and creamy red velvet cheesecake a reliable go-to for holidays, birthdays, or any special event.
Ingredient Spotlight: Quality Makes the Difference
Graham cracker crumbs are the foundation of your smooth and creamy red velvet cheesecake’s crust, providing a sturdy, buttery base that contrasts perfectly with the soft filling. Using high-quality, fresh crumbs ensures a crisp texture that doesn’t turn soggy, as they absorb the melted butter without becoming overly dense. A tested substitution could be crushed digestive biscuits for a slightly sweeter note, but stick to the originals for that authentic American flair.
Unsalted butter, melted, is essential for binding the crust together, adding richness and a subtle flavor that enhances the overall dessert. Opt for high-fat, European-style butter to achieve maximum creaminess, as it has less water content, resulting in a more even melt and better structure. If you’re out of unsalted butter, you can substitute with salted butter but reduce the added sugar to avoid over-salting; however, this might slightly alter the balance in your smooth and creamy red velvet cheesecake.
Granulated sugar sweetens both the crust and the cheesecake filling, helping to create that perfect balance of tart and sweet. Choose pure cane sugar for the best dissolution and flavor profile, as it integrates seamlessly without graininess. For a healthier twist, you could substitute with coconut sugar, which adds a mild caramel undertone, but be mindful that it may affect the color and texture of your smooth and creamy red velvet cheesecake.
Cream cheese is the star of this smooth and creamy red velvet cheesecake, delivering the signature tang and velvety mouthfeel that makes it irresistible. Full-fat, brick-style cream cheese is crucial for richness; lower-fat versions can lead to a watery batter. As per PAA2, a good substitute is mascarpone for a milder flavor, or vegan cream cheese blends for dairy-free options, though these may require slight adjustments to achieve the same creamy consistency.
Vanilla extract adds depth and aroma, elevating the flavors in your smooth and creamy red velvet cheesecake. Always go for pure extract over imitation for authentic taste; it’s the difference between flat and vibrant notes. If you’re avoiding alcohol, vanilla bean paste is a great alternative, offering visible specks and intense flavor without compromise.
Eggs act as a binding agent, contributing to the structure and creaminess of the cheesecake filling. Fresh, large eggs ensure even emulsification; room-temperature eggs blend more smoothly. For an egg-free version, aquafaba can be used as a substitute, but it might require additional stabilizers to maintain the extra creamy texture.
Sour cream boosts the moisture and tang, making this smooth and creamy red velvet cheesecake exceptionally lush. Full-fat sour cream is key for the best results; Greek yogurt can substitute for a tangier twist, but it may make the filling slightly denser, so use it sparingly.
All-purpose flour stabilizes the batter, preventing cracks and ensuring a smooth bake. It’s the unsung hero for texture; gluten-free flour blends work as a substitute for those with sensitivities, though you may need to add a binder like xanthan gum to preserve the integrity.
Red food coloring gives the iconic hue to your smooth and creamy red velvet cheesecake, but opt for gel-based for vibrancy without altering the consistency. Natural alternatives like beet powder can replace it for a healthier option, though they might subtly change the flavor.
For the red velvet layer, a box of red velvet cake mix provides convenience and that classic taste. Preparing it as directed ensures a moist counterpart; from-scratch versions can substitute, but follow the package for consistency in this recipe.
Step-by-Step Instructions
Step 1: Preparing the Pan and Crust
Preheat the oven to 325°F (163°C) and grease a 9-inch springform pan to ensure easy release later. In a bowl, mix graham cracker crumbs, melted butter, and 2 tablespoons granulated sugar until it forms a wet sand-like texture. Press this mixture firmly into the bottom of the pan to create an even crust base for your smooth and creamy red velvet cheesecake.
Pro Tip: Use the bottom of a flat measuring cup to press the crust evenly—this prevents uneven baking and ensures a professional finish.
Step 2: Mixing the Cheesecake Batter
In a large bowl, beat softened cream cheese and 1 cup granulated sugar until completely smooth and free of lumps, which typically takes about 2-3 minutes with an electric mixer. Add vanilla extract and eggs one at a time, beating well after each addition to incorporate air for that extra creamy texture.
Common Mistake to Avoid: Overbeating the batter after adding eggs can introduce too much air, leading to cracks; mix just until combined to maintain smoothness.
Step 3: Incorporating Additional Ingredients
Stir in sour cream, all-purpose flour, and red food coloring until the mixture is uniformly blended, creating a vibrant red hue for your smooth and creamy red velvet cheesecake. Pour this batter over the prepared crust in the pan.
Pro Tip: Add the food coloring gradually to achieve the desired shade without overpowering the flavor—less is often more for a natural look.
Step 4: Adding the Red Velvet Layer
Prepare the red velvet cake batter according to the package instructions, then carefully pour a layer over the cheesecake mixture in the pan, ensuring it doesn’t disturb the base.
Common Mistake to Avoid: Pouring the cake batter too quickly can mix the layers; gently spread it to keep distinct separation for the best layered effect.
Step 5: Baking the Cheesecake
Bake for 50-60 minutes or until the center is set but still slightly jiggly, as this allows for that perfect extra creamy texture upon cooling. Allow the cheesecake to cool completely in the oven with the door slightly ajar to prevent sudden temperature changes.
Pro Tip: Place a water bath in the oven to maintain humidity, which helps achieve a crack-free surface on your smooth and creamy red velvet cheesecake.
Step 6: Chilling and Topping
Once cooled, refrigerate the cheesecake for at least 4 hours or overnight to set fully. Top with cream cheese frosting before serving for the ultimate indulgence.
Common Mistake to Avoid: Rushing the chilling process can result in a runny texture; patience is key for the best results.
Serving & Presentation
Elevate your smooth and creamy red velvet cheesecake with creative plating: slice it cleanly using a warm knife for neat portions, and garnish with fresh berries or chocolate shavings for a pop of color and contrast. For an impressive presentation, dust the top with cocoa powder or add edible flowers to mimic a festive vibe. This dessert pairs wonderfully with a light coffee or a scoop of vanilla ice cream to balance its richness, making it ideal as a standalone treat or alongside a holiday meal like Thanksgiving dinner.
Make-Ahead & Storage Solutions
For make-ahead strategy, prepare the crust and cheesecake batter up to 3 days in advance; store the unbaked assembled pan in the refrigerator, covered, and bake when ready for fresh results in your smooth and creamy red velvet cheesecake.
Storing leftovers: Keep slices in an airtight container in the refrigerator for up to 5 days to maintain freshness; for longer storage, freeze individual portions wrapped in plastic and foil for up to 2 months.
The best way to reheat: Thaw frozen slices overnight in the fridge, then bring to room temperature for 30 minutes before serving to restore the original extra creamy texture without melting the frosting.

Frequently Asked Questions (FAQ)
How do you make red velvet cheesecake smooth and creamy without cracks?
To achieve a smooth and creamy red velvet cheesecake without cracks, focus on gentle mixing to avoid incorporating excess air, use a water bath during baking for even heat distribution, and allow the cheesecake to cool slowly in the oven. Ingredients like sour cream and flour in this recipe help stabilize the batter, ensuring that extra creamy texture while preventing surface cracks—our tested method guarantees success every time.
What can I substitute for cream cheese in red velvet cheesecake?
For substitutions in red velvet cheesecake, mascarpone offers a similar creamy texture with a milder taste, or you can use a vegan cream cheese alternative made from cashews or soy for dairy-free options. Keep in mind that these swaps might slightly alter the tanginess, so adjust the sugar levels accordingly to maintain the smooth and creamy profile of your red velvet cheesecake.
How long does it take to bake and chill red velvet cheesecake?
Baking a red velvet cheesecake typically takes 50-60 minutes at 325°F, followed by a full cooling period and at least 4 hours of chilling in the refrigerator for the best set. In total, including prep, this smooth and creamy red velvet cheesecake requires about 80 minutes of active time plus chilling, ensuring it’s ready for serving with optimal texture.
What are some good serving suggestions for red velvet cheesecake?
Great serving suggestions for red velvet cheesecake include pairing it with fresh whipped cream or fruit compote to cut through the richness, or serving it as a centerpiece for holidays with a drizzle of chocolate sauce. For casual gatherings, add a scoop of ice cream or a side of berries to enhance the flavors, making your smooth and creamy red velvet cheesecake even more irresistible.
Can this recipe be adapted for different dietary needs?
Yes, this smooth and creamy red velvet cheesecake can be adapted; for gluten-free, swap the flour and graham crackers with gluten-free alternatives, and for vegan, use plant-based cream cheese, eggs substitutes like flax eggs, and a vegan cake mix to maintain that extra creamy texture.
What tools do I need to make red velvet cheesecake at home?
Essential tools include a springform pan for easy removal, an electric mixer for smooth batter, and a baking sheet for the water bath, all of which help ensure your red velvet cheesecake turns out perfectly without any fuss.
Tried This Recipe? Leave a Comment!
Did you make this recipe? I’d love to hear how it turned out! Please leave a comment and a rating below. Your feedback helps other home cooks and supports cookinwithlalyta!
For more delicious inspiration, follow me on Pinterest!
Smooth and Creamy Red Velvet Cheesecake
- Total Time: 80 minutes
- Yield: 12 1x
Description
This smooth and creamy red velvet cheesecake features layers of moist red velvet cake and rich cheesecake, topped with cream cheese frosting for a decadent dessert perfect for celebrations.
Ingredients
- 2 cups graham cracker crumbs
- 1/2 cup unsalted butter, melted
- 2 tablespoons granulated sugar
- 16 ounces cream cheese, softened
- 1 cup granulated sugar
- 1 teaspoon vanilla extract
- 2 large eggs
- 1 cup sour cream
- 2 tablespoons all-purpose flour
- 1 tablespoon red food coloring
- For the red velvet layer: 1 box red velvet cake mix, prepared according to package instructions
Instructions
- Preheat the oven to 325°F (163°C) and grease a 9-inch springform pan.
- In a bowl, mix graham cracker crumbs, melted butter, and 2 tablespoons sugar. Press into the bottom of the pan to form the crust.
- In a large bowl, beat cream cheese and 1 cup sugar until smooth. Add vanilla extract and eggs one at a time, mixing well.
- Stir in sour cream, flour, and red food coloring until combined. Pour over the crust.
- Prepare the red velvet cake batter as per package instructions and pour a layer over the cheesecake mixture.
- Bake for 50-60 minutes or until the center is set. Allow to cool completely, then refrigerate for at least 4 hours.
- Top with cream cheese frosting before serving.
Notes
Ensure the cheesecake is fully chilled for the best texture. Store leftovers in the refrigerator for up to 5 days.
- Prep Time: 20 minutes
- Cook Time: 60 minutes
- Method: Dessert
- Cuisine: American
Nutrition
- Calories: 450
- Sugar: 30g
- Fat: 28g
- Carbohydrates: 45g
- Protein: 7g
Conclusion
This Smooth and Creamy Red Velvet Cheesecake offers a decadent blend of rich chocolate notes and velvety cream cheese, making it an irresistible treat for special occasions or indulgent desserts. Its smooth texture and vibrant red hue capture the classic essence of red velvet while delivering a satisfyingly creamy bite that’s sure to impress your guests. For the best experience, serve it chilled with a dollop of whipped cream, or try a variation by adding crushed nuts to the crust for an extra crunch.