Table of Contents
No Bake Red Velvet Cake Balls: The Only Recipe You’ll Ever Need
Imagine whipping up a batch of irresistible No Bake Red Velvet Cake Balls in just minutes, perfect for those hectic days when you crave a decadent dessert without turning on the oven. These extra creamy No Bake Red Velvet Cake Balls are a game-changer for home bakers, offering a simple yet luxurious treat that’s ready in under an hour. Drawing from Chef Lalybeth’s expertise, this recipe transforms everyday ingredients into bite-sized wonders that boast a velvety texture and vibrant red hue, making it the ultimate no-fuss dessert for parties or midnight snacks. With its focus on ease and flavor, this is the single best resource you’ll find for mastering No Bake Red Velvet Cake Balls effortlessly.
The allure of these No Bake Red Velvet Cake Balls lies in their sensory symphony—picture the rich, moist crumbs of red velvet cake mingling with the tangy, extra creamy cream cheese to create a smooth, dough-like base that’s impossible to resist. Each ball delivers a satisfying crunch from the white chocolate coating that gives way to a soft, velvety interior, bursting with the classic red velvet tang balanced by subtle sweetness. The aroma of melted white chocolate fills the air, evoking holiday cheer or a cozy evening in, while the optional red food coloring enhances the visual appeal, making these treats as photogenic as they are delicious. Every bite promises a harmonious blend of textures and flavors that will have you coming back for more.
As the creator behind cookinwithlalyta.com, Chef Lalybeth has perfected this No Bake Red Velvet Cake Balls recipe through rigorous testing, ensuring it’s not just another dessert—it’s an extra creamy masterpiece that’s foolproof for beginners and pros alike. What sets this version apart is the Chef’s Secret: a precise balance of cream cheese that guarantees a creamy binding without overpowering the red velvet essence, elevating it above generic recipes. In this comprehensive guide, you’ll learn insider tips, substitutions, and serving ideas that build your confidence in the kitchen, making you the hero of your next gathering. Dive in to discover why this is the go-to resource for no bake desserts that impress every time.
Why This No Bake Red Velvet Cake Balls Recipe is a Game-Changer
The Chef’s Secret to these No Bake Red Velvet Cake Balls lies in the extra creamy texture achieved by using high-quality cream cheese as the binding agent, which locks in moisture and creates a dough that’s easy to shape without crumbling. This technique ensures each ball has a velvety smooth interior that sets it apart from drier versions, making your treats irresistibly indulgent and professional-grade. By focusing on this key element, Chef Lalybeth has crafted a recipe that’s not only simple but also elevates the classic red velvet flavor with a subtle tang that enhances the chocolate coating.
Unbeatable Texture: The science behind the extra creamy consistency comes from the fat content in the cream cheese, which emulsifies with the cake crumbs to form a stable, cohesive mixture. This prevents the balls from becoming too dense or falling apart, as the cream cheese’s proteins help bind everything together while adding a luxurious mouthfeel that mimics baked goods. Unlike traditional recipes that might rely on binders like butter, this method keeps things light and airy, resulting in a texture that’s perfectly soft yet firm enough to hold its shape.
Foolproof for a Reason: This No Bake Red Velvet Cake Balls recipe has been tested multiple times in real kitchens to guarantee success, with adjustments made for common pitfalls like over-mixing or incorrect chilling times. Its reliability stems from straightforward instructions and the extra creamy angle, ensuring even novice bakers can achieve perfect results every time, making it a trustworthy staple for quick desserts.
Ingredient Spotlight: Quality Makes the Difference
For the 1 box red velvet cake mix (prepared and crumbled), this forms the flavorful base of your No Bake Red Velvet Cake Balls, providing the signature red hue and subtle cocoa notes that define the dessert. Quality matters here—opt for a reputable brand to ensure the mix is fresh and free of artificial aftertastes, as stale mixes can make the balls taste off. If you’re short on time, a homemade red velvet cake can substitute, but stick to the prepared and crumbled form to maintain the right texture; avoid using a different flavor like chocolate, as it would alter the iconic red velvet essence.
Next, 8 ounces of softened cream cheese is the star that delivers the extra creamy texture in these No Bake Red Velvet Cake Balls, acting as a binder that blends seamlessly with the crumbs for a dough-like consistency. Choose full-fat, block-style cream cheese for the best results, as it offers superior creaminess and flavor compared to low-fat versions, which can lead to a watery mixture. A tested substitution is Greek yogurt for a lighter option, but use it in the same amount and ensure it’s well-drained to prevent the balls from becoming too soft and falling apart.
The 1 cup of melted white chocolate chips provides a glossy, sweet coating that seals in the extra creamy goodness of your No Bake Red Velvet Cake Balls, adding a contrasting crunch and sweetness. High-quality chips with real cocoa butter melt smoothly and set firmly, enhancing the overall appeal—avoid baking chips, as they contain stabilizers that might make the coating grainy. For a dairy-free alternative, coconut oil-based white chocolate works well, melted gently to achieve the same coverage without compromising the recipe’s integrity.
Red food coloring (as needed for color) enhances the visual vibrancy of these No Bake Red Velvet Cake Balls, intensifying the red velvet theme without altering the taste. Opt for gel-based coloring for more potent hues with less liquid, which helps maintain the mixture’s consistency and prevents sogginess. If avoiding artificial dyes, natural alternatives like beet powder can substitute, but start with a small amount and adjust to achieve the desired shade without overpowering the extra creamy flavor profile.
Finally, sprinkles for decoration add a fun, festive touch to your No Bake Red Velvet Cake Balls, providing crunch and visual interest that makes them party-ready. Choose high-quality, colorful sprinkles without excess oils to ensure they adhere well and don’t melt into the chocolate. For personalization, edible glitter or crushed nuts can replace them, offering a similar decorative effect while adding texture—test a small batch to ensure compatibility with the extra creamy base.
Step-by-Step Instructions
Step 1: Crumbling the Prepared Red Velvet Cake
Start by taking your prepared and cooled red velvet cake from the box mix, and crumble it into fine crumbs in a large mixing bowl using your hands or a fork for even texture. Ensure there are no large chunks left, as they can make the mixture uneven and harder to roll. Mix thoroughly to create a uniform base for your No Bake Red Velvet Cake Balls.
Pro Tip: Use a food processor for quicker, finer crumbs if available, but pulse gently to avoid over-processing into a paste, which could make the balls too dense.
Step 2: Mixing in the Cream Cheese
Once your crumbs are ready, add the 8 ounces of softened cream cheese to the bowl and mix until a smooth, dough-like consistency forms. Use a sturdy spoon or your hands to knead everything together, ensuring the cream cheese is fully incorporated for that extra creamy texture in your No Bake Red Velvet Cake Balls.
Common Mistake to Avoid: Don’t add the cream cheese straight from the fridge; if it’s not softened, it won’t blend properly and could leave lumps, resulting in balls that fall apart easily.
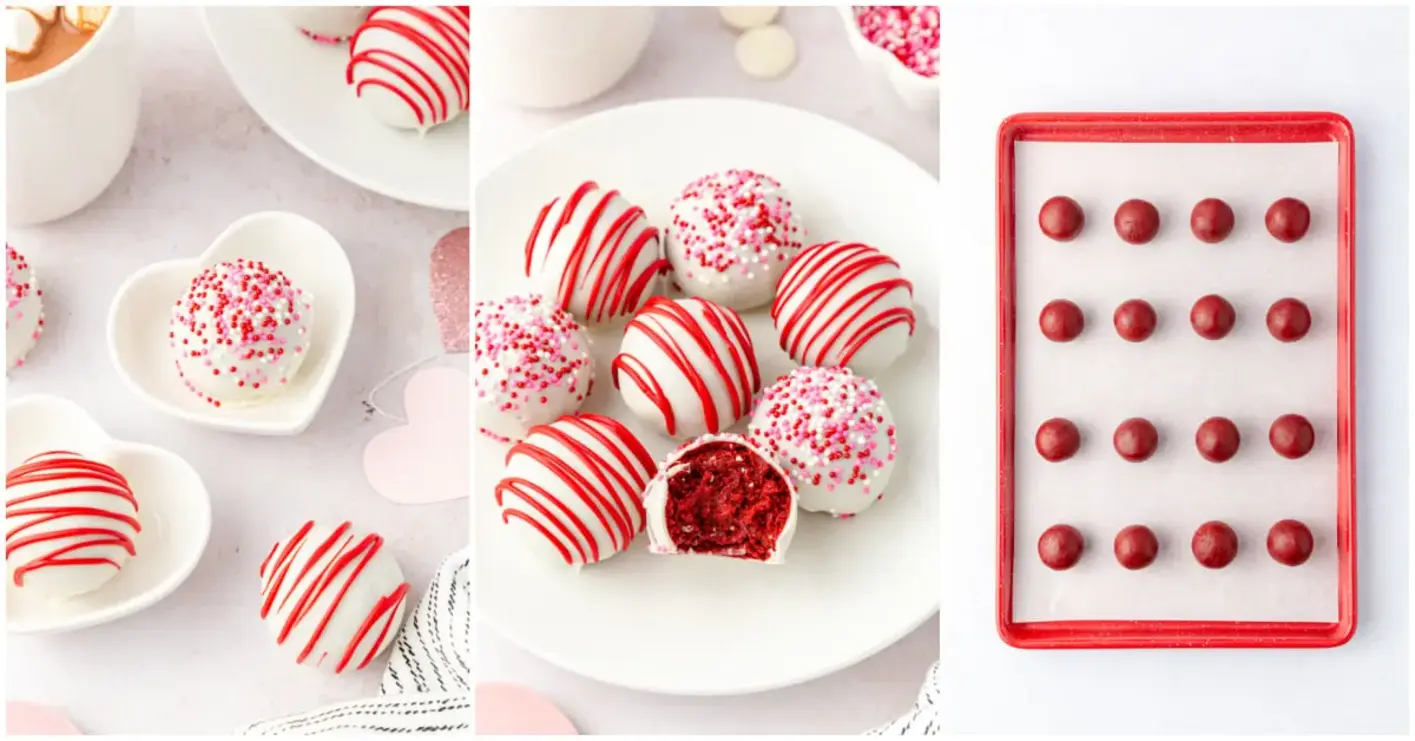
Step 3: Rolling the Mixture into Balls
After forming the dough, scoop out portions and roll them into 1-inch balls using your palms, placing each one on a baking sheet lined with parchment paper. Aim for uniform size to ensure even chilling and coating—about 24 balls from the mixture.
Pro Tip: Lightly moisten your hands with water before rolling to prevent sticking and achieve perfectly smooth surfaces on your No Bake Red Velvet Cake Balls.
Step 4: Dipping in Melted White Chocolate
Melt the 1 cup of white chocolate chips using a double boiler or microwave in short bursts, stirring until smooth, then dip each ball into the chocolate, ensuring full coverage by rolling it gently with a fork. Let any excess chocolate drip off before returning the ball to the parchment paper.
Common Mistake to Avoid: Overheating the chocolate can cause it to seize and become lumpy; always melt on low heat and stir frequently to maintain a silky coating for your extra creamy treats.
Step 5: Adding Sprinkles and Chilling
Immediately after dipping, sprinkle the decorations over the chocolate-coated balls while the chocolate is still wet, then place the baking sheet in the refrigerator to set for at least 30 minutes, allowing the flavors to meld and the structure to firm up.
Pro Tip: Work quickly when adding sprinkles to ensure they stick well, and refrigerate on a flat surface to prevent the balls from rolling and losing their shape.
Serving & Presentation
For serving these No Bake Red Velvet Cake Balls, arrange them on a decorative platter with a base of crushed nuts or edible glitter for an eye-catching display that highlights their extra creamy interior. Garnish with a dusting of cocoa powder or fresh mint leaves to add a pop of color and contrast, making them the centerpiece of any dessert table. These treats pair beautifully with a scoop of vanilla ice cream or a cup of coffee, enhancing their rich flavors and providing a balanced end to a meal.
Make-Ahead & Storage Solutions
For make-ahead strategies, prepare the dough up to 3 days in advance by crumbling the cake and mixing in the cream cheese, then store it tightly wrapped in the fridge; roll and coat the balls just before serving to maintain that extra creamy texture. When storing leftovers, place the cooled No Bake Red Velvet Cake Balls in an airtight container in the refrigerator for up to a week, or freeze them for up to 3 months by layering with parchment paper to prevent sticking. To reheat, let them thaw in the fridge overnight and bring to room temperature for 10-15 minutes, restoring their original soft texture and flavor without any microwave mishaps.
Frequently Asked Questions (FAQ)
How do you make no bake red velvet cake balls without them falling apart?
To prevent your No Bake Red Velvet Cake Balls from falling apart, ensure the cream cheese is fully softened and mixed thoroughly with the cake crumbs to create a cohesive dough. Over-mixing can make it too sticky, so aim for just enough blending—about 2-3 minutes by hand. Chilling the formed balls for a few minutes before dipping also helps solidify them, guaranteeing extra creamy results every time.
What can I substitute for cream cheese in no bake red velvet cake balls?
A great substitute for cream cheese in No Bake Red Velvet Cake Balls is Greek yogurt or mascarpone cheese, using the same 8-ounce amount for that extra creamy texture. Greek yogurt adds a tangy note but might make the mixture slightly softer, so drain it first; mascarpone offers a richer alternative. Always test a small batch with substitutions to ensure the balls hold their shape without altering the flavor profile.
How long do no bake red velvet cake balls need to chill in the fridge?
Your No Bake Red Velvet Cake Balls should chill in the fridge for at least 30 minutes after dipping to allow the chocolate to set and the flavors to firm up, but for optimal texture, leave them for 45-60 minutes. This chilling time enhances the extra creamy center and prevents them from becoming messy when served, though you can extend it up to 2 hours for even better results.
What are some serving ideas for no bake red velvet cake balls at a party?
For serving No Bake Red Velvet Cake Balls at a party, display them in mini cupcake liners on a tiered stand for a visually appealing spread, or skewer them on toothpicks for easy grabbing. Pair with complementary items like fresh fruit platters or a cheese board to balance the sweetness, and for a thematic touch, arrange them with red and white decorations to match their vibrant color, making them a hit at holidays or celebrations.
Can these no bake red velvet cake balls be made ahead for events?
Yes, you can make No Bake Red Velvet Cake Balls ahead for events—prepare the dough up to 3 days in advance and store it in the fridge, then roll and coat them the day before. This keeps the extra creamy texture intact, and once assembled, they can be refrigerated for up to 24 hours; just let them sit at room temperature for 10 minutes before serving to restore their softness.
Are no bake red velvet cake balls suitable for kids?
Absolutely, No Bake Red Velvet Cake Balls are kid-friendly due to their fun colors and flavors, but monitor portions as they’re rich in sugar. Use natural food coloring to make them healthier, and involve kids in the rolling and sprinkling steps for a hands-on activity, ensuring a safe and enjoyable treat for the whole family.
Can I use a different coating instead of white chocolate?
Yes, you can swap white chocolate for dark or milk chocolate in No Bake Red Velvet Cake Balls for a different flavor profile, melting it the same way for full coverage. This adds variety while maintaining the extra creamy core, but note that darker chocolates might intensify the taste, so adjust based on your preference for a balanced dessert.
Tried This Recipe? Leave a Comment!
Did you make this recipe? I’d love to hear how it turned out! Please leave a comment and a rating below. Your feedback helps other home cooks and supports cookinwithlalyta!
For more delicious inspiration, follow me on Pinterest!
No Bake Red Velvet Cake Balls
- Total Time: 45 minutes
- Yield: 24 balls 1x
Description
Easy no-bake treats made from red velvet cake crumbs mixed with cream cheese, rolled into balls, and coated in chocolate.
Ingredients
- 1 box red velvet cake mix (prepared and crumbled)
- 8 ounces cream cheese, softened
- 1 cup white chocolate chips, melted
- Red food coloring (as needed for color)
- Sprinkles for decoration
Instructions
- Crumble the prepared red velvet cake into fine crumbs in a large bowl.
- Add the softened cream cheese to the crumbs and mix until a dough forms.
- Roll the mixture into 1-inch balls and place them on a baking sheet lined with parchment paper.
- Dip each ball into the melted white chocolate, ensuring full coverage.
- Add sprinkles immediately after dipping and let them set in the refrigerator for 30 minutes.
Notes
These can be stored in an airtight container in the fridge for up to a week. For a festive touch, use holiday-themed sprinkles.
- Prep Time: 15 minutes
- Cook Time: 0 minutes
- Method: Dessert
- Cuisine: American
Nutrition
- Calories: 150
- Sugar: 12g
- Fat: 8g
- Carbohydrates: 18g
- Protein: 2g
Conclusion
These No Bake Red Velvet Cake Balls offer a perfect blend of rich chocolatey flavor and creamy texture, making them an ideal treat for holidays, parties, or any sweet craving without the hassle of baking. They’re quick to prepare and can be customized with different coatings like crushed nuts or festive sprinkles for added variety and fun. If you’re in the mood for more irresistible red velvet desserts, be sure to try the Flawless Red Velvet Macarons Recipe or the Irresistible Red Velvet Cream Cheese Thumbprints for even more delightful options.