Table of Contents
- How to Make the Perfect Fried Chicken Without the Buttermilk: The Only Recipe You’ll Ever Need
- Why This How to Make the Perfect Fried Chicken Without the Buttermilk Recipe is a Game-Changer
- Ingredient Spotlight: Quality Makes the Difference
- Step-by-Step Instructions for How to Make the Perfect Fried Chicken Without the Buttermilk
- Serving & Presentation
- Make-Ahead & Storage Solutions
- Frequently Asked Questions (FAQ)
- Tried This Recipe? Leave a Comment!
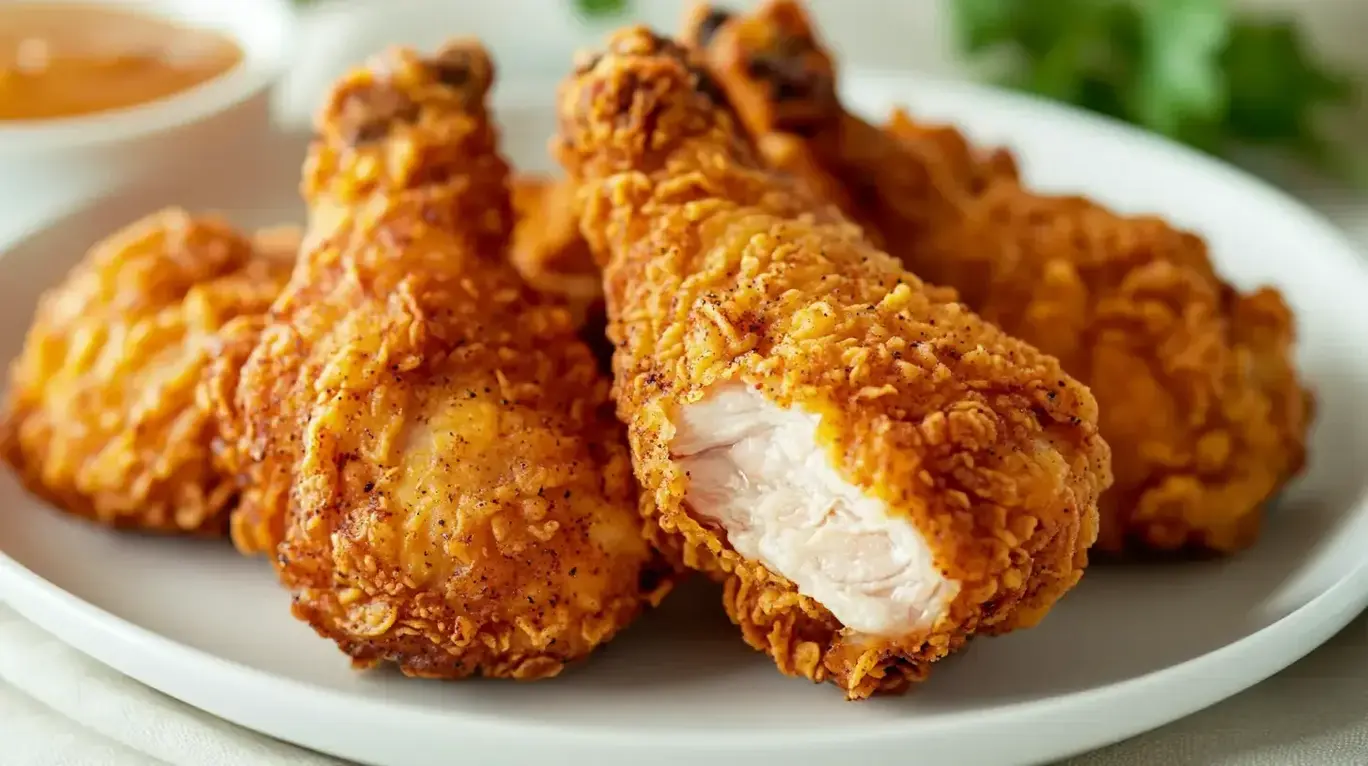
How to Make the Perfect Fried Chicken Without the Buttermilk: The Only Recipe You’ll Ever Need
Are you tired of searching for a reliable fried chicken recipe that skips the buttermilk but still delivers that irresistible crunch and flavor? Look no further—How to Make the Perfect Fried Chicken Without the Buttermilk is your ultimate solution, crafted by Chef Lalybeth on cookinwithlalyta.com. This straightforward method focuses on a masterful blend of seasonings that create an unbeatable, flavor-forward crust, making it easier than ever for home cooks to achieve restaurant-quality results without the fuss. Say goodbye to store-bought options and hello to juicy, golden-brown perfection right in your kitchen. Whether you’re a beginner or a seasoned chef, this How to Make the Perfect Fried Chicken Without the Buttermilk recipe ensures every bite is packed with savory goodness, proving that you don’t need buttermilk to wow your family and friends.
Imagine sinking your teeth into fried chicken that boasts a shatteringly crispy exterior, contrasted by tender, juicy meat that’s bursting with aromatic spices like paprika and garlic powder. The flavors dance on your palate—earthy undertones from the onion powder, a subtle kick from cayenne, and a harmonious balance of salt and pepper that elevates the natural taste of the chicken. As it fries, the air fills with an enticing aroma that promises a satisfying meal, drawing everyone to the table with anticipation. This How to Make the Perfect Fried Chicken Without the Buttermilk recipe transforms simple ingredients into a textural masterpiece, where each piece emerges with that golden-brown allure, making it a go-to for any occasion.
What’s truly special about this How to Make the Perfect Fried Chicken Without the Buttermilk recipe from cookinwithlalyta.com is the expertise of Chef Lalybeth, who has perfected the art of seasoning to deliver consistent, mouthwatering results. Drawing from years of testing and refining, this version stands out by emphasizing a foolproof technique that anyone can master, including a chef’s secret for an extra-crispy finish. You’ll learn how to achieve that ideal balance of flavors and textures, avoiding common pitfalls while building your confidence in the kitchen. Stick around to uncover these insider tips that make this the single best resource for fried chicken mastery.
Why This How to Make the Perfect Fried Chicken Without the Buttermilk Recipe is a Game-Changer
The Chef’s Secret: The unique angle of this recipe lies in its “Seasoning Mastery” technique, where a precise blend of spices like paprika, garlic powder, and onion powder creates a robust, flavor-forward crust that rivals traditional buttermilk methods. This isn’t just about skipping an ingredient; it’s about elevating the chicken’s natural flavors through a well-balanced seasoning mix that adheres perfectly during frying, ensuring every bite is infused with depth and zest. By focusing on this, Chef Lalybeth has transformed a simple dredge into a game-changer for home cooks seeking bold taste without the hassle.
Unbeatable Texture: The science behind the texture here is all about the flour coating and oil temperature—frying at 350°F allows the flour to form a protective barrier that seals in moisture while crisping up externally. The spices help create micro-cracks in the crust for added crunch, as the proteins in the flour react with the hot oil, producing a golden, airy exterior that’s far superior to standard recipes. This method guarantees a juicy interior and shatteringly crisp outside, making it a textural triumph.
Foolproof for a Reason: This recipe has been tested multiple times in real kitchens to ensure reliability, with adjustments for common variables like oil heat and chicken thickness. It’s designed for success, minimizing errors and maximizing flavor, so even novice cooks can impress with consistent results every time.
Ingredient Spotlight: Quality Makes the Difference
For the 2 pounds of chicken pieces (wings, drumsticks, or thighs), fresh, high-quality cuts are essential as they provide the base for juicy, flavorful meat. Opt for free-range or organic chicken if possible, as it absorbs seasonings better and offers a cleaner taste. This ingredient’s role is to deliver tender protein that holds up during frying without drying out. A tested substitution: Use turkey pieces for a leaner option, but adjust frying time to avoid overcooking.
All-purpose flour at 1 cup serves as the primary coating agent, creating that iconic crispy layer. Choose unbleached flour for better texture, as it has more protein to help form a sturdy crust. Its role is to bind the seasonings and protect the chicken from the oil. Quality matters because finer flours lead to even coating. Substitution: Gluten-free flour blends work well for those with sensitivities, but add a bit of xanthan gum to maintain crispiness.
Paprika (2 teaspoons) adds a smoky, vibrant color and mild heat, enhancing the overall flavor profile without overpowering. Use smoked paprika for an extra layer of depth—it elevates the chicken’s taste by complementing the garlic and onion powders. This spice is key for that appealing golden hue. Substitution: Sweet paprika if you prefer less heat, or chipotle powder for a smokier twist.
Garlic powder (1 teaspoon) infuses a pungent, aromatic essence that penetrates the chicken during frying. Freshly ground garlic powder ensures potency, making the dish more flavorful. It pairs with other spices to create a balanced seasoning. Substitution: Fresh minced garlic mixed into the flour, but use sparingly to avoid burning in the oil.
Onion powder (1 teaspoon) provides a subtle sweetness and depth, rounding out the savory notes. Opt for pure onion powder without additives for authentic flavor. It helps in building a complex taste without the need for actual onions. Substitution: Finely grated onion for a fresher bite, though it may alter the texture slightly.
Salt (1 teaspoon) is crucial for enhancing all flavors and drawing out the chicken’s natural juices. Use sea salt for better mineral content and controlled seasoning. It’s the backbone of the mix, ensuring nothing tastes flat. Substitution: Kosher salt for a coarser grain that distributes evenly.
Black pepper (1/2 teaspoon) adds a sharp, warming note that balances the spices. Freshly ground pepper retains more oils for intensified flavor. It prevents the dish from being one-dimensional. Substitution: White pepper for a milder, earthier alternative if you want to keep the color uniform.
Cayenne pepper (1/2 teaspoon, optional) brings optional heat, making the fried chicken exciting for spice lovers. Choose organic for purity, as it amplifies the recipe’s kick without overwhelming. Its role is to add complexity. Substitution: Red pepper flakes for a chunkier heat, or omit for a milder version.
Vegetable oil for frying acts as the medium that achieves the perfect crisp. Use neutral oils with high smoke points, like canola or peanut oil, to maintain stability at 350°F. Quality oil ensures even cooking and prevents a greasy finish. Substitution: Lard for a richer flavor, but monitor temperature closely.
Step-by-Step Instructions for How to Make the Perfect Fried Chicken Without the Buttermilk
Step 1: Preparing the Seasoning Mix
In a bowl, mix together the flour, paprika, garlic powder, onion powder, salt, black pepper, and cayenne pepper if you’re adding heat. Stir until the ingredients are evenly distributed for a uniform coating. This step is crucial for building that flavor-forward crust.
Pro Tip: Always measure your spices accurately using a digital scale to ensure the perfect balance, as too much salt can overpower the chicken while too little might make it bland.
Step 2: Drying the Chicken Pieces
Pat the chicken pieces dry with paper towels to remove any excess moisture. This helps the flour mixture adhere better and promotes a crispier result during frying.
Common Mistake to Avoid: Skipping this step can lead to a soggy coating, so take your time to dry thoroughly to prevent the oil from splattering excessively.
Step 3: Dredging the Chicken
Dredge each chicken piece in the flour mixture, making sure it’s fully coated on all sides, then shake off any excess. This creates the base for that iconic crispy exterior.
Pro Tip: For an even coating, use one hand for dry ingredients to avoid clumping, and let the chicken rest for a minute after dredging to help the flour set.
Step 4: Heating the Oil
Heat about 1 inch of vegetable oil in a large skillet or deep fryer to exactly 350°F (175°C). Use a thermometer to monitor the temperature for optimal results.
Common Mistake to Avoid: Overheating the oil can burn the exterior before the inside cooks, so keep an eye on it and adjust the heat as needed to maintain consistency.
Step 5: Frying the Chicken
Carefully add the chicken pieces to the hot oil, frying in batches if necessary to avoid overcrowding the pan. This ensures even cooking and prevents steaming.
Pro Tip: Flip the chicken every few minutes for uniform browning, and don’t rush the process—patience leads to perfectly cooked results.
Step 6: Monitoring Cooking Time
Fry for 12-15 minutes, turning occasionally, until the chicken is golden brown and reaches an internal temperature of 165°F (75°C). Check with a meat thermometer for accuracy.
Common Mistake to Avoid: Undercooking can make the chicken unsafe, so always verify the internal temperature rather than relying solely on color.
Step 7: Draining the Chicken
Remove the chicken from the oil and place it on paper towels to drain excess oil. This step helps maintain crispiness by absorbing any leftover grease.
Pro Tip: Let the chicken drain on a wire rack instead of stacked paper towels for better air circulation and crunch retention.
Step 8: Resting Before Serving
Let the fried chicken rest for a few minutes before serving. This allows the juices to redistribute, ensuring each bite is moist and flavorful.
Common Mistake to Avoid: Serving immediately can cause the coating to soften, so a short rest enhances both texture and taste.
Serving & Presentation
To elevate your How to Make the Perfect Fried Chicken Without the Buttermilk, focus on creative plating by arranging the pieces on a rustic wooden board with fresh herbs like parsley for a pop of color. Garnish with a sprinkle of additional paprika or a wedge of lemon to add brightness and cut through the richness. Complement this dish with classic sides like creamy coleslaw, buttery cornbread, or a fresh green salad to balance the flavors and textures. For a full meal, pair it with macaroni and cheese or baked beans, creating a comforting, American-style feast that’s perfect for family dinners or gatherings.
Make-Ahead & Storage Solutions
Make-Ahead Strategy: Prepare the seasoning mix and dredge the chicken up to 3 days in advance. Store the coated chicken in an airtight container in the refrigerator, but hold off on frying until you’re ready to serve for the best texture.
Storing Leftovers: Cool the fried chicken completely, then place it in an airtight container or wrap tightly in foil. Refrigerate for up to 3 days or freeze for up to 2 months to maintain freshness and prevent sogginess.
The Best Way to Reheat: For optimal results, reheat in an oven at 400°F for 10-15 minutes to restore crispiness, or use an air fryer for 5 minutes. Avoid microwaving, as it can make the coating limp; instead, let it come to room temperature first for even heating.
Frequently Asked Questions (FAQ)
What can I use instead of buttermilk to marinate fried chicken?
You don’t need buttermilk at all for this How to Make the Perfect Fried Chicken Without the Buttermilk recipe, as the seasoning mix provides all the flavor and moisture. If you’re looking for a marinade alternative, try a simple brine of salt, water, and herbs, or even yogurt for tanginess. This keeps the chicken juicy without altering the core method.
How do I make fried chicken crispy without using buttermilk?
To achieve crispy fried chicken without buttermilk, focus on the dredging technique and oil temperature as outlined in this recipe. Pat the chicken dry, use a well-seasoned flour mix, and fry at 350°F to create a golden crust. Double-dredging with a light water dip can enhance crispiness further, ensuring a texture that’s superior and reliable.
How long does it take to fry chicken without buttermilk?
In this How to Make the Perfect Fried Chicken Without the Buttermilk recipe, frying takes about 12-15 minutes per batch, depending on the piece size. The total cook time is around 20 minutes, but always check for an internal temperature of 165°F to ensure it’s fully cooked and safe.
What are the best side dishes to serve with fried chicken made without buttermilk?
Great sides for this recipe include classic pairings like coleslaw, cornbread, or potato salad to complement the savory flavors. For a healthier twist, add grilled vegetables or a fresh green salad. These options enhance the meal’s balance, making it versatile for any occasion.
Is this fried chicken recipe suitable for beginners?
Absolutely! This How to Make the Perfect Fried Chicken Without the Buttermilk recipe is designed to be straightforward, with simple steps and pro tips to guide you. As long as you monitor oil temperature and follow instructions closely, even novice cooks can succeed on their first try.
Can I bake this fried chicken instead of frying?
Yes, you can adapt this recipe for baking by placing the dredged chicken on a wired rack in a preheated oven at 425°F for 25-30 minutes, flipping halfway. However, for the crispiest results, frying is recommended, as it achieves the signature texture more effectively.
Can I make this recipe vegan or gluten-free?
To make it vegan, substitute the chicken with firm tofu or seitan and use a plant-based oil; for gluten-free, swap the all-purpose flour with a gluten-free blend and add xanthan gum for better coating. These changes keep the recipe delicious while accommodating dietary needs.
Tried This Recipe? Leave a Comment!
Did you make this How to Make the Perfect Fried Chicken Without the Buttermilk recipe? I’d love to hear how it turned out! Please leave a comment and a rating below. Your feedback helps other home cooks and supports cookinwithlalyta.com!
For more delicious inspiration, follow me on Pinterest!

How to Make the Perfect Fried Chicken Without the Buttermilk
- Total Time: 35 minutes
- Yield: 4 1x
Description
This recipe provides a simple way to achieve crispy fried chicken without using buttermilk, focusing on flavorful seasonings and a straightforward frying method.
Ingredients
- 2 pounds chicken pieces (wings, drumsticks, or thighs)
- 1 cup all-purpose flour
- 2 teaspoons paprika
- 1 teaspoon garlic powder
- 1 teaspoon onion powder
- 1 teaspoon salt
- 1/2 teaspoon black pepper
- 1/2 teaspoon cayenne pepper (optional for heat)
- Vegetable oil, for frying
Instructions
- In a bowl, mix together the flour, paprika, garlic powder, onion powder, salt, black pepper, and cayenne pepper if using.
- Pat the chicken pieces dry with paper towels.
- Dredge each chicken piece in the flour mixture, ensuring it's fully coated, and shake off any excess.
- Heat about 1 inch of vegetable oil in a large skillet or deep fryer to 350°F (175°C).
- Carefully add the chicken pieces to the hot oil, frying in batches if necessary to avoid overcrowding.
- Fry for 12-15 minutes, turning occasionally, until the chicken is golden brown and cooked through (internal temperature of 165°F or 75°C).
- Remove the chicken from the oil and drain on paper towels.
- Let it rest for a few minutes before serving.
Notes
For extra crispiness, you can double-dredge the chicken by dipping it in a bit of water and then back into the flour mixture. Ensure the oil doesn’t get too hot to prevent burning.
- Prep Time: 15 minutes
- Cook Time: 20 minutes
- Method: Main Course
- Cuisine: American
Nutrition
- Calories: 450
- Sugar: 1g
- Fat: 25g
- Carbohydrates: 25g
- Protein: 30g
Conclusion
This fried chicken recipe delivers a crispy, golden exterior and juicy, flavorful meat without relying on buttermilk, making it an accessible option for any home cook. It’s ideal for family dinners or casual gatherings, emphasizing simple ingredients and straightforward techniques for mouthwatering results every time. For a delicious twist, serve it with a side of coleslaw or add some heat with cayenne pepper to customize the flavor.