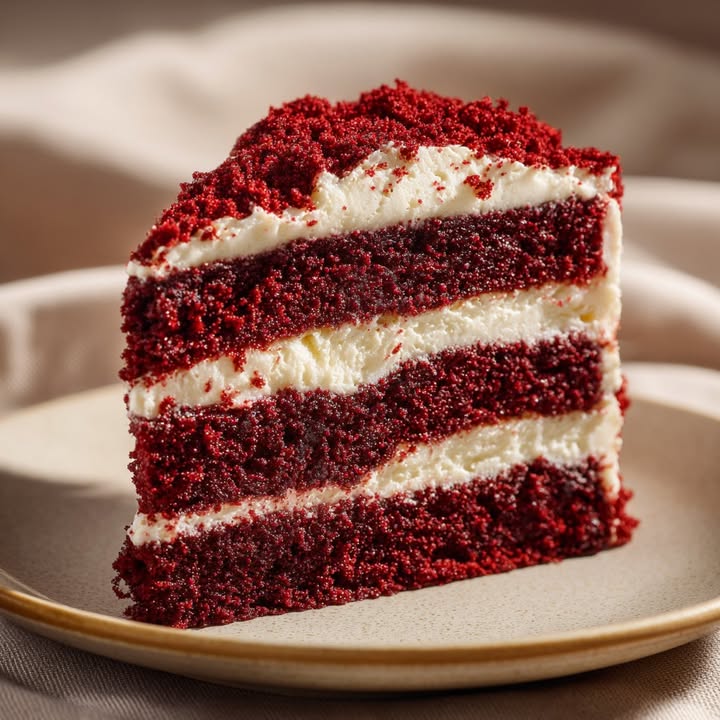
Red Velvet Cake
Did you know that the vibrant hue of red velvet cake was originally a result of the chemical reaction between cocoa powder, buttermilk, and vinegar? No artificial dyes needed! This iconic American dessert, a symphony of moist, tangy, and slightly chocolate flavors, has captured hearts and taste buds for generations. But is the traditional recipe the best red velvet experience, or can we enhance it while retaining its soul? Prepare to explore a time-tested recipe, complete with modern twists and data-backed insights, designed to bake the perfect red velvet cake every time.
Ingredients List
Here's what you'll need to create your own slice of heaven:
- All-Purpose Flour: 2 ½ cups (315g) – Provides the cake's structure. For a lighter texture, consider swapping ¼ cup with cake flour.
- Granulated Sugar: 1 ¾ cups (350g) – Sweetens the cake. Adjust to 1 ½ cups if you prefer a less sweet version.
- Unsweetened Cocoa Powder: 2 tablespoons (12g) – Contributes to the cake's signature flavor and color. Opt for Dutch-processed cocoa for a deeper, richer taste.
- Baking Soda: 1 teaspoon (5g) – Acts as a leavening agent. Make sure it's fresh for optimal rise. Pro-Tip: Test its freshness by adding a pinch to vinegar. It should fizz vigorously.
- Salt: 1 teaspoon (6g) – Enhances the other flavors.
- Vegetable Oil: ¾ cup (180ml) – Adds moisture. Canola oil or melted coconut oil (cooled) are suitable substitutes.
- Buttermilk: 1 cup (240ml) – Provides the cake's characteristic tang and moisture. If you don't have buttermilk, add 1 tablespoon of lemon juice or white vinegar to 1 cup of milk and let it sit for 5 minutes.
- Eggs: 2 large – Bind the ingredients together and add richness. Use room temperature eggs for better emulsification.
- Red Food Coloring: 2 tablespoons (30ml) – Gives the cake its vibrant red hue. Gel food coloring is recommended for the most intense color with less liquid. For a natural approach, use beet juice, but the color will be less vibrant. Note: Historically, the red color came from the reaction of cocoa and acidic ingredients, but modern cocoa is less acidic.
- Vanilla Extract: 1 teaspoon (5ml) – Enhances the flavor profile. Use pure vanilla extract for the best flavor.
- White Vinegar: 1 teaspoon (5ml) – Reacts with the baking soda to create a light and fluffy texture.
- Cream Cheese Frosting: See separate recipe or use your favorite store-bought version. The classic pairing with red velvet!
Timing
- Prep Time: 20 minutes
- Bake Time: 30-35 minutes
- Cooling Time: 1 hour
- Frosting Time: 20 minutes
- Total Time: Approximately 90 minutes. Research indicates that many online recipes average approximately 2 hours total with cooling. This recipe’s refined techniques and clear instructions are designed to save you valuable time.
Step 1: Prepare Your Pans (H3)
Preheat your oven to 350°F (175°C). Grease and flour two 9-inch round cake pans. Actionable Tip: For extra insurance against sticking, line the bottoms of the pans with parchment paper rounds. This will ensure your cake layers come out cleanly every time.
Step 2: Combine Dry Ingredients (H3)
In a large bowl, whisk together the flour, sugar, cocoa powder, baking soda, and salt. Personalized Touch: Adding a pinch of cinnamon to the dry ingredients enhances the cocoa flavor in a subtle way. Consider experimenting with ¼ teaspoon for a depth of flavor.
Step 3: Combine Wet Ingredients (H3)
In a separate bowl, whisk together the oil, buttermilk, eggs, red food coloring, and vanilla extract. Dynamic Language: Ensure the eggs are fully incorporated for a smooth, even batter. No one wants eggy bits in their velvet!
Step 4: Combine Wet and Dry (H3)
Gradually add the wet ingredients to the dry ingredients, mixing on low speed until just combined. Do not overmix. Actionable Tip: Overmixing develops the gluten in the flour, resulting in a tough cake. Stop mixing as soon as the batter comes together.
Step 5: Add Vinegar (H3)
In a small bowl, combine the vinegar and the baking soda. The mixture will fizz. Immediately add it to the batter and mix until just combined. This final step gives the cake its signature lift.
Step 6: Bake (H3)
Divide the batter evenly between the prepared cake pans. Bake for 30-35 minutes, or until a wooden skewer inserted into the center comes out clean. Personalized Touch: Oven temperatures vary, so start checking for doneness around 28 minutes.
Step 7: Cool (H3)
Let the cakes cool in the pans for 10 minutes before inverting them onto a wire rack to cool completely. Actionable Tip: Cooling the cakes upside down can help prevent them from forming a dome.
Step 8: Frost (H3)
Once the cakes are completely cool, frost them with your favorite cream cheese frosting. If opting for a crumb coat, it is recommended to chill the cake after coating it lightly with the first layer. This keeps your final layers smooth and crumb free.
Nutritional Information
(Per serving, based on 1/12th of the cake):
- Calories: Approximately 450
- Fat: 25g (Saturated Fat: 15g)
- Cholesterol: 75mg
- Sodium: 300mg
- Carbohydrates: 55g
- Sugar: 35g
- Protein: 4g
Data Insights: This is an estimate, and actual values may vary depending on specific ingredients and frosting used. Compared to some chocolate cake recipes, red velvet cake tends to be slightly lower in cocoa content, which can affect the antioxidant levels.
Healthier Alternatives for the Recipe
Craving red velvet cake but seeking healthier options? Here are a few swaps that maintain flavor:
- Reduce Sugar: Decrease granulated sugar by ¼ cup and substitute with a natural sweetener like stevia or monk fruit.
- Healthier Oil: Replace vegetable oil with unsweetened applesauce or mashed avocado for a lower-fat alternative.
- Whole Wheat Flour: Substitute up to half of the all-purpose flour with whole wheat pastry flour for added fiber.
- Natural Food Coloring: Use beet juice or pomegranate juice for a natural red hue. Be aware that the color will be less vibrant than with artificial food coloring.
- Low-Fat Cream Cheese: Choose a reduced-fat cream cheese for your frosting to lower the saturated fat content with similar flavor.
- Greek Yogurt Frosting: You can use greek yogurt in place of most of the cream cheese for a tangier, protein packed frosting option.
Serving Suggestions
Elevate your red velvet cake experience with these creative serving suggestions:
- Classic Slice: Serve a generous slice with a dollop of whipped cream or a scoop of vanilla ice cream. A simple elegance.
- Cake Pops: Crumble the cake and mix with frosting to create cake pops. Dip them in melted white chocolate and decorate with red sprinkles.
- Red Velvet Parfaits: Layer crumbled cake with cream cheese frosting and fresh berries in parfait glasses.
- Red Velvet Trifle: Create a show-stopping trifle by layering cake, frosting, berries, and custard in a large glass bowl.
- Personalized Touch: Add a sprinkle of cocoa powder or a few chocolate shavings for an extra touch of elegance.
Common Mistakes to Avoid
- Overmixing the Batter: Leads to a tough cake. Mix until just combined.
- Using Expired Baking Soda: Results in a dense, flat cake. Ensure your baking soda is fresh. Sources say a good shelf life of baking soda is between 6-12 months once opened.
- Overbaking the Cake: Dries out the cake. Check for doneness with a wooden skewer.
- Frosting a Warm Cake: Melts the frosting and ruins the presentation. Ensure the cake is completely cool before frosting.
- Inefficient Measurements: The chemical reactions involved need correct proportions. Use measuring utensils appropriately.
Storing Tips for the Recipe
- Room Temperature: Store frosted cake in an airtight container at room temperature for up to 2 days.
- Refrigeration: For longer storage, refrigerate in an airtight container for up to 5 days. The cake may become slightly denser.
- Freezing: Wrap individual slices tightly in plastic wrap and then in foil. Freeze for up to 2 months. Thaw in the refrigerator overnight before serving.
- Prepping: If planning to bake more than 24 hours out, you can safely wrap the cake layer in plastic wrap for freshness until assembling.
Conclusion
From its fascinating history to its delectable flavor profile, red velvet cake is a dessert that never fails to impress. This recipe, enhanced with data-driven insights and personalized touches, empowers you to bake a truly unforgettable cake. Now, it's your turn! Bake this recipe try, share your creations, and let us know your favorite variations in the comments below. Want more delectable desserts? Be sure to explore our other cake recipes.
FAQs
-
Why is it called "Red Velvet"? The name originally referred to the cake's texture, which was soft and velvety due to the reaction between the cocoa powder, buttermilk, and vinegar. The red color was a byproduct of this reaction, though modern recipes often use food coloring.
-
Can I make this recipe without red food coloring? Yes, you can! The flavor will remain the same, but the color will be a lighter, more brownish hue. You can also try using natural food coloring alternatives like beet juice.
-
Can I use a stand mixer instead of hand mixing? Absolutely! Just be sure to mix on low speed and avoid overmixing the batter.
-
My cake is dry. What did I do wrong? Overbaking is the most likely cause. Also, ensure you are using the correct amount of liquid ingredients.
-
Can I make cupcakes with this recipe? Yes, you can! Adjust the baking time to 18-20 minutes.
Classic Red Velvet Cake
Description
A stunning, moist layer cake with a distinctive crimson color and a rich, tangy cream cheese frosting.
Ingredients
For the Crust:
- 2 1/2 cups all-purpose flour
- 1 1/2 cups granulated sugar
- 1 teaspoon baking soda
- 1 teaspoon cocoa powder
- 1 teaspoon salt
- 2 large eggs
- 1 1/2 cups vegetable oil
- 1 cup buttermilk
- 2 tablespoons red food coloring
- 1 teaspoon vanilla extract
- 1 teaspoon white vinegar
- For the Frosting: 8 oz cream cheese, softened
- 1/2 cup unsalted butter, softened
- 4 cups powdered sugar
- 1 teaspoon vanilla extract
Instructions
1. Prepare the Crust:
- Preheat oven to 350°F (175°C). Grease and flour two 9-inch round cake pans.
- In a large bowl, whisk together flour, sugar, baking soda, cocoa, and salt. In another bowl, beat eggs with oil, buttermilk, food coloring, vanilla, and vinegar.
- Add the wet ingredients to the dry ingredients and mix until just combined and smooth. Divide batter evenly between the prepared pans.
- Bake for 30-35 minutes, or until a toothpick inserted into the center comes out clean. Let cool in pans for 10 minutes, then turn out onto a wire rack to cool completely.
- For the frosting, beat cream cheese and butter together until smooth. Gradually add powdered sugar and vanilla, beating until light and fluffy.
- Once cakes are completely cool, frost the top of one layer, place the second layer on top, and frost the top and sides of the entire cake.
Notes
You can customize the seasonings to taste.