Table of Contents
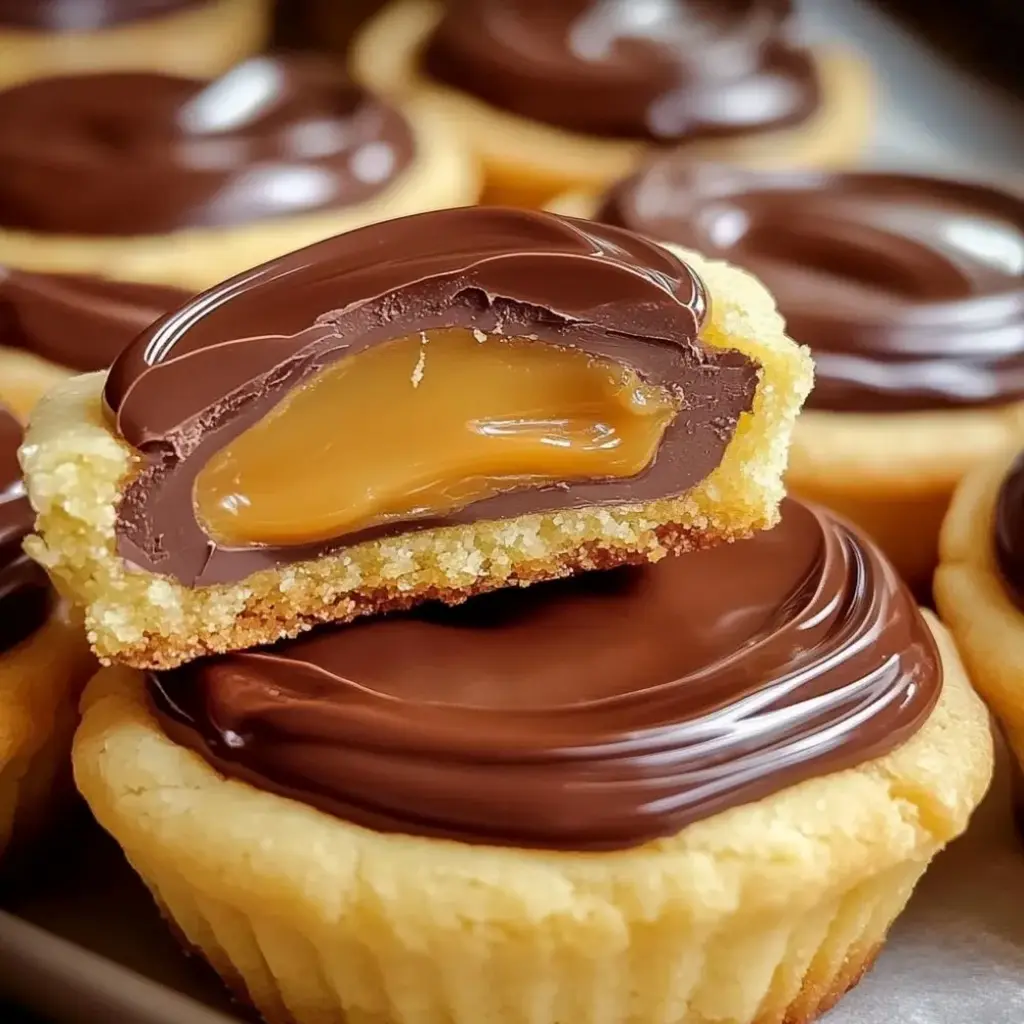
Twix Cookie Cups: The Only Recipe You’ll Ever Need
Imagine biting into a treat that perfectly captures the iconic layers of a Twix bar, but with a homemade twist that elevates it to new heights—yes, we’re talking about irresistible Twix Cookie Cups. As a busy home cook, I’ve often craved that satisfying crunch of shortbread, the gooey caramel pull, and the smooth chocolate finish without the store-bought shortcuts. This Twix Cookie Cups recipe from cookinwithlalyta.com solves that dilemma with ease, delivering a rich homemade caramel layer that makes every bite feel indulgent and fresh. Whether you’re a baking novice or a seasoned pro, these cookie cups are your gateway to effortless, crowd-pleasing desserts that mimic your favorite candy bar.
Now, picture the sensory delight of these Twix Cookie Cups: the buttery shortbread base crumbles just right, offering a tender, melt-in-your-mouth texture that contrasts beautifully with the thick, velvety caramel layer. Each cup releases an aroma of warm vanilla and toasted butter as it bakes, drawing everyone into the kitchen. The chocolate topping adds a glossy sheen and a snap that coats your tongue in creamy richness, while the subtle saltiness balances the sweetness for a harmonious flavor profile. It’s not just a dessert; it’s a textural adventure that leaves you craving more with every luscious layer.
What sets this Twix Cookie Cups recipe apart on cookinwithlalyta.com is the expertise of Chef Lalybeth, whose passion for simple yet innovative baking shines through. Drawing from years of testing and perfecting recipes, this version includes a Chef’s Secret that ensures foolproof results every time. You’ll learn how to achieve that rich homemade caramel layer for ultimate flavor depth, along with pro tips, ingredient spotlights, and creative serving ideas that make this the single best resource online. Dive in and discover why thousands trust cookinwithlalyta.com for reliable, delicious Twix Cookie Cups that guarantee kitchen success.
Why This Twix Cookie Cups Recipe is a Game-Changer
The Chef’s Secret lies in the rich homemade caramel layer, which infuses these Twix Cookie Cups with an unparalleled depth of flavor that sets them apart from ordinary recipes. By using high-quality ingredients and a simple technique to craft caramel from scratch—or opting for a premium store-bought version—you create a gooey, luxurious center that mimics the authentic Twix bar while adding a personal touch. This unique angle ensures every bite is decadently rich, turning a simple cookie into a showstopper dessert.
Unbeatable Texture: The science behind the perfect texture starts with creaming the butter and sugar to incorporate air, resulting in a light and fluffy shortbread base. When baked, the all-purpose flour provides structure, while the butter’s fat content creates a tender, crumbly cup that holds the caramel without sogginess. This combination, enhanced by the rich homemade caramel layer, delivers a contrast of crisp edges and soft centers that elevate the overall mouthfeel.
Foolproof for a Reason: This Twix Cookie Cups recipe has been meticulously tested multiple times in our kitchen to ensure consistent results, even for beginners. With clear instructions and pro tips, you can avoid common pitfalls and achieve bakery-quality treats every time, making it a reliable go-to for family gatherings or solo indulgences.
Ingredient Spotlight: Quality Makes the Difference
Unsalted Butter: As the foundation of these Twix Cookie Cups, unsalted butter provides the rich, creamy base that gives the shortbread its signature tender texture. Using high-quality, softened butter ensures even creaming and prevents the dough from becoming greasy. Opt for European-style butter for extra fat content if you want an even flakier result. A tested substitution is vegan butter for dairy-free versions, but be sure to adjust salt levels as it can vary in saltiness.
Granulated Sugar: This sweet staple not only adds the perfect level of sweetness to your Twix Cookie Cups but also helps cream with the butter for that light and airy dough. Quality matters here—use pure cane sugar to avoid any aftertaste from refined versions. For a lower-calorie option, substitute with coconut sugar, which maintains the caramel-like notes and complements the rich homemade caramel layer, though it may slightly alter the color and texture.
All-Purpose Flour: Serving as the structure in these Twix Cookie Cups, all-purpose flour binds the ingredients while allowing the dough to hold its cup shape during baking. Choose unbleached flour for better taste and texture. For gluten-free Twix Cookie Cups, swap with a 1:1 gluten-free flour blend, ensuring it’s xanthan gum-fortified to mimic the elasticity and prevent crumbling.
Vanilla Extract: This aromatic enhancer infuses the dough with warm, floral notes that elevate the overall flavor profile of your Twix Cookie Cups. Always go for pure vanilla extract over imitation for authentic taste—it’s the difference between mundane and memorable. If you’re out, almond extract can substitute in a pinch, using half the amount to avoid overpowering the rich homemade caramel layer.
Caramel Sauce: The star of the rich homemade caramel layer in these Twix Cookie Cups, caramel sauce provides that gooey, sweet center that defines the Twix experience. Homemade is best for superior flavor, but if time is short, select a thick, high-quality store-bought version. For a dairy-free alternative, use coconut caramel made from coconut milk and sugar to keep the indulgence without compromising on taste.
Milk Chocolate Chips: These deliver the glossy, melt-in-your-mouth chocolate topping that seals the deal on your Twix Cookie Cups. Opt for premium chips with high cocoa butter content for a smoother melt. Dark chocolate chips can substitute for a less sweet version, which pairs wonderfully with the rich homemade caramel layer and adds a sophisticated twist.
Salt: A simple yet crucial addition, salt balances the sweetness and enhances the flavors in these Twix Cookie Cups. Use fine sea salt for even distribution. If you’re watching sodium, a sprinkle of flaky salt on top can substitute, providing that essential contrast without overwhelming the recipe.
Step-by-Step Instructions
Step 1: Preheat the Oven and Prepare the Tin
Start by preheating your oven to 350°F and generously greasing a muffin tin with butter or a non-stick spray. This ensures your Twix Cookie Cups release easily without sticking.
Pro Tip: Use a pastry brush to evenly coat the tin for complete coverage, preventing any edges from burning and maintaining the perfect shape for that rich homemade caramel layer.
Step 2: Cream the Butter and Sugar
In a large mixing bowl, use an electric mixer to cream 1 cup of softened unsalted butter and 1/2 cup of granulated sugar until the mixture is light and fluffy, about 2-3 minutes. This step incorporates air for a tender texture.
Common Mistake to Avoid: Don’t over-cream the mixture, as it can lead to tough dough; stop once it’s pale and fluffy to keep your Twix Cookie Cups from becoming dense.
Step 3: Add Vanilla and Flour
Once creamed, stir in 1 teaspoon of vanilla extract and 2 cups of all-purpose flour along with 1/4 teaspoon of salt until just combined. Be careful not to overmix, as this will form the base dough for your Twix Cookie Cups.
Pro Tip: Sift the flour before adding it to eliminate lumps and ensure a smooth dough that bakes evenly, enhancing the overall texture for that signature Twix-inspired treat.
Step 4: Form and Bake the Cups
Press the dough evenly into the greased muffin tin to form small cups, filling each about three-quarters full. Bake in the preheated oven for 15 minutes or until the edges are golden brown.
Common Mistake to Avoid: Overbake the cups, which can make them too hard; check at 12 minutes to achieve the ideal crisp-yet-tender texture for holding the rich homemade caramel layer.
Step 5: Cool and Fill with Caramel
Allow the baked cups to cool in the tin for 10 minutes, then transfer to a wire rack. Once cooled, fill each cup with about 1 tablespoon of caramel sauce, ensuring it’s evenly distributed.
Pro Tip: Warm the caramel sauce slightly before filling to make it easier to pour, guaranteeing a smooth, even layer that doesn’t seep through the cups.
Step 6: Add the Chocolate Layer
Melt 2 cups of milk chocolate chips in a microwave-safe bowl in 30-second intervals, stirring until smooth. Pour the melted chocolate over the caramel layer in each Twix Cookie Cup.
Common Mistake to Avoid: Overheat the chocolate, which can cause it to seize; stir gently and use short bursts to keep it glossy and perfect for topping.
Step 7: Refrigerate and Serve
Place the filled Twix Cookie Cups in the refrigerator for at least 1 hour until the chocolate sets completely. Once firm, remove and serve immediately for the best experience.
Pro Tip: Chill them on a flat surface to prevent shifting, ensuring the rich homemade caramel layer stays intact for a professional finish.
Serving & Presentation
Elevate your Twix Cookie Cups with creative plating by arranging them on a rustic wooden board alongside fresh berries for a pop of color and contrast. Garnish with a light dusting of sea salt or crushed nuts to enhance the flavors and add texture. These treats pair wonderfully with coffee or a scoop of vanilla ice cream, making them an ideal dessert course for any meal. For parties, serve them in mini cupcake liners for easy grab-and-go, turning your Twix Cookie Cups into a highlight that complements charcuterie boards or fruit platters.
Make-Ahead & Storage Solutions
Make-Ahead Strategy: Prepare the dough up to 3 days in advance by mixing and storing it in an airtight container in the refrigerator. You can also bake the cups ahead and fill them with caramel just before serving to maintain freshness—just assemble within 24 hours.
Storing Leftovers: Keep Twix Cookie Cups in an airtight container at room temperature for up to 2 days, or refrigerate for up to 5 days to preserve the rich homemade caramel layer. For longer storage, freeze them in a single layer, then transfer to a freezer-safe bag for up to 2 months.
The Best Way to Reheat: To restore the original texture, thaw frozen cups in the refrigerator overnight, then warm in a 300°F oven for 5 minutes. This gently melts the chocolate without making the base soggy, ensuring your Twix Cookie Cups taste freshly made.
Frequently Asked Questions (FAQ)
How do you make the caramel layer for Twix Cookie Cups?
To make the caramel layer for your Twix Cookie Cups, start with 1 cup of caramel sauce as listed. For a homemade version, simmer 1 cup of sugar with 6 tablespoons of butter and 1/2 cup of heavy cream over medium heat until it reaches a thick, golden consistency—about 10 minutes. This rich homemade caramel layer adds depth and ensures it’s free from preservatives, making your treats superior. Cool slightly before filling the cups for the perfect gooey texture.
What are good ingredient substitutions for Twix Cookie Cups, like gluten-free options?
For Twix Cookie Cups, good substitutions include using a 1:1 gluten-free flour blend in place of all-purpose flour to accommodate gluten sensitivities, which maintains the structure without altering taste. For dairy-free needs, swap unsalted butter with vegan butter and use dairy-free chocolate chips and caramel sauce made from coconut milk. These changes keep the rich homemade caramel layer intact while ensuring the recipe remains delicious and inclusive.
How long should you bake Twix Cookie Cups for the perfect texture?
Bake your Twix Cookie Cups at 350°F for exactly 15 minutes to achieve a golden edge with a tender center, allowing the shortbread to hold the rich homemade caramel layer without becoming overly crisp. Ovens vary, so check at 12 minutes—if they’re still pale, bake a bit longer. This timing ensures the perfect balance of crunch and softness for an authentic Twix-like experience.
What are some creative serving ideas for Twix Cookie Cups at parties?
For parties, serve Twix Cookie Cups on a tiered platter with themed labels for an interactive dessert station. Pair them with coffee or hot chocolate for a cozy vibe, or incorporate them into a candy bar setup with toppings like sprinkles or crushed pretzels. They’re also great as party favors in individual boxes, making your Twix Cookie Cups the star that encourages guests to mingle and share.
Can these Twix Cookie Cups be made ahead for events?
Yes, you can make Twix Cookie Cups ahead for events by preparing the dough and baking the cups up to 3 days in advance. Store them unfilled in an airtight container, then add the caramel and chocolate layers the day of for freshness. This strategy keeps the rich homemade caramel layer gooey and prevents sogginess, making it ideal for stress-free entertaining.
Are Twix Cookie Cups suitable for kids or dietary restrictions?
Twix Cookie Cups are kid-friendly and can be adapted for various dietary restrictions. For nut allergies, ensure all ingredients are nut-free, and for vegan options, use plant-based substitutes as mentioned. Always check for cross-contamination, and consider smaller portions for children to enjoy the rich flavors without excess sugar.
Tried This Recipe? Leave a Comment!
Did you make this recipe? I’d love to hear how it turned out! Please leave a comment and a rating below. Your feedback helps other home cooks and supports cookinwithlalyta!
For more delicious inspiration, follow me on Pinterest!

Twix Cookie Cups
- Total Time: 35 minutes
- Yield: 24 cups 1x
Description
Delicious cookie cups filled with layers of shortbread, caramel, and chocolate, mimicking the popular Twix bar.
Ingredients
- 1 cup unsalted butter, softened
- 1/2 cup granulated sugar
- 2 cups all-purpose flour
- 1 teaspoon vanilla extract
- 1 cup caramel sauce
- 2 cups milk chocolate chips
- 1/4 teaspoon salt
Instructions
- Preheat oven to 350°F and grease a muffin tin.
- In a bowl, cream butter and sugar until light and fluffy.
- Add vanilla and flour to the mixture and stir until combined.
- Press dough into the muffin tin to form cups and bake for 15 minutes.
- Let cool, then fill each cup with caramel sauce.
- Melt chocolate chips and pour over the caramel layer.
- Refrigerate until set, then serve.
Notes
For a richer flavor, use homemade caramel sauce. Store in an airtight container for up to 5 days.
- Prep Time: 20 minutes
- Cook Time: 15 minutes
- Method: Dessert
- Cuisine: American
Nutrition
- Calories: 250
- Sugar: 18g
- Fat: 14g
- Carbohydrates: 28g
- Protein: 2g
Conclusion
These Twix Cookie Cups offer the perfect combination of buttery cookie, gooey caramel, and smooth chocolate, making them an irresistible treat for candy lovers and dessert enthusiasts alike. They’re simple to prepare and ideal for sharing at gatherings or as a sweet afternoon pick-me-up. For more delicious Twix-inspired ideas, be sure to try the Irresistible Salted Pretzel Twix Cheesecake Minis or the Homemade No-Bake Twix Cheesecake.