Table of Contents
Delightful Twinkie Cake Recipe A Nostalgic Treat: The Only Recipe You’ll Ever Need
Remember the joy of unwrapping a Twinkie as a kid, that soft, golden sponge filled with creamy goodness? This Delightful Twinkie Cake Recipe A Nostalgic Treat brings back those cherished memories with a modern twist, transforming simple Twinkies into an ultra-creamy layered dessert that’s perfect for family gatherings or a quick weeknight indulgence. As a no-bake wonder from cookinwithlalyta.com, it’s incredibly easy to whip up in just minutes, making it the ultimate nostalgic treat for busy home cooks seeking a hassle-free yet decadent dessert. With its ultra-creamy layers of pudding and whipped topping, this recipe stands out as a game-changer in the world of easy Twinkie cake recipes, ensuring every bite is as delightful as the original snack.
Imagine sinking your fork into layers of soft, spongy Twinkies soaked just enough to stay tender, topped with a velvety vanilla pudding that melts in your mouth, followed by the light, airy whipped topping that adds a fluffy contrast. The burst of tart cherry pie filling cuts through the sweetness, creating a harmonious balance of flavors and textures that evoke pure bliss. Aromas of vanilla waft through the air as you prepare this nostalgic dessert, building anticipation for that first heavenly bite, where the creaminess envelops your senses in a comforting embrace, making it an irresistible no-bake Twinkie dessert for any occasion.
What sets this Delightful Twinkie Cake Recipe A Nostalgic Treat apart is the expertise of Chef Lalybeth, who has perfected the art of simple, reliable desserts on cookinwithlalyta.com. This version isn’t just another recipe—it’s a tested favorite with a Chef’s Secret that ensures ultra-creamy results every time. You’ll learn insider tips on achieving the perfect texture, creative variations, and foolproof techniques that make this the single best resource for home cooks. Whether you’re a beginner or a seasoned baker, this guide will boost your confidence in the kitchen and deliver a nostalgic treat that’s sure to impress.
Why This Delightful Twinkie Cake Recipe A Nostalgic Treat Recipe is a Game-Changer
The Chef’s Secret lies in the ultra-creamy layers achieved by carefully whisking the instant vanilla pudding with cold milk to the perfect thickness before layering it over the Twinkies. This technique creates a luxurious, velvety base that elevates the nostalgic treat far above standard Twinkie desserts, ensuring a melt-in-your-mouth experience that’s both simple and sophisticated. By allowing the pudding to set properly, it locks in moisture and flavor, making this no-bake Twinkie cake recipe exceptionally creamy and irresistible.
Unbeatable Texture: The science behind the texture comes from the combination of instant pudding mix and whipped topping, which forms a stable emulsion that prevents sogginess in the Twinkies. This high-fat whipped topping helps maintain a light, airy layer while the pudding provides structure, resulting in a dessert that’s creamy without being overly dense, thanks to the precise ratios tested in our kitchen.
Foolproof for a Reason: This recipe has been prepared multiple times in our test kitchen to guarantee success, even for novice bakers. Its straightforward steps and minimal ingredients mean there’s no room for error, making it a reliable choice for anyone craving a nostalgic dessert that’s ready with minimal effort.
Ingredient Spotlight: Quality Makes the Difference
For the 1 box of Twinkies (about 10 pieces), these iconic snacks serve as the foundational layer, providing that signature soft, spongy texture that makes this Delightful Twinkie Cake Recipe A Nostalgic Treat so nostalgic. Opt for fresh, unexpired Twinkies to ensure they absorb the creamy layers without becoming mushy—stale ones can affect the overall mouthfeel. Quality matters because their pre-filled cream adds an extra burst of vanilla flavor. If substituting, try homemade golden pound cake slices for a fresher twist, but they won’t replicate the exact nostalgic essence.
The 1 package (3.4 oz) instant vanilla pudding mix is the heart of the ultra-creamy layers, thickening quickly to create a rich, smooth base that binds everything together in this no-bake Twinkie dessert. Choose a high-quality brand without artificial flavors for a more authentic taste; imitation mixes can taste synthetic. Its role is to add structure and vanilla depth, and for substitutions, you could use homemade vanilla custard, but it might require cooking, altering the ease of this recipe.
With 2 cups cold milk, this ingredient activates the pudding mix, ensuring it sets to the perfect creamy consistency without lumps, enhancing the overall texture of the Delightful Twinkie Cake Recipe A Nostalgic Treat. Always use whole milk for richness; low-fat versions can make the layers watery. Quality cold milk from the fridge helps achieve instant thickening, and if dairy-free, substitute with unsweetened almond milk, though it may slightly dilute the creaminess.
The 1 container (8 oz) whipped topping, thawed, adds a light, fluffy element that balances the denser layers, making this nostalgic treat feel indulgent yet effortless. Select a stabilized whipped topping for better hold; generic brands might deflate quickly. It contributes to the ultra-creamy profile, and a good alternative is homemade whipped cream from heavy cream, but ensure it’s stabilized with gelatin to maintain shape during chilling.
Including 1 can (21 oz) cherry pie filling brings a tart, fruity contrast that cuts through the sweetness, turning this Twinkie cake recipe into a vibrant, layered delight. Go for a brand with real fruit pieces for authentic flavor; overly syrupy versions can overpower the dessert. It’s essential for visual appeal and taste balance, and you can substitute with strawberry or blueberry pie filling for variety, as noted in the recipe tips.
Finally, fresh cherries for garnish add a pop of color and freshness, elevating the presentation of this Delightful Twinkie Cake Recipe A Nostalgic Treat. Choose ripe, firm cherries for the best crunch and flavor; washed and pitted ones ensure safety and ease. Their role is purely decorative and textural, and if unavailable, frozen thawed cherries work, but they won’t have the same crispness.
Step-by-Step Instructions
Step 1: Arranging the Twinkies
Start by taking your 9×13 inch baking dish and carefully placing the Twinkies in a single, even layer at the bottom. Ensure they fit snugly without overlapping to create a stable base for the layers above. This step is crucial for even absorption of flavors.
Pro Tip: Gently press the Twinkies down slightly to form a flat surface, which helps the pudding layer adhere better and prevents shifting during assembly.
Step 2: Preparing the Pudding Mixture
In a medium bowl, combine the instant vanilla pudding mix with 2 cups of cold milk. Whisk vigorously for about 2 minutes until the mixture thickens to a creamy consistency, ensuring there are no lumps for a smooth finish.
Common Mistake to Avoid: Don’t use warm milk, as it can cause the pudding to set unevenly or become grainy—always start with cold milk straight from the fridge to achieve that perfect ultra-creamy texture.
Step 3: Spreading the Pudding Layer
Once thickened, evenly spread the pudding mixture over the arranged Twinkies in the baking dish, using a spatula to cover the entire surface without leaving gaps. This layer acts as the glue that holds the Delightful Twinkie Cake Recipe A Nostalgic Treat together.
Pro Tip: Work quickly after whisking to prevent the pudding from setting in the bowl; a thin layer of plastic wrap over it can keep it from forming a skin.
Step 4: Adding the Whipped Topping
Take the thawed whipped topping and spread it smoothly over the pudding layer, using gentle motions to maintain its fluffiness and create an even, airy finish across the top.
Common Mistake to Avoid: Over-mixing the whipped topping can deflate it, leading to a dense layer—apply it directly from the container for the best ultra-creamy results in this nostalgic dessert.
Step 5: Topping with Cherry Pie Filling
Spoon the cherry pie filling evenly over the whipped topping layer, distributing the cherries and sauce uniformly to ensure every slice gets a balanced burst of tartness.
Pro Tip: For a more artistic touch, swirl the filling lightly into the whipped topping to create a marbled effect, enhancing the visual appeal of your no-bake Twinkie cake recipe.
Step 6: Garnishing and Chilling
Garnish the top with fresh cherries, placing them strategically for an eye-catching presentation, then cover the dish and refrigerate for at least 2 hours. This chilling time allows the flavors to meld and the layers to set firmly.
Common Mistake to Avoid: Skipping the full chilling time can result in a runny dessert—always refrigerate for the specified duration to maintain the perfect texture in this Delightful Twinkie Cake Recipe A Nostalgic Treat.
Serving & Presentation
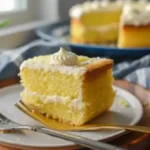
To serve this Delightful Twinkie Cake Recipe A Nostalgic Treat, cut into generous squares and plate on dessert dishes for a clean, inviting look. Enhance presentation with a dusting of powdered sugar or additional fresh cherries arranged in a pattern, adding a professional touch to this nostalgic dessert. The ultra-creamy layers pair beautifully with its vibrant cherry topping, making it a centerpiece for any table.
For complementary pairings, serve alongside a light vanilla ice cream to amplify the creamy notes or pair with a fresh fruit salad to balance the sweetness, perfect for a summer picnic or holiday gathering. This no-bake Twinkie cake recipe shines as a standalone dessert but also complements lighter main courses like grilled chicken salads, providing a sweet finale without overwhelming the palate.
Make-Ahead & Storage Solutions
Make-Ahead Strategy: Prepare the Twinkie base and pudding layer up to 3 days in advance by assembling them in the baking dish, covering tightly, and refrigerating. Add the whipped topping and cherry filling just before serving to keep the textures fresh and prevent sogginess in this Delightful Twinkie Cake Recipe A Nostalgic Treat.
Storing Leftovers: Store any remaining cake in an airtight container in the refrigerator for up to 3 days to maintain its ultra-creamy consistency. For longer storage, freeze individual portions wrapped in plastic and foil for up to 1 month, thawing in the fridge overnight.
The Best Way to Reheat: While this nostalgic dessert is best served cold, if you prefer a softer texture, let it sit at room temperature for 10-15 minutes before serving. Avoid microwaving, as it can melt the layers; instead, refresh in the fridge and enjoy as is for optimal flavor restoration.

Frequently Asked Questions (FAQ)
How do you make a Delightful Twinkie Cake from scratch?
While this recipe uses store-bought Twinkies for simplicity, you can adapt it by making your own sponge cake from scratch. Bake a basic vanilla sponge cake, cut it into Twinkie-sized pieces, and follow the same layering steps. Start with a simple batter of 1 cup flour, 1 tsp baking powder, 1/2 cup sugar, 2 eggs, and 1/2 cup milk, baked at 350°F for 15 minutes. This creates a fresher version of the Delightful Twinkie Cake Recipe A Nostalgic Treat, maintaining its ultra-creamy layers while adding a homemade touch.
Can I substitute Twinkies with another ingredient in a Twinkie Cake recipe?
Yes, you can substitute Twinkies with other soft cakes like pound cake slices or even ladyfingers for a similar texture in this no-bake Twinkie dessert. However, keep in mind that Twinkies provide a unique pre-filled cream that enhances the nostalgic flavor, so alternatives might need an extra layer of vanilla filling. For best results, choose items with a spongy consistency to ensure the ultra-creamy layers integrate well in the Delightful Twinkie Cake Recipe A Nostalgic Treat.
How long does it take to prepare and chill a Twinkie Cake?
Preparation for this Delightful Twinkie Cake Recipe A Nostalgic Treat takes about 15 minutes, with no cooking required, followed by a chilling time of at least 2 hours for the flavors to set. The total time is around 2 hours and 15 minutes, making it an ideal quick dessert. Factors like refrigeration efficiency can affect this, but planning ahead ensures perfect results for your nostalgic treat.
What are the best ways to serve and store a Twinkie Cake for a party?
For serving at a party, present this no-bake Twinkie cake on a chilled platter with garnishes like fresh cherries to enhance its appeal, and cut into pre-portioned squares for easy sharing. Store it in the fridge until serving to keep the ultra-creamy layers intact. After the event, refrigerate leftovers in an airtight container for up to 3 days or freeze for a month, as detailed in the recipe, to preserve its nostalgic taste.
Is this recipe suitable for kids or dietary restrictions?
This Delightful Twinkie Cake Recipe A Nostalgic Treat is kid-friendly due to its fun, familiar flavors, but it’s high in sugar, so serve in moderation. For dietary restrictions, it’s not naturally gluten-free due to Twinkies, but you can use gluten-free sponge cake as a substitute; check for dairy-free options in the milk and whipped topping.
What variations can I try with this Twinkie Cake recipe?
To vary this nostalgic dessert, experiment with different pie fillings like strawberry or blueberry for a seasonal twist, as suggested. You could also add nuts or chocolate shavings for texture, keeping the ultra-creamy core intact while personalizing the Delightful Twinkie Cake Recipe A Nostalgic Treat to your tastes.
Tried This Recipe? Leave a Comment!
Did you make this recipe? I’d love to hear how it turned out! Please leave a comment and a rating below. Your feedback helps other home cooks and supports cookinwithlalyta.
For more delicious inspiration, follow me on Pinterest!
Delightful Twinkie Cake
- Total Time: 2 hours 15 minutes
- Yield: 12 servings 1x
Description
This delightful Twinkie cake is a nostalgic dessert that combines the classic taste of Twinkies with creamy layers for a fun and easy treat.
Ingredients
- 1 box of Twinkies (about 10 pieces)
- 1 package (3.4 oz) instant vanilla pudding mix
- 2 cups cold milk
- 1 container (8 oz) whipped topping, thawed
- 1 can (21 oz) cherry pie filling
- Fresh cherries for garnish
Instructions
- Step 1: Arrange the Twinkies in a single layer at the bottom of a 9×13 inch baking dish.
- Step 2: In a medium bowl, whisk together the instant pudding mix and cold milk until thickened, about 2 minutes.
- Step 3: Spread the pudding mixture evenly over the layer of Twinkies.
- Step 4: Top with the whipped topping, spreading it smoothly over the pudding layer.
- Step 5: Spoon the cherry pie filling over the whipped topping.
- Step 6: Garnish with fresh cherries and refrigerate for at least 2 hours before serving.
Notes
For a variation, use different pie fillings like strawberry or blueberry. Store leftovers in the refrigerator for up to 3 days.
- Prep Time: 15 minutes
- Cook Time: 0 minutes
- Method: Dessert
- Cuisine: American
Nutrition
- Calories: 350
- Sugar: 30g
- Fat: 16g
- Carbohydrates: 45g
- Protein: 4g
Conclusion
This Delightful Twinkie Cake Recipe offers a nostalgic treat that combines soft, creamy layers with sweet, comforting flavors, perfect for evoking childhood memories with every bite. Whether you’re serving it at a family gathering or as a simple weeknight dessert, chilling it in the fridge enhances its texture and makes it even more refreshing. For a fun variation, consider adding fresh fruits like strawberries, and check out our Irresistible Strawberry Twinkie Cake Recipe for an easy twist on this beloved classic.