Table of Contents
Golden Buttery Raspberry Jam Thumbprint Biscuits: A Melt-in-Your-Mouth French-Inspired Treat
I still remember the first time I tasted a thumbprint cookie—or as my Parisian pastry chef mentor called them, “biscuits à la confiture.” The way that buttery, shortbread-like dough just shattered into tender crumbs, while the jewel-toned raspberry jam added a bright, tangy burst, was nothing short of magical. Years later, when I moved to New York City, I started baking these raspberry jam thumbprint biscuits for my new friends at tea time, blending my Moroccan heritage of preserving fruits with the precise French technique I’d learned. Now, they’ve become my signature “welcome to the neighborhood” treat, and I’m so excited to share my foolproof recipe with you!
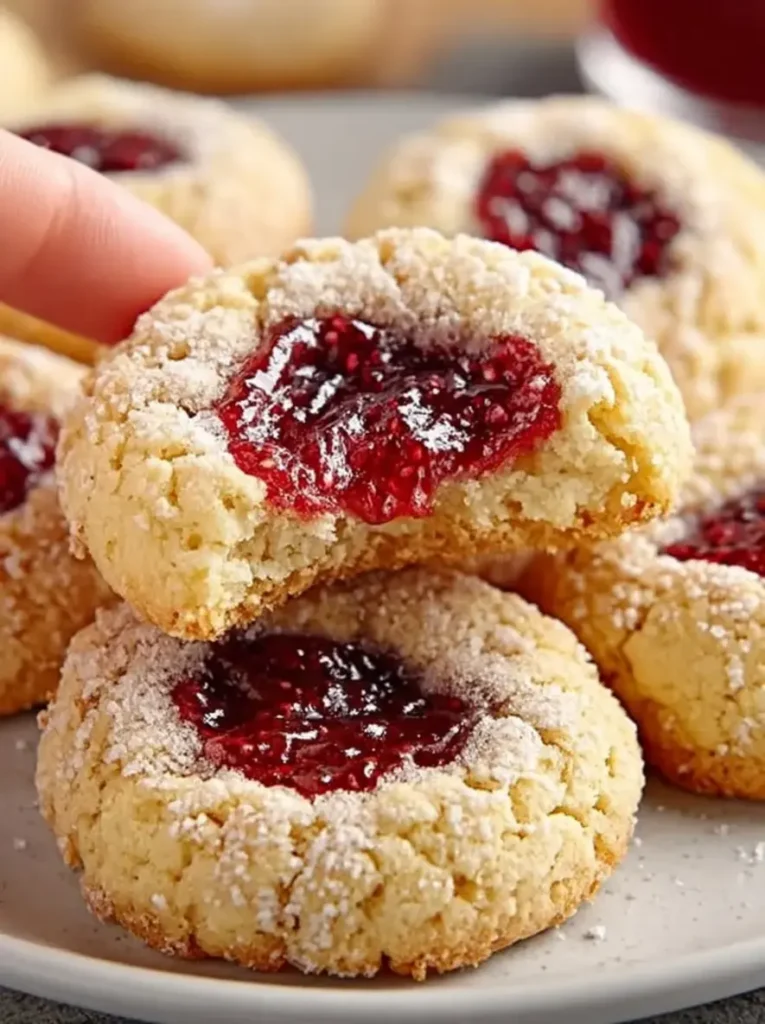
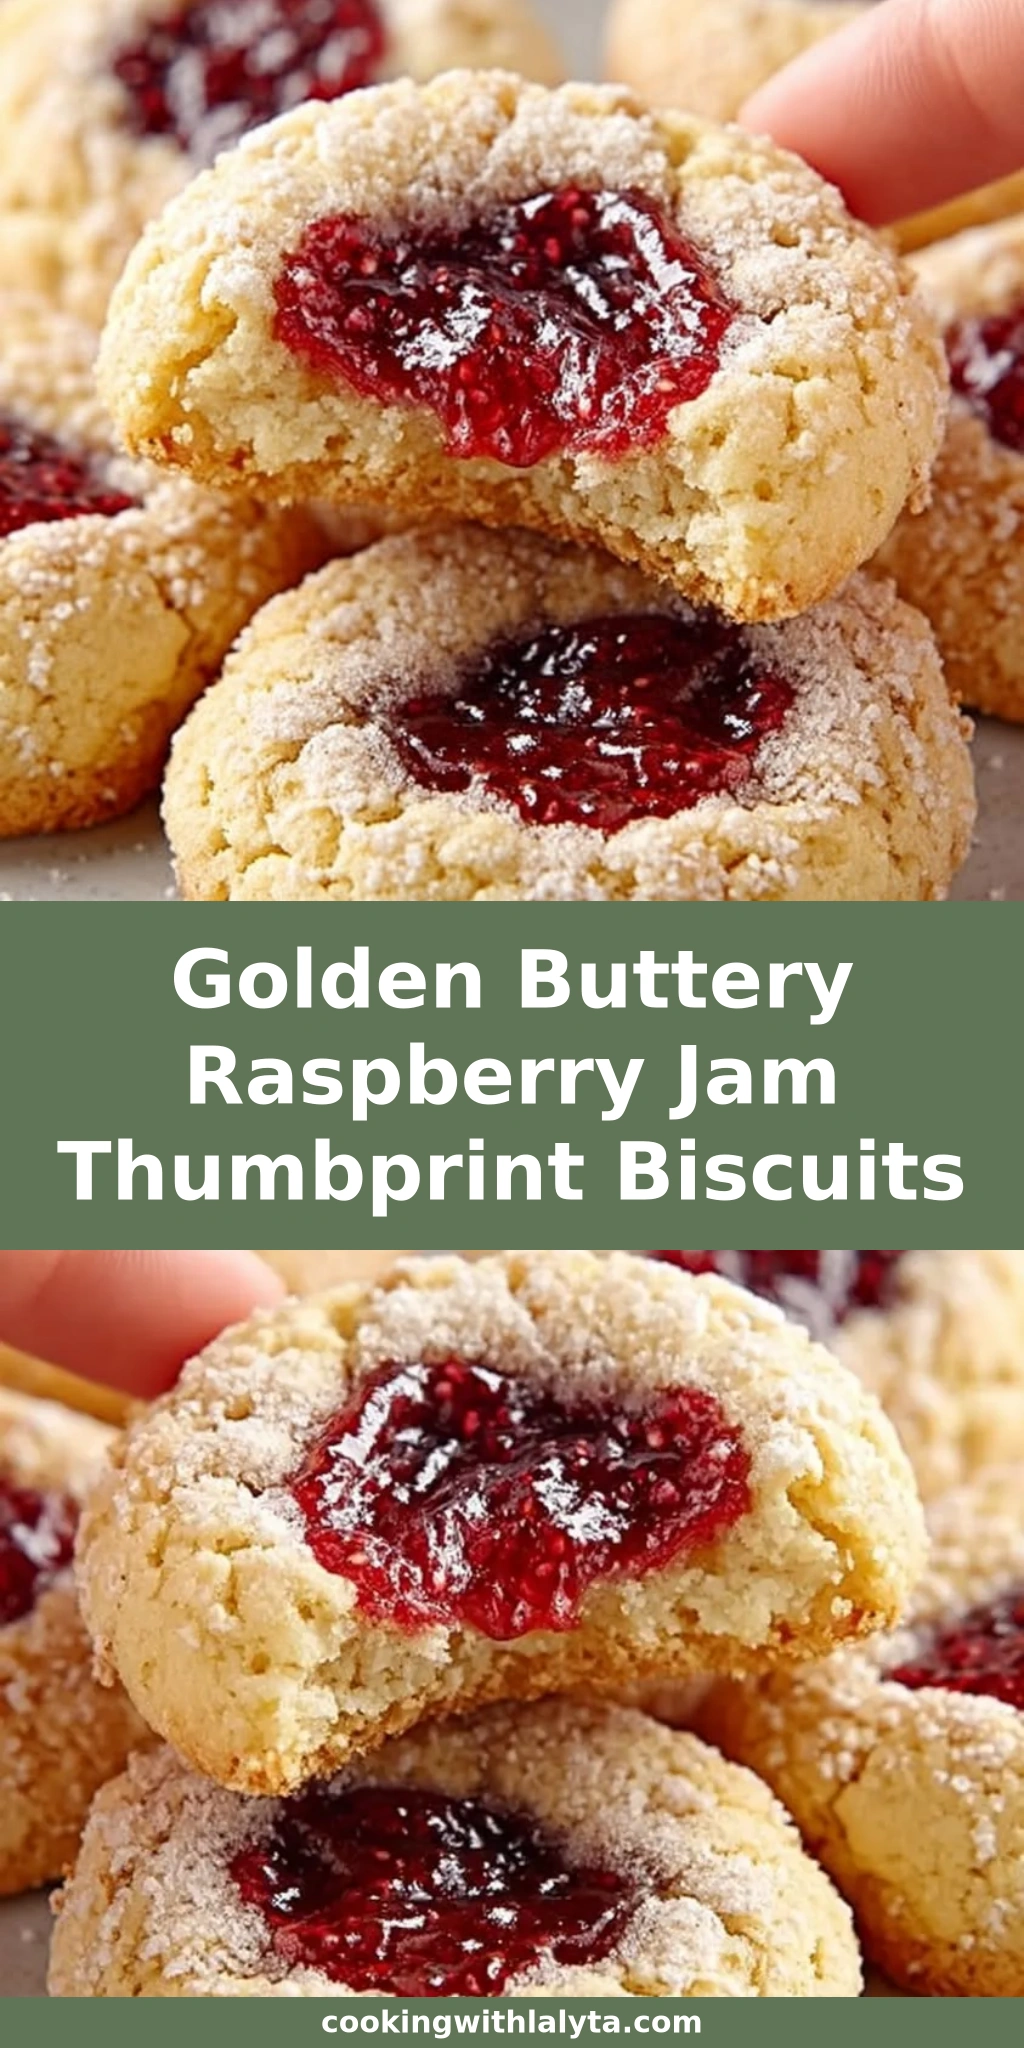
These golden buttery biscuits are all about contrasts: the crumbly, melt-in-your-mouth base made from a simple dough enriched with egg yolks, and the intense, slightly tart raspberry jam that sets into a shiny, sticky pool in the center. Each bite starts with a whisper of vanilla, then the richness of butter, and finally that fruity zing that wakes up your palate. Unlike many thumbprint cookie recipes, mine uses only egg yolks—a trick I picked up in France to create an exceptionally tender, golden cookie that doesn’t dry out. And yes, I prefer seedless raspberry jam for a smooth, luscious finish; it’s a small detail that makes the whole biscuit feel more elegant.
Over the years, I’ve tested this recipe dozens of times in my NYC kitchen, tweaking the butter-to-flour ratio and the shaping technique until I landed on the ultimate version. The secret? A delicate hand when mixing and a quick chill that prevents spreading—don’t skip that. In this post, I’ll walk you through every step, share my best pro tips, and warn you about the one common mistake that can lead to jam bubbling over or tough biscuits. Whether you’re a beginner baker or a seasoned pro, these raspberry jam thumbprint biscuits will become your new favorite go-to for cookie exchanges, afternoon tea, or simply a sweet, buttery moment of joy.
Why This Golden Buttery Raspberry Jam Thumbprint Biscuits Recipe Is the Best
The Flavor Secret: Real Butter & French Technique. As a chef trained in Paris, I know that the quality of butter makes or breaks a shortbread. I use a full cup of high-fat European-style unsalted butter, which gives these biscuits a deep, almost nutty richness and a golden hue that screams “homemade.” Instead of whole eggs, I rely on two large egg yolks—a classic French pâtisserie trick that adds incredible tenderness without extra moisture that can cause spreading. The vanilla extract is pure, never imitation, and the raspberry jam? I always reach for a seedless, high-fruit-content variety from my local farmers market; it’s less sweet and more vibrant, letting the buttery dough shine.
Perfected Texture: Tender, Not Tough. The dough comes together in less than five minutes, but the real magic happens in how you handle it. I mix just until the flour disappears—overworking activates gluten and makes biscuits hard. And because I grew up watching my mom make Moroccan almond cookies, I learned to work the dough with cool hands and to let the balls chill on the tray for 10-15 minutes before baking. This ensures they hold their shape beautifully, with crisp edges and a soft, sandy interior that literally melts on your tongue.
Foolproof & Fast: No Stress, Just Golden Biscuits. This recipe is incredibly forgiving. You don’t need a stand mixer (a hand mixer or even a wooden spoon works), and the entire active prep is about 15 minutes. My step-by-step guidance will make you feel like a pro, even if it’s your first time making thumbprint cookies. Plus, I’ll give you all my storage secrets and easy swaps—so you can whip up a batch tonight and still have perfect biscuits for a weekend gathering.
Raspberry Jam Thumbprint Biscuits Ingredients
One of the joys of living in New York City is having access to incredible ingredients year-round—from the butter aisle at my corner grocery to the raspberry preserves at the Union Square Greenmarket. I’ve kept this ingredient list simple and pantry-friendly, the way my mom did back in Morocco when she’d make date-filled thumbprints. Here’s everything you’ll need for these buttery, jam-packed beauties.
Ingredients List
- 1 cup unsalted butter, softened
- 1/2 cup granulated sugar
- 2 large egg yolks
- 1 teaspoon vanilla extract
- 2 cups all-purpose flour
- 1/4 teaspoon salt
- 1/2 cup raspberry jam (seedless preferred)
- 1/4 cup powdered sugar for dusting (optional)
Ingredient Spotlight
Unsalted Butter. Always start with room-temperature butter—it should yield slightly when pressed but still hold its shape. I steer clear of salted butter here so I can control the salt level, but if you only have salted, simply omit the added salt. European-style butters (like Plugrá or Kerrygold) have higher butterfat and less water, which yields an even richer, more tender biscuit. Don’t melt it; softened and creamy is the goal.
All-Purpose Flour. Regular unbleached all-purpose flour gives just the right amount of structure without making the biscuits tough. For a slightly more delicate crumb, you can substitute 1/4 cup of the flour with cornstarch—a trick I learned in Paris for extra-meltaway shortbread. Sifting the flour isn’t mandatory, but do whisk it with the salt to distribute evenly.
Raspberry Jam. Seedless raspberry jam is my top pick; it spreads smoothly into the indent and won’t have those distracting little seeds. Look for one that lists fruit as the first ingredient and has a deep, rich color. I often use Bonne Maman or a local artisanal brand. If you only have seeded jam, no worries—just warm it slightly and press through a fine-mesh sieve to remove seeds. Apricot, strawberry, or even fig preserves make lovely alternatives, each bringing its own personality.
Egg Yolks. The star of the show! Yolks add fat and emulsifiers that create a cookie with a fine, tender crumb and a gorgeous golden color. Be sure to separate them while the eggs are cold—the yolk will be less likely to break. Save those egg whites for a meringue or an egg-white omelet tomorrow.
| Original Ingredient | Best Substitution | Flavor / Texture Impact |
|---|---|---|
| Unsalted butter | Salted butter (omit added salt) | Slightly saltier taste but still delicious; may spread a tiny bit more. |
| All-purpose flour | 1:1 gluten-free flour blend | Very similar texture; possibly a bit more crumbly; add 1 tsp xanthan if blend lacks it. |
| Granulated sugar | Powdered sugar | Shorter, more tender biscuit; slightly less crisp edges. |
| Raspberry jam | Apricot, strawberry, or fig preserves | Different fruit tartness/sweetness; all work beautifully, just adjust to taste. |
How to Make Golden Buttery Raspberry Jam Thumbprint Biscuits — Step-by-Step
I know baking can feel intimidating, but I promise you, this recipe is as easy as whisk, scoop, press, and bake. I’ll be right here with you, sharing every visual cue and chef’s trick so your biscuits come out perfectly golden every time.
Step 1: Prepare Your Oven and Pans
Preheat your oven to 350°F (175°C). Line two baking sheets with parchment paper—I swear by this, as it prevents sticking and makes clean-up a breeze. No parchment? Lightly grease the sheets, but the bottoms may brown a tad faster.
💡 Lalybeth’s Pro Tip: For extra insurance against spreading, pop your parchment-lined baking sheets in the freezer while you make the dough. A cold pan helps the biscuits hold their shape in the oven.
Step 2: Cream Butter and Sugar
In a large bowl, beat the softened butter and granulated sugar together until the mixture is light, pale, and fluffy—about 2 to 3 minutes using a hand mixer on medium speed. You’re not just combining; you’re incorporating air. The color should lighten to a creamy ivory. If doing this by hand, use a sturdy wooden spoon and really give it some elbow grease until it feels light and no longer gritty.
⚠️ Common Mistake to Avoid: Don’t let the butter get too warm. If it’s greasy or shiny, the dough will spread like crazy. If your kitchen is warm, pop the bowl in the fridge for 5 minutes before moving on.
Step 3: Add Egg Yolks and Vanilla
Add the two egg yolks and vanilla extract to the butter mixture. Beat on low speed just until fully incorporated and the mixture looks smooth and velvety, about 30 seconds. Scrape down the sides of the bowl to make sure everything is combined. The yellow color will deepen beautifully from the yolks.
💡 Lalybeth’s Pro Tip: For an even more pronounced golden color and a nutty undertone, swap 1/2 teaspoon of vanilla extract for 1/4 teaspoon of almond extract. It’s a tiny change that transports these biscuits to a French pâtisserie.
Step 4: Whisk Dry Ingredients and Combine
In a separate bowl, whisk together the all-purpose flour and salt. Gradually add this dry mixture to the wet mixture, mixing on the lowest speed just until a soft, cohesive dough forms. Stop as soon as the flour streaks disappear—the dough will look slightly crumbly but should hold together when pressed. Overmixing is the enemy of tender shortbread.
⚠️ Common Mistake to Avoid: Dumping all the flour in at once can create lumps and lead to overmixing as you struggle to blend it. Add it in two additions, mixing briefly after each.
Step 5: Roll Dough into Balls
Using a small cookie scoop or a tablespoon, portion out the dough and roll it into 1-inch balls. Place them on the prepared baking sheets, leaving about 2 inches between each. I like to roll with slightly damp hands so the dough doesn’t stick. At this point, you can chill the balls on the tray in the fridge for 10-15 minutes—this is my secret to picture-perfect biscuits that don’t spread.
💡 Lalybeth’s Pro Tip: If you have a kitchen scale, aim for each ball to weigh about 18-20 grams. Uniform size means even baking, and you’ll get exactly 24 gorgeous biscuits.
Step 6: Make the Thumbprint Indentation
Using your thumb or the back of a round measuring spoon (like a 1/2 teaspoon measure), gently press a deep but stable well into the center of each dough ball. Don’t push all the way through; you want the bottom to remain about 1/4 inch thick. If the edges crack a little, simply smooth them back together with your fingers—the dough is forgiving.
⚠️ Common Mistake to Avoid: Shallow indentations cause the jam to bubble over and pool on the baking sheet. Go deep and slightly wide, like a little bird’s nest, giving the jam a home.
Step 7: Fill with Raspberry Jam
Spoon about 1/2 teaspoon of raspberry jam into each indentation. I like to warm the jam slightly in a small bowl and give it a good stir first—this makes it easier to drop in and reduces air bubbles that can cause it to boil over. Don’t overfill; a small mound is perfect.
💡 Lalybeth’s Pro Tip: Use a piping bag or a small zip-top bag with the corner snipped off to pipe the jam precisely into each well. It’s neater, faster, and prevents drips on the biscuit edges that can burn.
Step 8: Bake to Golden Perfection
Bake for 12-14 minutes, rotating the pans halfway through, until the edges are just lightly golden. The centers will still look slightly soft and the jam may be bubbly—that’s normal. Remove from the oven and let the biscuits cool on the baking sheets for a full 5 minutes; they will firm up as they sit. Then transfer them to a wire rack to cool completely.
⚠️ Common Mistake to Avoid: Moving the biscuits too early can cause them to break. Be patient during that 5-minute cooling—it’s the set-up time that gives you a perfect, transportable cookie.
Step 9: Dust with Powdered Sugar (Optional)
Once completely cool, just before serving, dust the biscuits with a light snowfall of powdered sugar using a fine-mesh sieve. It adds a lovely visual contrast and a whisper of extra sweetness. Skip it if you prefer a less sweet finish, or drizzle with a tiny bit of melted white chocolate for a more decadent look.
💡 Lalybeth’s Pro Tip: Dust only the edges, leaving the shiny jam center exposed—it’s like a little window to the fruitiness inside. And always dust just before serving, as the sugar can absorb moisture and dissolve over time.
| Step | Action | Duration | Key Visual Cue |
|---|---|---|---|
| 1 | Preheat & Line Pans | 5 min | Oven light on, parchment flat |
| 2 | Cream Butter & Sugar | 2-3 min | Pale, fluffy, no graininess |
| 3 | Add Egg Yolks & Vanilla | 30 sec | Smooth, uniform yellow |
| 4 | Add Dry Ingredients | 1 min | Dough holds when pressed, not sticky |
| 5 | Roll into Balls & Chill | 10-15 min | Firm, cool to the touch |
| 6 | Make Indentations | 2 min | Deep well, smooth edges |
| 7 | Fill with Jam | 2 min | Jam mounded, not overflowing |
| 8 | Bake | 12-14 min | Edges lightly golden, jam bubbly |
| 9 | Cool & Dust | 20+ min | Firm to touch, jam set |
Serving & Presentation
When I arrange these biscuits on a platter for guests, I love to mimic the look of a Parisian pâtisserie window—neat rows with a dusting of powdered sugar that looks like fresh snow. For a casual NYC-style brunch, I’ll stack them haphazardly on a wooden board with fresh raspberries and mint leaves scattered around. However you serve them, they’re guaranteed to steal the spotlight.
These buttery gems are just as perfect with a steaming cup of Moroccan mint tea as they are with an afternoon cappuccino. The jam’s tartness cuts through the richness, so a simple, not-too-sweet drink is ideal. They also make a lovely addition to a cookie tin gift—layer them between sheets of wax paper to protect the jam surface, and tie with a ribbon. My NYC neighbors always ask for the recipe when I drop these off.
For an extra special presentation, drizzle a bit of melted dark chocolate over the cooled biscuits instead of powdered sugar—the bittersweet chocolate plays beautifully with the raspberry. Or, if you’re feeling more Moroccan, sprinkle a tiny pinch of flaky sea salt on each dollop of jam before baking; that salty-sweet contrast is out of this world.
| Pairing Type | Suggestions | Why It Works |
|---|---|---|
| Side Dish | Fresh raspberries, whipped cream, vanilla bean ice cream | Echoes the jam flavor and adds a cool, creamy contrast. |
| Sauce / Dip | Crème anglaise, lemon curd, or a dark chocolate ganache | Adds a luxurious layer and turns biscuits into a plated dessert. |
| Beverage | Earl Grey tea, café au lait, or a chilled Moscato d’Asti | The floral notes and mild sweetness complement without overpowering. |
| Garnish | Powdered sugar, lemon zest, toasted sliced almonds, edible flowers | Brightens the look and adds a hint of texture or aroma. |
Make-Ahead, Storage & Reheating
Like most butter-based cookies, these raspberry jam thumbprint biscuits actually get better after a day of rest—the flavors meld and the texture settles into that perfect shortbread crumble. In my busy NYC life, I often make the dough the night before or bake a double batch and store them so I’m always ready for drop-in guests.
| Method | Container | Duration | Reheating Tip |
|---|---|---|---|
| Refrigerator | Airtight container with wax paper between layers | Up to 5 days | No need to reheat—enjoy at room temp for best texture. |
| Freezer (baked) | Freezer-safe container, separated by parchment | Up to 2 months | Thaw at room temp for 1 hour; dust with fresh powdered sugar. |
| Make-Ahead (dough) | Wrapped tightly in plastic wrap, then placed in a zip-top bag | Refrigerate up to 2 days; freeze up to 1 month | Thaw refrigerated dough 15 min at RT; frozen dough overnight in fridge, then roll and bake. |
If you’ve refrigerated the dough, it will be quite firm. Let it sit on the counter for 10-15 minutes until soft enough to scoop, but don’t let it get greasy. For frozen dough, thaw it in the fridge overnight—never at room temperature—to prevent uneven softening. Once the biscuits are baked and fully cooled, I store them at room temperature in a cookie tin with a slice of bread; the bread absorbs excess moisture and keeps them perfectly crumbly.
A quick note on the jam: the biscuits are best stored in a single layer to keep the jam from sticking to the cookie above. If you must stack, do so with a piece of parchment or wax paper between layers. And if they soften a bit after a few days, just pop them in a 300°F oven for 3-5 minutes to recrisp the edges.
Variations & Easy Swaps
One of the things I love most about this thumbprint biscuit recipe is how versatile it is. Inspired by my mother’s Moroccan kitchen—where she’d fill ma’amoul with dates or walnuts—I started experimenting with different jams and flavorings. Here are a few of my tried-and-tested twists.
| Variation | Key Change | Best For | Difficulty Impact |
|---|---|---|---|
| Apricot-Almond | Swap jam for apricot preserves + add 1/4 tsp almond extract | Brunch, spring gatherings | No change |
| Gluten-Free | Use 1:1 GF flour blend (e.g., King Arthur Measure for Measure) + 1 tsp xanthan gum if blend lacks it | GF guests, everyday baking | Slightly more crumbly; chill dough longer |
| Lemon-Rosemary | Add 1 tbsp lemon zest + 1 tsp fresh minced rosemary to dough; fill with lemon curd instead of jam | Easter, summer picnics, herb gardeners | Still easy; just mind the curd’s consistency |
Apricot-Almond Bliss
This is my go-to when raspberries aren’t at their peak. Apricot preserves have a mellow, honeyed sweetness that pairs beautifully with almond. I add a few drops of almond extract to the dough and sometimes tuck a slivered almond into the jam before baking. The result is a biscuit that tastes like a French frangipane tart in cookie form—and it fills the kitchen with the most heavenly scent.
Gluten-Free & Dairy-Free Option
For a gluten-free version, I’ve tested with a 1:1 all-purpose gluten-free flour blend that includes xanthan gum. The dough is slightly more delicate, so I chill the formed balls for a full 20 minutes. To make it dairy-free as well, swap the butter for a solid stick-style vegan butter (like Earth Balance), and use coconut cream in place of the egg yolks—yes, it works! The texture is a bit softer, but still wonderfully buttery-tasting. Just ensure your jam is also vegan.
Seasonal Berry Swirl
In late spring, at my NYC farmers market, I’ll buy a mix of strawberries, blackberries, and currants to make a quick stovetop jam. Spoon a little of that chunky, rustic preserve into the thumbprint wells for a jewel-like finish. It’s a gorgeous, rustic twist that tastes of summer. If you’re short on time, simply swirl two different store-bought jams—say, raspberry and blueberry—together in the indentation.
What is the best way to prevent thumbprint biscuits from spreading too much while baking?
The number one trick is to chill the dough after shaping it into balls and before baking—pop the tray in the fridge for 10–15 minutes. Chilling firms the butter so the biscuits hold their indentation and don’t melt into puddles. Also, use a heavy baking sheet and avoid greasing the pan; parchment paper is better because it provides a little grip. I also recommend weighing your flour (240g for 2 cups) because too little flour = spread. Finally, don’t skip the egg yolks—they add structure without the water that’s in egg whites, which can cause puffing and spreading.
Can I substitute salted butter for unsalted butter in golden buttery raspberry jam thumbprint biscuits?
Absolutely. If you only have salted butter, simply omit the 1/4 teaspoon of salt called for in the recipe. The result will still be delicious, with a slightly more savory undertone that can actually enhance the sweet jam. Just be aware that salted butter sometimes contains a tiny bit more water, so you might see a touch more spread. Chilling the dough thoroughly will compensate. In my own kitchen, I always use unsalted so I can control the salt level precisely, but I’ve made these with salted butter in a pinch and nobody could tell the difference.
How long should I chill the dough before making the thumbprint indentations?
Ideally, chill the rolled balls on the baking sheet for 10 to 15 minutes before you press the wells. This firms the butter just enough to create a clean, deep indentation without the dough sticking to your thumb or spoon. If you chill the entire bowl of dough before rolling, it may become too hard to scoop, so I recommend portioning first. In warmer kitchens, you might need the full 15 minutes. The dough should feel cool and slightly firm but still pliable—if it’s rock hard, let it sit at room temperature for 2–3 minutes before pressing.
How do I keep the raspberry jam from bubbling over or burning in the oven?
There are three keys: the depth of your indentation, the amount of jam, and its temperature. Make a well that’s deep and wide enough to hold a generous 1/2 teaspoon of jam—a shallow imprint will cause the jam to overflow as the cookie puffs. Use exactly 1/2 teaspoon, no more; a piping bag helps you be precise. Also, let your jam come to room temperature and stir it well to break up any air pockets before filling. Some bubbling is normal, but if it looks excessive, your oven might be too hot; check with an oven thermometer. Baking at 350°F usually keeps the jam glossy and set, not scorched.
Can I use a different jam besides raspberry in this thumbprint biscuit recipe?
Yes, and I encourage it! Apricot, strawberry, blackberry, and fig preserves all work wonderfully. Just choose a thick, high-fruit jam (not a syrupy spread) so it stays put during baking. If using homemade jam that’s a bit runnier, stir in 1/2 teaspoon of cornstarch to help it set. My personal favorite twist is orange marmalade with a tiny sprinkle of dark chocolate chips in the center—very sophisticated. The recipe is forgiving, so experiment based on what’s in your pantry or what’s in season at the farmers market.
Why are my thumbprint cookies dry and crumbly instead of buttery?
Dry thumbprint biscuits usually mean too much flour or overbaking. Spoon your flour into the measuring cup and level it with a knife rather than scooping directly, which packs in too much. Even better, use a kitchen scale—240g is perfect for 2 cups. Overmixing the dough after adding flour develops gluten and creates a tough texture, so mix just until combined. Finally, watch your baking time carefully; the biscuits should still look slightly soft in the center when you pull them out. They’ll finish setting on the hot baking sheet. If they’re already overbaked, try reducing the time by a minute or two next batch.
Can I freeze the unbaked dough for later?
Definitely. Prepare the dough up to the point of rolling into balls (without the indentation), then place the balls on a parchment-lined tray and freeze until solid. Transfer to a zip-top freezer bag, squeezing out air, and store for up to 1 month. When ready to bake, arrange the frozen balls on baking sheets, let them thaw at room temperature for about 20 minutes, then press indentations, fill with jam, and bake as directed—you may need 1-2 extra minutes in the oven. It’s a lifesaver for holiday baking marathons.
Why do my thumbprint cookies crack when I press the indentation?
Some cracking is normal, especially if the dough is too firm or if you press too hard. To minimize cracks, make sure your dough balls are smoothly rolled with no creases, and press gently but firmly with a rounded tool—the back of a 1/2 teaspoon measure works beautifully because it creates a rounded well without sharp edges. If a few small cracks appear around the rim, simply pinch them back together with your fingers. The dough is very forgiving. Chilling too long can also cause excessive cracking, so if the balls are rock hard, let them sit for a couple of minutes.
Can I make these thumbprint biscuits ahead and gift them?
Yes! These are a dream for gifting. Bake and cool completely, then carefully pack them in a shallow box or tin with wax paper between layers so the jam doesn’t stick to the cookie above. They stay fresh at room temperature for up to 5 days. For longer storage, freeze the baked biscuits. I love to include a little handwritten note with the recipe and a suggestion to dust them with powdered sugar just before serving. Add a ribbon and a sprig of dried lavender for a charming touch that always delights my friends and neighbors.
Is it necessary to use seedless raspberry jam?
It’s not necessary, but I highly recommend it for the silkiest texture. Seeds can distract from the buttery melt, and they sometimes get a bit tough after baking. If you only have seeded jam, you can warm it slightly and press it through a fine-mesh strainer to remove the seeds—it takes two minutes and elevates the whole cookie. Many jarred “preserves” are already seedless, so check the label. That said, if you enjoy a little crunch, by all means use what you have. The flavor will still be fantastic.
Share Your Version!
I can’t wait to see your golden buttery raspberry jam thumbprint biscuits! Did you stick with raspberry, or did you get creative with apricot or a swirl of two jams? Maybe you added a dash of Moroccan orange blossom water? Whatever your twist, please take a photo and tag me on Instagram or Pinterest @cookingwithlalyta—I love to repost your beautiful creations and share the baking joy.
If you try this recipe, I’d be so grateful if you’d leave a star rating and a comment below. Tell me what you thought, ask any question, or share how you served them. Your feedback helps other home bakers discover these little gems and trust the process. Don’t be shy—this NYC kitchen always has room for your voice.
From my NYC kitchen to yours — I hope this recipe brings as much warmth to your table as it does to mine. — Lalybeth 🧡
Love This Recipe? Save It to Pinterest!
If you enjoyed this Golden Buttery Raspberry Jam Thumbprint Biscuits recipe, don’t let it get lost in your browser tabs! 😄 Pin it now so you can find it again anytime — and explore hundreds more tried-and-tested recipes waiting for you on my Pinterest boards.
👉 Follow Lalybeth on Pinterest @cookingwithlalyta
📌 Pin this recipe · 🔁 Re-pin your favorites · 💬 Tag me when you make it — I love seeing your creations!
Did you bake these thumbprint biscuits? I’d love to hear how they turned out!
Leave a comment below ★★★★★, ask a question, or tag @cookingwithlalyta on Instagram. Every baker’s kitchen has a story, and I can’t wait to read yours.

Golden Buttery Raspberry Jam Thumbprint Biscuits
- Total Time: 27-29 minutes
- Yield: 24 biscuits 1x
Description
These golden buttery biscuits filled with raspberry jam are perfect for tea time or any festive occasion. The shortbread-like dough melts in your mouth, and the sweet-tart raspberry jam adds a bright pop of flavor.
Ingredients
- 1 cup unsalted butter, softened
- 1/2 cup granulated sugar
- 2 large egg yolks
- 1 teaspoon vanilla extract
- 2 cups all-purpose flour
- 1/4 teaspoon salt
- 1/2 cup raspberry jam (seedless preferred)
- 1/4 cup powdered sugar for dusting (optional)
Instructions
- Preheat oven to 350°F (175°C). Line two baking sheets with parchment paper.
- In a large bowl, cream together the softened butter and granulated sugar until light and fluffy, about 2-3 minutes.
- Add the egg yolks and vanilla extract; beat until well combined.
- In a separate bowl, whisk together the flour and salt. Gradually add the dry mixture to the wet mixture, mixing on low speed just until a soft dough forms. Do not overmix.
- Roll the dough into 1-inch balls and place them 2 inches apart on the prepared baking sheets.
- Using your thumb or the back of a round measuring spoon, make an indentation in the center of each ball.
- Fill each indentation with about 1/2 teaspoon of raspberry jam.
- Bake for 12-14 minutes, or until the edges are lightly golden. Let cool on the baking sheets for 5 minutes, then transfer to a wire rack to cool completely.
- If desired, dust with powdered sugar before serving.
Notes
For a twist, try using apricot or strawberry jam instead of raspberry. Ensure the butter is properly softened for the best texture. The biscuits can be stored in an airtight container at room temperature for up to 5 days.
- Prep Time: 15 minutes
- Cook Time: 12-14 minutes
- Method: Dessert
- Cuisine: American
Nutrition
- Calories: 120
- Sugar: 8g
- Fat: 6g
- Carbohydrates: 15g
- Protein: 2g
Tried This Recipe? Leave a Comment!
Did you make this recipe? I’d love to hear how it turned out! Please leave a comment and a rating below. Your feedback helps other home cooks and supports cookingwithlalyta.com!
For more delicious inspiration, follow me on Pinterest!