Table of Contents
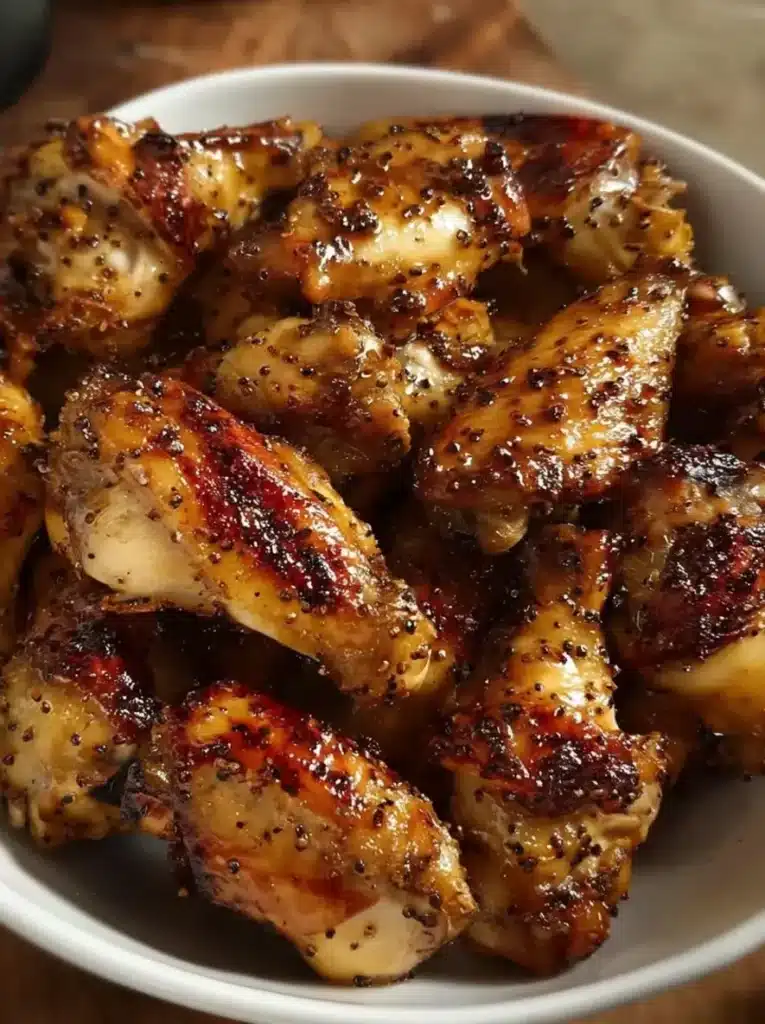
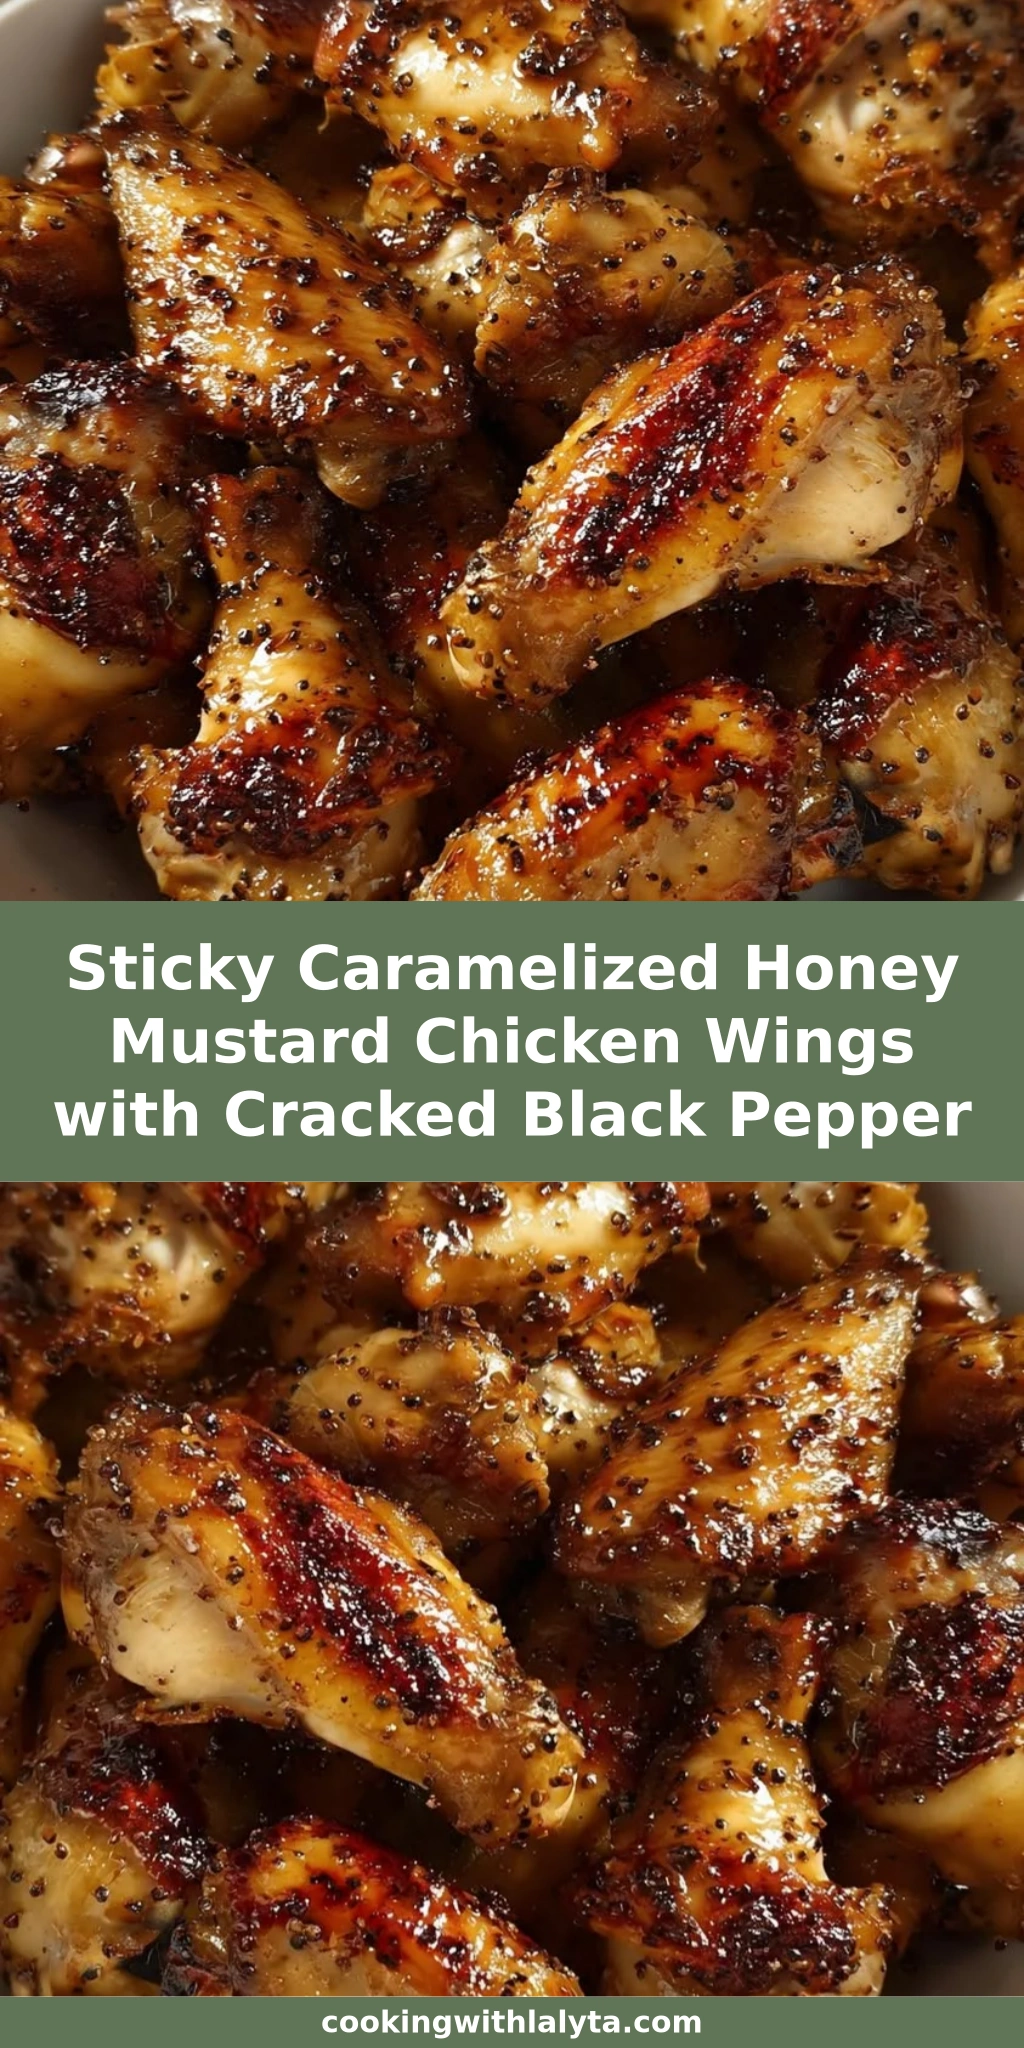
Sticky Caramelized Honey Mustard Chicken Wings with Cracked Black Pepper – The Double-Baste Method for Ultimate Stickiness
I still remember the first time I tasted truly sticky honey mustard chicken wings — it wasn’t in a sports bar or at a Super Bowl party, but in a tiny bistro tucked behind the Marché d’Aligre in Paris during my culinary school years. The chef there had this almost obsessive technique: he’d baste the wings not once, but twice with a glossy honey mustard glaze, letting each layer set and caramelize under the fierce heat of a professional oven. The result was this impossibly lacquered, deeply golden wing with a crackling pepper-flecked crust that shattered gently when you bit into it. For years, I chased that memory, experimenting in my tiny Paris apartment kitchen and later in my NYC test kitchen, until I finally landed on this oven baked method that delivers that same bistro-level stickiness — no deep fryer, no professional equipment, just smart technique and a little patience. These sticky chicken wings have become my go-to for everything from game day gatherings to impromptu dinner parties in my Brooklyn neighborhood.
Picture this: a tray emerges from the oven, and the aroma hits you first — toasted honey mingling with sharp Dijon mustard, the smoky warmth of paprika, and the unmistakable bite of freshly cracked black pepper. The wings themselves glisten under the kitchen lights, each one coated in a deep amber caramelized honey mustard glaze that practically glues itself to the skin in the most irresistible way. When you lift one, thin strands of sticky sauce stretch between your fingers, and the first bite is a symphony — the initial crackle of the caramelized exterior gives way to juicy, tender meat infused with sweet-tangy flavor, punctuated by tiny explosions of cracked black pepper that wake up your palate. The whole grain mustard seeds add these delightful little pops of texture and bursts of sharpness that cut through the honey’s richness beautifully. I’ve served these at countless gatherings, and without fail, the platter is empty within minutes — usually accompanied by people shamelessly licking their fingers and asking for the recipe.
What makes my caramelized chicken wings different from the dozens of recipes you’ll find online boils down to two things: the double-baste method I learned during my Paris training, and an unexpected ingredient — a touch of apple cider vinegar that brightens the entire honey mustard glaze without making it taste sour. Most recipes have you toss the wings in sauce once and bake them until done, which is fine but yields a one-dimensional stickiness. My approach — coating the wings before baking, then brushing them again with reserved fresh glaze halfway through — builds layers of flavor and creates that coveted lacquered finish. The cracked black pepper isn’t an afterthought either; I add it at two stages so it infuses the sauce while baking and then gets a final fresh sprinkle at the end for that aromatic pop. Before we dive in, here’s my biggest piece of advice: don’t rush the caramelization. Those last 15 to 20 minutes are where the magic happens, and pulling the wings out early means missing out on that deep, sticky, almost candy-like glaze that makes these wings unforgettable.
Why This Honey Mustard Chicken Wings Recipe Is the Best
The flavor secret behind these wings lies in the balance between sweet, tangy, and savory — something I learned to calibrate precisely during my years in French kitchens. Honey brings a floral sweetness that caramelizes beautifully under high heat, but on its own it can feel cloying and one-note. That’s where Dijon mustard enters — not the bright yellow ballpark mustard, but a proper Dijon with its sharp, vinous heat that cuts through the honey and creates a far more sophisticated glaze. I also incorporate whole grain mustard for texture and those little pops of acidity, plus a measured pour of soy sauce for an umami backbone that makes the flavor feel deeper and more complete. The apple cider vinegar is my little French-trained trick: just a tablespoon brightens every other ingredient without announcing itself, the way a squeeze of lemon transforms a pan sauce. And then there’s the cracked black pepper, which I grind coarsely so it stays present as distinct, aromatic flecks rather than disappearing into the background heat.
Texture-wise, these oven baked chicken wings achieve what most people think requires a deep fryer: crispy, rendered skin that holds its crunch even under a generous coating of sticky glaze. The secret is the wire rack set over a baking sheet — it elevates the wings so hot air circulates all around them, crisping the skin on every surface instead of leaving the underside soggy in its own rendered fat. This is the same principle chefs use when roasting whole birds or prime rib, and it works wonders for wings. Patting the wings thoroughly dry with paper towels before coating them is another non-negotiable step; excess moisture is the enemy of crispiness because it creates steam in the oven. I learned this the hard way during a humid NYC summer when I skipped the drying step and ended up with perfectly tasty but disappointingly soft-skinned wings. Now I take the extra two minutes every time, and the difference is night and day.
Despite its restaurant-quality results, this recipe is genuinely foolproof and fast enough for a weeknight. The active prep takes about 15 minutes — most of which is simply measuring and whisking — and then the oven does the heavy lifting while you set the table, make a side salad, or just relax with a glass of wine. There’s no finicky deep-frying thermometer to monitor, no messy oil splatters to clean up, and no hovering over a hot stove. The double-baste timing is forgiving: if you miss the 25-minute mark by a few minutes, it won’t ruin anything. And because the sauce is made from pantry staples I almost always have on hand — honey, mustard, soy sauce, garlic — these sticky chicken wings are my emergency entertaining recipe when friends text that they’re dropping by in an hour. Even if you’ve never made wings from scratch before, the visual cues I’ve included in each step will guide you to success.
Honey Mustard Chicken Wings Ingredients
When I shop for these ingredients in NYC, I love swinging by the Union Square Greenmarket on a Saturday morning for locally produced honey — the wildflower varieties from upstate New York have this incredible depth that mass-market clover honey just can’t match. For the mustards, I head to my neighborhood specialty store where I can grab a good imported Dijon and a rustic whole grain mustard with visible seeds. The chicken wings I usually source from my local butcher; they’re typically fresher and meatier than the bagged ones at the supermarket, and the butcher will often separate the drumettes and flats for me if I ask nicely — a small kindness that saves me five minutes of knife work at home. Everything else — soy sauce, apple cider vinegar, garlic, spices — lives in my pantry year-round, which is exactly why this recipe has become such a reliable staple in my rotation.
Ingredients List
- 2 lbs chicken wings (drumettes and flats separated)
- 1/2 cup honey
- 1/4 cup Dijon mustard
- 2 tablespoons whole grain mustard
- 2 tablespoons soy sauce
- 1 tablespoon olive oil
- 1 tablespoon apple cider vinegar
- 2 cloves garlic, minced
- 1 teaspoon smoked paprika
- 1 teaspoon cracked black pepper
- 1/2 teaspoon salt
- 1/4 teaspoon cayenne pepper (optional)
Ingredient Spotlight
Honey: The backbone of our glaze and the primary caramelizing agent. In a US grocery store, look for pure honey — not “honey sauce” or blends with corn syrup. Clover honey works beautifully and is widely available, but if you can find orange blossom or wildflower honey, the subtle floral notes add wonderful complexity. Honey’s high fructose content means it caramelizes at a lower temperature than sugar alone, which is why it creates that gorgeous lacquered finish before the chicken overcooks. If you’re out of honey, pure maple syrup is your best substitute — it will caramelize similarly but will add a distinct maple flavor that shifts the profile slightly toward a more autumnal, woodsy direction. The texture will remain sticky and glossy. Agave nectar works in a pinch but won’t caramelize quite as deeply.
Dijon Mustard: This is non-negotiable for authentic honey mustard chicken wings. Dijon brings a sharp, wine-based acidity and a smooth, emulsified texture that blends seamlessly into the glaze. In US stores, brands like Maille or Grey Poupon are reliable and widely available. The key difference between Dijon and yellow mustard is complexity — Dijon has layers of heat and tang that yellow mustard’s simpler turmeric-forward profile can’t replicate. If you must substitute, use a stone-ground spicy brown mustard; the texture will be slightly grainier but the flavor will be closer to Dijon than yellow mustard would be. Yellow mustard will make the glaze sweeter and less nuanced, with a brighter color and a more one-dimensional tang.
Soy Sauce: The umami workhorse that deepens the entire honey mustard glaze without making it taste Asian-influenced. I use regular Kikkoman soy sauce — the red-labeled bottle that’s in practically every American supermarket. It adds salt, depth, and a subtle fermented complexity that makes the sweetness of the honey feel more rounded. For a gluten-free version, tamari is an excellent one-to-one substitute with nearly identical flavor. Coconut aminos will work for a soy-free option, but expect a slightly sweeter, less salty result — you may want to increase the salt by a pinch and reduce the honey by a teaspoon to compensate.
Cracked Black Pepper: Not pre-ground pepper from a tin — I’m talking about whole black peppercorns that you crush coarsely yourself, either in a mortar and pestle or by pressing them with the flat side of a chef’s knife. This creates irregular, chunky flecks that embed themselves in the sticky glaze and deliver bursts of aromatic heat with every bite. Tellicherry peppercorns are my favorite for their complex, almost fruity heat, but any whole black peppercorns will work. The coarseness matters because finely ground pepper disperses too evenly and loses its personality in the sauce. Pre-ground pepper is a last resort — use a generous 3/4 teaspoon and expect a less dynamic pepper presence.
| Original Ingredient | Best Substitution | Flavor / Texture Impact |
|---|---|---|
| Honey | Pure maple syrup | Slightly less sticky; adds woodsy, autumnal flavor |
| Dijon mustard | Spicy brown mustard | Grainier texture; slightly less sharp, more earthy heat |
| Soy sauce | Tamari (gluten-free) or coconut aminos | Tamari: nearly identical. Coconut aminos: sweeter, less salty |
| Chicken wings | Chicken drumsticks or bone-in thighs | Longer cook time needed; equally sticky, meatier result |
How to Make Sticky Caramelized Honey Mustard Chicken Wings — Step-by-Step
I promise you, if you follow these steps — especially the drying step and the double-baste — you’ll pull a tray of wings out of your oven that look and taste like they came from a restaurant kitchen. Take your time, trust the visual cues, and let the caramelization happen.
Step 1: Preheat and Prepare Your Baking Setup
Preheat your oven to 400°F (200°C) — this temperature is the sweet spot for rendering fat from the skin while caramelizing the honey mustard glaze without scorching it. While the oven heats, line a rimmed baking sheet with parchment paper or aluminum foil for easy cleanup, then place a wire rack on top. The wire rack is essential here: it elevates the wings so hot air can circulate all around them, crisping the undersides instead of letting them steam in their own juices. If you don’t have a wire rack, you can place the wings directly on the parchment, but you’ll need to flip them halfway through and the bottoms won’t get quite as crispy. While you wait for the oven, pat the chicken wings thoroughly dry with paper towels — I cannot stress this enough. Any surface moisture will create steam and prevent the skin from crisping up properly.
💡 Lalybeth’s Pro Tip: If you have the time, place the patted-dry wings on the wire rack and let them air-dry in the refrigerator, uncovered, for 30 to 60 minutes before baking. This extra step dehydrates the skin even further and yields noticeably crispier results — it’s a trick I picked up from a roast chicken technique we used in culinary school in Paris, and it works wonders on wings too.
Step 2: Make the Honey Mustard Glaze
In a small bowl, whisk together the honey, Dijon mustard, whole grain mustard, soy sauce, olive oil, apple cider vinegar, minced garlic, smoked paprika, cracked black pepper, salt, and cayenne pepper if you’re using it. Whisk vigorously until the mixture is completely smooth and emulsified — you shouldn’t see any streaks of oil separating from the honey. The glaze should be thick enough to coat the back of a spoon but still pourable. Now, here’s the key move: measure out about 1/4 cup of this glaze and set it aside in a separate small bowl. This reserved portion will be your basting sauce later — because it hasn’t touched raw chicken, it’s completely safe to use for brushing, and it’ll give your wings that second layer of fresh, bright flavor that makes the double-baste method so effective. The remaining sauce goes into a large mixing bowl for coating the raw wings.
⚠️ Common Mistake to Avoid: Don’t skip the step of reserving sauce before it touches the chicken. If you baste with sauce that’s been in contact with raw poultry, you’ll need to cook the wings long enough to pasteurize that second layer, which can lead to overcooking. Reserving a clean portion upfront solves this problem elegantly and ensures food safety without compromising texture.
Step 3: Coat the Wings
Place the dried chicken wings into the large bowl with the remaining glaze. Using your hands or tongs, toss the wings thoroughly until every piece is evenly coated — get into all the nooks and crannies of the drumettes and flats. The glaze should cling to the skin in a thin, even layer. Don’t let the wings sit in the glaze for too long before baking; the salt in the soy sauce will start drawing moisture out of the skin, and you want that moisture to evaporate in the oven, not pool in the bottom of the bowl. Once coated, transfer the wings immediately to the prepared wire rack, arranging them in a single layer with a little space between each piece — crowded wings steam instead of roast, and you’ll lose that precious crispiness.
💡 Lalybeth’s Pro Tip: Use one hand for tossing the wings in the glaze (your “wet hand”) and keep the other hand clean for handling utensils, the oven door, and your pepper grinder. This simple mise en place habit — drilled into me during my Paris training — keeps your kitchen from turning into a sticky mess and makes the whole process feel more effortless.
Step 4: Arrange and Initial Bake
Slide the baking sheet into the preheated 400°F oven and set a timer for 25 minutes. During this first phase, the heat is doing several things simultaneously: rendering the fat from beneath the skin, beginning to set the glaze, and cooking the meat through. You’ll notice the kitchen starting to fill with the aroma of toasting honey and garlic around the 15-minute mark — that’s a good sign. At 25 minutes, the wings will have taken on some color but won’t yet be deeply caramelized. The skin should look set and slightly golden, and the fat should be visibly sizzling on the rack below. This is your cue that it’s time for the crucial second baste.
Step 5: Baste and Caramelize
Remove the baking sheet from the oven and, using a silicone brush or a spoon, generously brush each wing with the reserved 1/4 cup of fresh glaze. Get every surface — tops, sides, and even the bottoms if you can reach them. This second layer of sauce is what creates that deep, lacquered, multi-dimensional stickiness. Return the wings to the oven and bake for another 15 to 20 minutes. Watch for the transformation: the glaze will deepen from golden to a rich amber, and the edges will start to darken and bubble. The wings are done when the internal temperature at the thickest part (away from the bone) reaches 165°F and the glaze looks glossy, sticky, and deeply caramelized. If you’re using an instant-read thermometer, test a drumette and a flat to be sure.
💡 Lalybeth’s Pro Tip: Position your oven rack in the middle (not the top) during the main baking phase. If the rack is too high, the honey in the glaze can scorch before the chicken cooks through. If you want extra color at the end, that’s what the broil step is for — but keep the main bake in the middle for even, controlled caramelization.
Step 6: Optional Broil for Extra Stickiness
If you’re after that next-level sticky, almost candy-like exterior, switch your oven to broil on high for the final 2 to 3 minutes. This step is optional but highly recommended — the intense top-down heat rapidly bubbles and thickens the glaze, creating an even thicker, tackier coating that clings to the wings. However, this is not the moment to walk away from the kitchen. The line between beautifully blistered and tragically burnt is thin, and the sugar in the honey can go from perfect to charcoal in under a minute. Stand at the oven door, watch the wings closely, and pull them the moment you see the glaze turn a deep mahogany with a few dark spots beginning to appear at the edges. The wings will continue to darken slightly from residual heat after you pull them out, so err on the side of slightly under rather than over.
⚠️ Common Mistake to Avoid: Broiling with the wire rack still positioned in the middle of the oven. For broiling, move the rack to the upper third — about 4 to 6 inches from the broiler element. If the rack is too far away, the broil will just dry out the wings without intensifying the caramelization, and you’ll lose moisture without gaining stickiness.
Step 7: Rest and Finish
Remove the wings from the oven and let them rest on the wire rack for a full 5 minutes. I know it’s tempting to grab one immediately — the smell is incredible — but resting allows the glaze to set and thicken further as it cools slightly, becoming even stickier and more adherent. It also lets the juices redistribute inside the meat so every bite is succulent. Right before serving, give the wings a final generous sprinkle of freshly cracked black pepper. This last-minute addition provides that aromatic, nose-tingling pepper punch that makes these wings memorable. Transfer to a serving platter and watch them disappear.
💡 Lalybeth’s Pro Tip: Serve the wings on a warm platter — I run mine under hot water and dry it quickly before arranging the wings. A cold plate can cause the glaze to seize up and lose its glossy sheen, especially in an air-conditioned room. This is a small restaurant trick that makes a big visual impact when you set the platter down.
| Step | Action | Duration | Key Visual Cue |
|---|---|---|---|
| 1 | Preheat oven & prepare rack | 10 min | Oven at 400°F; rack lined and ready |
| 2 | Make glaze & reserve 1/4 cup | 5 min | Smooth, emulsified sauce; no oil streaks |
| 3 | Coat wings evenly | 2 min | Every wing glistening with thin, even glaze |
| 4 | Initial bake at 400°F | 25 min | Skin set and light golden; fat sizzling |
| 5 | Baste with reserved glaze & bake | 15-20 min | Deep amber glaze; internal temp 165°F |
| 6 | Optional broil | 2-3 min | Mahogany color; bubbling, tacky surface |
| 7 | Rest & finish with pepper | 5 min | Glaze set and glossy; pepper flecks visible |
Serving & Presentation
When I plate these sticky chicken wings for a gathering, I like to pile them high on a large wooden board or a warm ceramic platter lined with parchment paper for a rustic, family-style feel. A scatter of fresh herbs — flat-leaf parsley or chives, finely chopped — adds a pop of green that makes the deep amber glaze visually stunning. For game day, I set out small ramekins of extra honey mustard glaze on the side for dipping, plus a bowl of cool, creamy blue cheese or ranch dressing to contrast with the sticky sweetness. The combination of hot, caramelized wings and cold, tangy dip is pure magic, and it’s always the first thing to vanish from the table.
Side dishes for these caramelized honey mustard chicken wings should balance the richness. A crisp, acidic slaw — think shredded cabbage with a bright apple cider vinaigrette — cuts through the sticky glaze beautifully. Celery sticks and carrot batons are classic for a reason; their cool crunch provides a refreshing contrast. For a more substantial spread, I often serve these wings alongside roasted sweet potato wedges dusted with smoked paprika, or a simple green salad with a lemon vinaigrette. The Moroccan side of my heritage sometimes sneaks in too: a bowl of fluffy couscous with toasted almonds and dried apricots makes a surprisingly wonderful companion, soaking up any extra glaze that drips off the wings.
Beverage pairings matter more than you’d think with a dish this boldly flavored. A crisp, cold lager or pilsner is my go-to — the carbonation and clean bitterness refresh the palate between sticky, sweet bites. For wine lovers, an off-dry Riesling or a slightly chilled Gamay plays beautifully with the honey and mustard notes without being overwhelmed. If you’re serving these at a party, a batch of spicy ginger lemonade (spiked or not) is a crowd-pleaser that echoes the pepper’s warmth. In my NYC kitchen, I’ve also been known to pair these wings with a bold hard cider from one of the Hudson Valley orchards — the apple notes tie in with the cider vinegar in the glaze in the most satisfying way.
| Pairing Type | Suggestions | Why It Works |
|---|---|---|
| Side Dish | Apple cider slaw, roasted sweet potato wedges, simple green salad | Acidity and crunch balance the sticky richness |
| Sauce / Dip | Blue cheese dressing, ranch, extra honey mustard glaze | Cool, creamy contrast to hot, sticky wings |
| Beverage | Crisp lager, off-dry Riesling, hard cider, ginger lemonade | Bubbles and acidity cut through the glaze’s sweetness |
| Garnish | Chopped parsley, chives, extra cracked pepper, sesame seeds | Fresh color and aromatic lift against the dark glaze |
Make-Ahead, Storage & Reheating
In my busy NYC life, I’m always looking for ways to get ahead on entertaining prep, and these sticky chicken wings are surprisingly meal-prep friendly. The glaze can be whisked together up to three days in advance and stored in an airtight container in the refrigerator — just give it a good stir before using, as the honey may settle. You can also pat the wings dry, separate the drumettes from the flats, and store them on a paper towel-lined tray in the fridge overnight. When it’s time to cook, everything comes together in about 15 minutes of active work. For fully cooked wings, I’ve found they reheat beautifully, retaining much of their stickiness and crispness, especially if you have an air fryer.
| Method | Container | Duration | Reheating Tip |
|---|---|---|---|
| Refrigerator | Airtight glass container | Up to 4 days | Reheat in air fryer at 375°F for 4-5 min or oven at 350°F for 8-10 min |
| Freezer | Freezer-safe zip-top bag with air removed | Up to 3 months | Thaw overnight in fridge; reheat in oven at 375°F for 12-15 min |
| Make-Ahead | Glaze: glass jar. Wings: on wire rack in fridge | Glaze: 3 days ahead. Wings: pat dry 1 day ahead | Assemble and bake day-of for best texture |
My absolute favorite way to reheat leftover sticky wings is in the air fryer — it revives the crispy skin and re-melts the glaze in about 4 to 5 minutes at 375°F, which is faster and more effective than a microwave (which makes them soggy) or a conventional oven (which takes longer). If you don’t have an air fryer, a toaster oven on the “bake” setting works nearly as well. Spread the wings in a single layer, not touching, so the hot air can circulate. For wings that have lost a bit of their sticky luster in the fridge, I sometimes brush them very lightly with a little fresh honey mustard glaze before reheating — it’s like giving them a quick refresh coat that melts and caramelizes as they warm up.
One thing to note: the glaze will soften slightly in the refrigerator as the honey absorbs moisture, so don’t be alarmed if your cold wings don’t feel as sticky as they did fresh out of the oven. The stickiness returns as soon as they’re reheated and the moisture evaporates. I’ve even served these wings at room temperature at picnics and outdoor gatherings — they’re not quite as crisp but still incredibly flavorful, and nobody has ever complained about a room-temperature sticky wing in the grass at Central Park on a summer afternoon.
Variations & Easy Swaps
| Variation | Key Change | Best For | Difficulty Impact |
|---|---|---|---|
| Spicy Moroccan Harissa Wings | Replace cayenne with 2 tbsp harissa paste; add 1 tsp cumin | Heat lovers; North African-inspired gatherings | Same — easy swap |
| Gluten-Free & Soy-Free Wings | Use tamari instead of soy sauce; verify Dijon is GF | Gluten-sensitive guests; celiac-friendly menus | Same — simple substitution |
| Maple Bourbon Fall Wings | Replace honey with maple syrup; add 1 tbsp bourbon to glaze | Autumn gatherings; Thanksgiving appetizer | Same — alcohol cooks off during baking |
Spicy Moroccan Harissa Wings
This variation is a love letter to the flavors I grew up with in my mother’s kitchen in Casablanca. Replace the cayenne pepper with 2 tablespoons of good-quality harissa paste — the kind that comes in a tube or jar, with visible flecks of chili and a smoky, garlicky depth. Add a teaspoon of ground cumin to the glaze as well; it brings an earthy warmth that pairs beautifully with the honey and mustard. The harissa adds not just heat but a complex, roasted pepper flavor that transforms these wings into something entirely different while keeping the same sticky, caramelized exterior. I’ve served these at dinner parties alongside a cooling cucumber-yogurt dip and warm flatbread, and they transport me right back to the vibrant street food stalls of Marrakech — but with that New York edge I love.
Gluten-Free & Soy-Free Wings
Making these sticky chicken wings gluten-free is surprisingly simple and doesn’t sacrifice any of the flavor or texture. Swap the soy sauce for tamari — a Japanese-style fermented soy sauce that’s typically brewed without wheat and is widely available in the international aisle of most US grocery stores. Most brands of Dijon mustard are naturally gluten-free, but it’s worth checking the label if you’re cooking for someone with celiac disease. The rest of the ingredients are naturally gluten-free, so you’re essentially making a one-bottle swap. The finished wings taste virtually identical to the original, with the same deep umami and perfectly sticky glaze. For a soy-free version (whether due to allergy or preference), coconut aminos work reasonably well, though they’re sweeter and less salty than soy sauce — reduce the honey by 1 tablespoon and add an extra pinch of salt to compensate.
Maple Bourbon Fall Wings
When the leaves start turning in Central Park and there’s a chill in the air, I switch my honey for pure grade A dark maple syrup and add a splash of bourbon to the glaze. The maple caramelizes even more dramatically than honey, producing an almost glass-like candy shell on the wings, while the bourbon adds a warm, vanilla-oak undertone that feels tailor-made for football Sundays and Thanksgiving appetizer spreads. Use 1/2 cup maple syrup in place of the honey and whisk in 1 tablespoon of bourbon along with the other glaze ingredients. The alcohol mostly cooks off during baking, leaving behind just the aromatic essence. A final sprinkle of flaky sea salt instead of extra black pepper takes these in a sweet-savory direction that pairs incredibly well with a crackling fireplace and a cozy sweater.
Share Your Version!
I truly believe recipes are meant to be shared, adapted, and made your own — that’s how food traditions stay alive and evolve. If you make these sticky caramelized honey mustard chicken wings, I would absolutely love to hear how they turned out for you. Did you try the harissa variation? Did you nail that perfect broiled finish? Did your guests lick the platter clean? Drop a star rating and a comment below — I read every single one and often respond with tips or just to share in your kitchen victory. Your feedback helps other home cooks too, and it lets me know what recipes you want to see more of.
And if you’re proud of your creation — and you should be! — snap a photo and share it on Instagram or Pinterest. Tag me @cookingwithlalyta so I can see your beautiful wings and share them with our growing community of passionate home cooks. There’s nothing that makes my day quite like scrolling through my feed and seeing someone’s version of a recipe I developed in my little NYC kitchen, especially when they’ve added their own creative twist. One question I’d love to hear your answer to: what’s your favorite dipping sauce to serve alongside these wings — classic ranch, bold blue cheese, or something totally unexpected? I’m always looking for new pairing ideas to try.
From my NYC kitchen to yours — I hope this recipe brings as much warmth to your table as it does to mine. — Lalybeth 🧡
How do you get the honey mustard glaze to caramelize on chicken wings without burning?
The key to perfectly caramelized honey mustard chicken wings without any scorching is a combination of temperature control and technique. Bake your wings at 400°F on a middle oven rack — this is hot enough to render fat and caramelize the honey’s natural sugars, but not so hot that the exterior burns before the interior cooks through. The double-baste method I use is also critical: baking the wings first with an initial coating, then brushing on fresh reserved glaze for the final 15 to 20 minutes, ensures the surface sugars don’t spend too long under direct heat. If you want extra stickiness, broil for only 2 to 3 minutes at the very end and watch constantly — honey can go from perfectly lacquered to charred in under 60 seconds. Positioning your oven rack correctly (middle for baking, upper third for broiling) and never walking away during the broil step are the two habits that will guarantee beautifully caramelized results every time.
Can I use Dijon mustard instead of yellow mustard for sticky honey mustard chicken wings?
Absolutely — and in fact, I strongly recommend Dijon mustard over yellow mustard for sticky honey mustard chicken wings. Dijon brings a sophisticated, wine-based sharpness and a smooth, emulsified texture that creates a far more complex and balanced glaze than the simpler, turmeric-heavy flavor of yellow mustard. Yellow mustard tends to be sweeter and more one-dimensional, which can make the final glaze taste a bit flat and overly sugary. Dijon’s assertive heat and acidity cut through the honey’s sweetness and create layers of flavor that develop beautifully during caramelization in the oven. Most US grocery stores carry reliable Dijon brands like Maille or Grey Poupon in the condiment aisle. If you don’t have Dijon, a stone-ground spicy brown mustard is a better substitute than yellow mustard, as it offers more depth and a similar sharpness, though the texture will be slightly grainier.
What temperature should I bake honey mustard chicken wings to make them crispy and sticky?
For crispy and sticky oven baked chicken wings, 400°F (200°C) is the ideal baking temperature. This temperature is hot enough to render the fat from beneath the chicken skin efficiently — which is essential for crispiness — while also being the sweet spot for caramelizing the sugars in the honey mustard glaze without scorching them. Baking at a lower temperature, like 350°F, will cook the wings through but won’t crisp the skin adequately or create that desirable lacquered finish. Higher temperatures above 425°F risk burning the honey before the meat is fully cooked. I also recommend using a wire rack set over your baking sheet so hot air circulates completely around each wing, crisping every surface. The combination of 400°F heat, a wire rack, and thoroughly dried wings is what delivers that restaurant-quality crispy-yet-sticky texture that makes these wings so irresistible.
What side dishes go best with caramelized honey mustard chicken wings?
Caramelized honey mustard chicken wings pair beautifully with sides that provide contrast — specifically crunch, acidity, and freshness to balance the rich, sticky glaze. A tangy apple cider vinegar coleslaw is my top recommendation; the crisp shredded cabbage and bright dressing cut through the sweetness perfectly. Classic celery and carrot sticks with blue cheese or ranch dressing are always a hit and require zero cooking. For something more substantial, roasted sweet potato wedges seasoned with smoked paprika echo the glaze’s warmth while adding a different texture, or a simple green salad with a sharp lemon vinaigrette refreshes the palate between bites. From a beverage perspective, a crisp lager, off-dry Riesling, or sparkling hard cider all complement the sweet-tangy flavor profile without overwhelming it. These pairings work for everything from casual game day spreads to more elevated dinner party appetizer courses.
How do you keep honey mustard chicken wings crispy after baking?
Keeping honey mustard chicken wings crispy after baking comes down to three critical steps: proper drying before coating, baking on a wire rack, and serving promptly. Always pat your wings completely dry with paper towels before tossing them in the glaze — excess surface moisture creates steam in the oven, which softens the skin. The wire rack elevates the wings so rendered fat drips away rather than pooling around them, which would make the bottoms soggy. Once baked, serve the wings within 15 to 20 minutes for maximum crispiness; the glaze will stay sticky but the skin gradually softens as it sits, especially in a humid environment. If you need to hold them for a party, keep them on the wire rack in a warm (200°F) oven with the door slightly cracked — this maintains warmth while allowing steam to escape rather than condensing on the wings. Avoid covering them with foil, which traps moisture and ruins the crispy exterior you worked so hard to achieve.
Can I make honey mustard chicken wings in an air fryer instead of the oven?
Yes, you can absolutely make these sticky honey mustard chicken wings in an air fryer, and the results are fantastic. Preheat your air fryer to 380°F, arrange the coated wings in a single layer with space between them (cook in batches if needed), and air fry for 18 to 20 minutes, shaking the basket or flipping the wings halfway through. Brush with the reserved glaze during the last 3 to 4 minutes of cooking for that double-basted effect, then bump the temperature to 400°F for a final 2 minutes to caramelize the glaze. The air fryer’s intense convection heat actually accelerates the caramelization process and produces exceptionally crispy skin. One thing to watch: the honey in the glaze can drip and smoke slightly in the air fryer drawer, so you may want to place a small piece of foil or a drip tray underneath. The cooking time is shorter than the oven method, so keep a close eye on the wings during the final minutes.
Why are my baked chicken wings not sticky enough?
If your baked chicken wings aren’t achieving that desired sticky, lacquered finish, there are a few common culprits to investigate. First, you may not be using enough glaze — the sauce should generously coat each wing, and the reserved portion for basting is essential for building that second sticky layer. Second, baking at too low a temperature (below 400°F) won’t drive off enough moisture for the honey to properly caramelize and thicken into a tacky coating. Third, skipping the final broil step means missing out on the rapid surface bubbling that creates maximum stickiness. Fourth, some home cooks accidentally thin the glaze with water or extra vinegar, which prevents it from setting up properly. Finally, if your wings aren’t dry before coating, the glaze slides off during baking rather than adhering and caramelizing. Double-check these variables — especially the oven temperature and the drying step — and you should see dramatically stickier results next time.
How long do leftover honey mustard chicken wings last in the fridge?
Leftover honey mustard chicken wings will keep well in the refrigerator for up to 4 days when stored properly. Transfer the cooled wings to an airtight glass container or a zip-top bag with as much air removed as possible — glass is preferable because the acidic mustard and vinegar in the glaze can sometimes interact with plastic containers over extended periods. The glaze will soften slightly during refrigeration as the honey absorbs ambient moisture, but don’t worry — the stickiness returns when you reheat them. For the best texture revival, reheat the wings in an air fryer at 375°F for 4 to 5 minutes, or in a conventional oven at 350°F for 8 to 10 minutes on a wire rack. Avoid the microwave if you can; it heats unevenly and will make the skin soggy and chewy rather than reviving its crispy-sticky character. If you won’t eat the leftovers within 4 days, these wings freeze well for up to 3 months — just thaw overnight in the fridge before reheating.
Can I use frozen chicken wings for this honey mustard recipe?
You can use frozen chicken wings, but you must thaw them completely and dry them thoroughly before proceeding with the recipe — this is non-negotiable. Frozen wings release a significant amount of water as they thaw, and any residual moisture on the skin will create steam in the oven, preventing the glaze from adhering and the skin from crisping. I recommend thawing frozen wings overnight in the refrigerator on a paper towel-lined tray, which absorbs excess liquid as they defrost. Once thawed, pat them extremely dry with fresh paper towels — I sometimes even let them sit uncovered in the fridge for an additional 30 minutes after patting to really dehydrate the skin. If you’re in a rush, you can use the cold-water thaw method (submerge the sealed bag in cold water, changing the water every 30 minutes), but the refrigerator method yields drier skin and therefore crispier results. Never bake wings from frozen with the glaze on — the moisture released during cooking will ruin the sticky caramelized finish.
What’s the difference between Dijon mustard and whole grain mustard in this glaze recipe?
In this honey mustard glaze, Dijon mustard and whole grain mustard serve complementary but distinct roles. Dijon provides the smooth, emulsified base of the sauce — its fine texture and sharp, wine-based acidity blend seamlessly into the glaze, creating a uniform coating and a consistent tang throughout. Whole grain mustard, with its visible intact seeds, adds texture and little bursts of sharper, more vinegary flavor that punctuate the sweetness of the honey. When you bite into a wing, the whole grain seeds pop between your teeth and release small hits of acidity that keep the glaze from tasting flat or monotonous. Using both mustards together is one of the secrets to this recipe’s layered flavor — Dijon for the backbone and whole grain for the accent. If you only have Dijon, the recipe will still work beautifully, but you’ll miss those delightful textural pops. Conversely, using only whole grain would make the glaze too coarse and less cohesive for even coating.
Love This Recipe? Save It to Pinterest!
If you enjoyed this Sticky Caramelized Honey Mustard Chicken Wings with Cracked Black Pepper recipe, don’t let it get lost in your browser tabs! 😄 Pin it now so you can find it again anytime — and explore hundreds more tried-and-tested recipes waiting for you on my Pinterest boards.
👉 Follow Lalybeth on Pinterest @cookingwithlalyta
📌 Pin this recipe · 🔁 Re-pin your favorites · 💬 Tag me when you make it — I love seeing your creations!
Made This Recipe? I’d Love to Hear From You!
Drop a ⭐ star rating and a comment below to let me know how your sticky honey mustard chicken wings turned out. Did you try the broil finish? The harissa twist? Your feedback helps other home cooks and inspires my next recipe. Don’t forget to tag @cookingwithlalyta on Instagram or Pinterest — I feature my favorite reader creations every week!
📸 Share a photo · ⭐ Leave a review · 💌 Subscribe for more NYC kitchen recipes
Sticky Caramelized Honey Mustard Chicken Wings with Cracked Black Pepper
- Total Time: 1 hour
- Yield: 4 1x
Description
These sticky caramelized honey mustard chicken wings are baked to perfection, then coated in a sweet and tangy sauce with a hint of cracked black pepper. Perfect for parties or game day.
Ingredients
- 2 lbs chicken wings (drumettes and flats separated)
- 1/2 cup honey
- 1/4 cup Dijon mustard
- 2 tablespoons whole grain mustard
- 2 tablespoons soy sauce
- 1 tablespoon olive oil
- 1 tablespoon apple cider vinegar
- 2 cloves garlic, minced
- 1 teaspoon smoked paprika
- 1 teaspoon cracked black pepper
- 1/2 teaspoon salt
- 1/4 teaspoon cayenne pepper (optional)
Instructions
- Preheat oven to 400°F (200°C). Line a baking sheet with parchment paper or aluminum foil and place a wire rack on top.
- In a small bowl, whisk together honey, Dijon mustard, whole grain mustard, soy sauce, olive oil, apple cider vinegar, minced garlic, smoked paprika, cracked black pepper, salt, and cayenne pepper if using. Reserve about 1/4 cup of the sauce for basting later.
- Place the chicken wings in a large bowl. Pour the remaining sauce over the wings and toss to coat evenly.
- Arrange the wings in a single layer on the wire rack. Bake for 25 minutes.
- Remove from oven and brush the wings with the reserved sauce. Return to oven and bake for another 15-20 minutes, or until the wings are caramelized and cooked through (internal temperature reaches 165°F).
- Optional: For extra stickiness, broil on high for 2-3 minutes at the end, watching carefully to prevent burning.
- Let the wings rest for 5 minutes. Sprinkle with additional cracked black pepper if desired before serving.
Notes
For extra crispiness, pat the wings dry with paper towels before coating. The sauce can be doubled if you prefer extra glaze. Leftover wings reheat well in an air fryer.
- Prep Time: 15 minutes
- Cook Time: 45 minutes
- Method: Appetizer
- Cuisine: American
Nutrition
- Calories: 350
- Sugar: 15g
- Fat: 22g
- Carbohydrates: 20g
- Protein: 25g
Tried This Recipe? Leave a Comment!
Did you make this recipe? I’d love to hear how it turned out! Please leave a comment and a rating below. Your feedback helps other home cooks and supports cookingwithlalyta.com!
For more delicious inspiration, follow me on Pinterest!