
Table of Contents
Root Vegetable Gratin with Sweet Potatoes, Parsnips, and Beets: Creamy Herb-Infused Layers for a Showstopping Side Dish

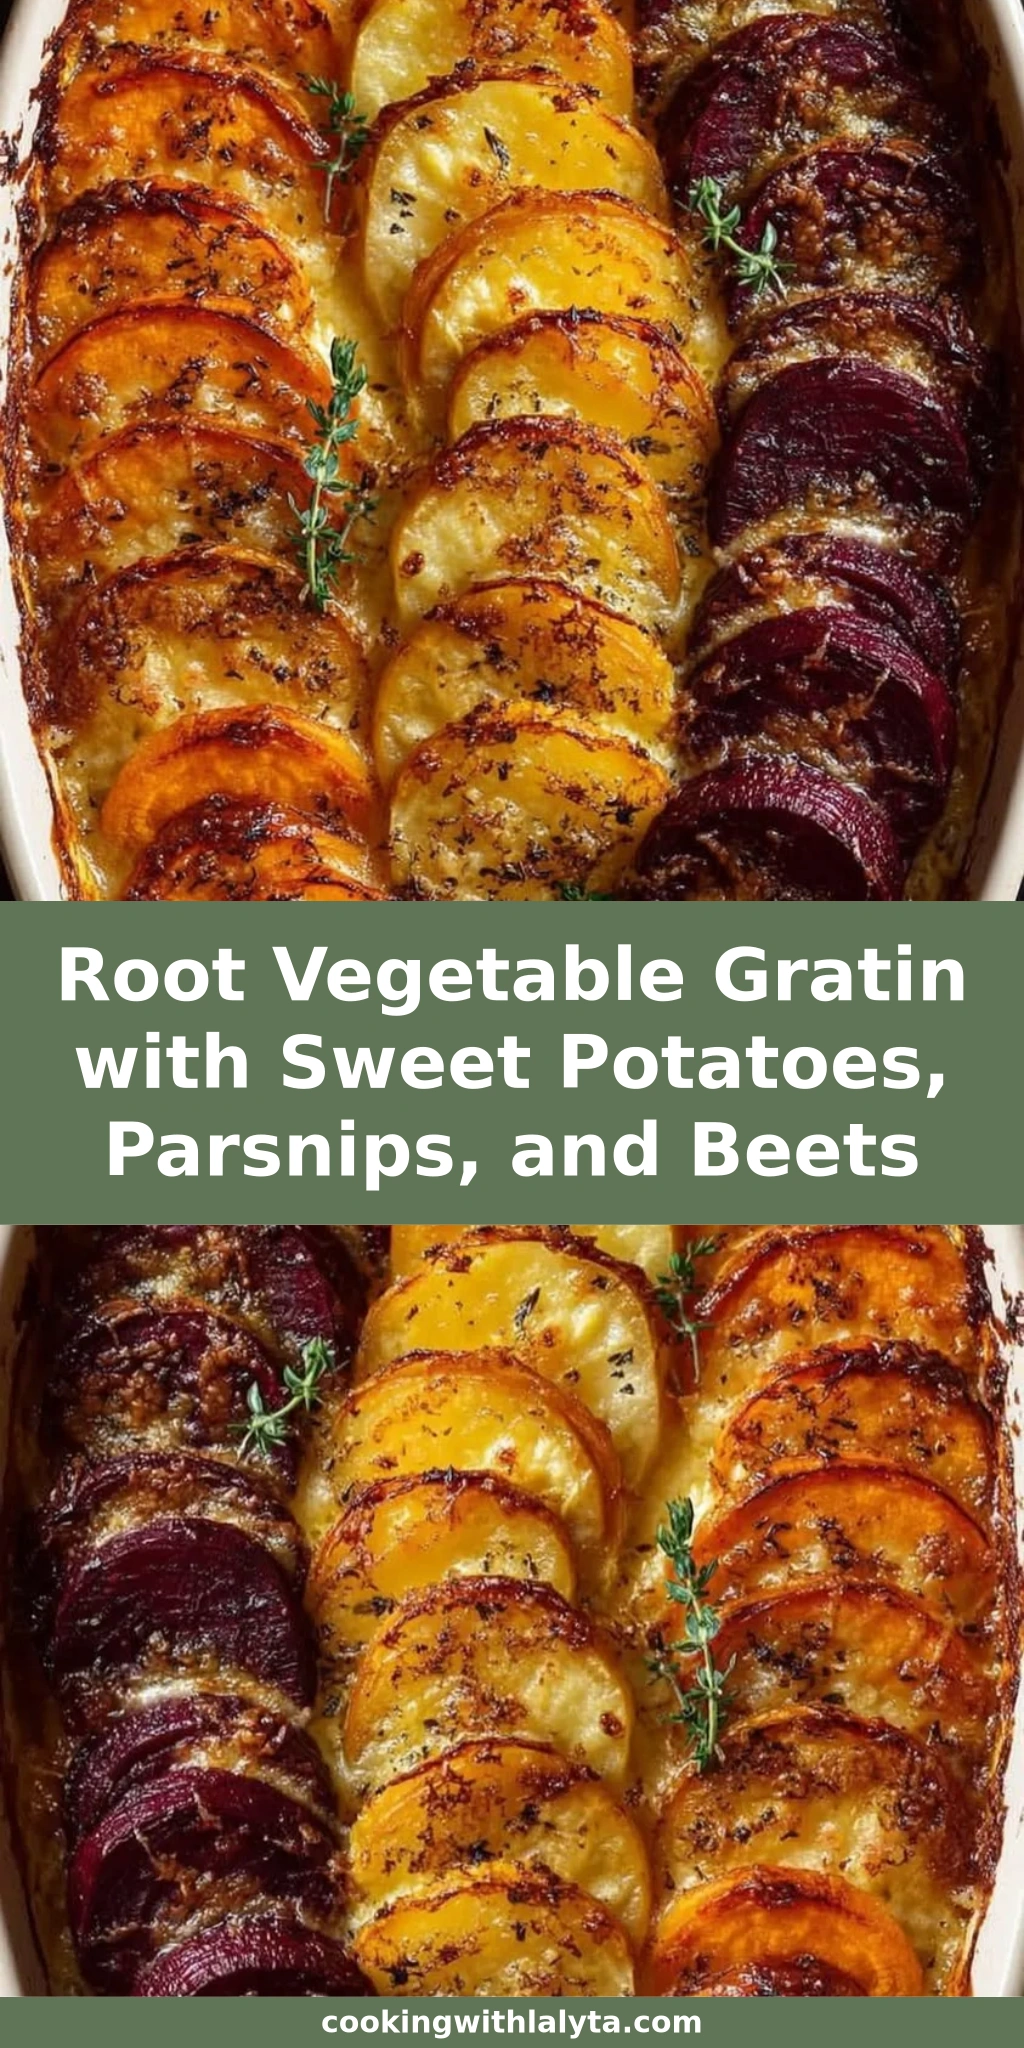
Growing up in my mother’s kitchen in Morocco, I learned early that root vegetables weren’t just pantry staples—they were the earthy soul of a meal. She would slow-cook beets and sweet potatoes with cumin and olive oil until they surrendered into melting tenderness. Years later, standing in my Paris culinary school kitchen, I discovered the French gratin technique: thinly sliced vegetables nestled in cream, baked until bubbling and crowned with a golden crust. Now, from my New York City kitchen, I’m bringing those two worlds together in this root vegetable gratin—a dish that transforms humble sweet potatoes, parsnips, and beets into a stunning, herb-kissed casserole that feels both rustic and elegant. It’s the kind of healthy holiday side dish that wows guests with its vibrant stripes and cozy, creamy interior.
The moment you pull this gratin from the oven, the aroma fills your kitchen— warm thyme and garlic mingling with the caramelized edges of cream and butter. As you cut through the layers, every forkful contrasts earthy beets, sweet parsnips, and velvety sweet potatoes, all bound in a sauce infused with fresh thyme and a whisper of garlic. I love how the natural sugars in the vegetables intensify as they bake, creating a flavor so deep that you barely need the optional Gruyère. The top gets lacy and golden while the inside stays silky—never mushy, thanks to a precise baking method I perfected in Paris. This is the vegetable gratin recipe that turns even root-vegetable skeptics into believers.
What makes my version stand out? I use a quick herb infusion for the cream—no roux required—so it’s simpler than classic gratins but still delivers that French-born richness. The beets are sliced thin enough to become tender but thick enough to hold their shape, a detail I picked up from pastry-chef precision. One thing I always tell my readers: don’t skimp on the resting time after baking; it’s the secret to clean slices. And a common pitfall? Under-seasoning the cream mixture—don’t be shy with the salt. In the steps ahead, I’ll share all the tricks I’ve gathered from my triple-threat background to make your root vegetable casserole foolproof.
Why This Root Vegetable Gratin Recipe Is the Best
The flavor secret lies in how I build the herb cream. Instead of simply mixing everything cold, I gently heat the garlic and fresh thyme in the dairy, letting the aromatics bloom like they do in a Moroccan stew. That cream base tastes of garden-fresh thyme—not harsh or raw—and it soaks right into the vegetables. The combination of sweet, earthy, and savory notes reminds me of the layered spice profiles I grew up with, but it’s delivered through a French lens. I’ve found that this small step makes a sweet potato parsnip beet gratin taste far more sophisticated than its simple ingredient list suggests.
Texture is everything in a gratin. Many recipes leave you with a soupy bottom or undercooked beets. I call for slicing the parsnips and sweet potatoes about ⅛ inch thick, and the beets just a shade thinner—a little trick from my pastry days where precision mattered. This ensures they all finish cooking at the same time. The foil-cover-then-uncover method creates steam to soften the vegetables, then dries out the top just enough for that irresistible golden crust. The result is a root vegetable gratin that’s creamy but not heavy, each layer distinctly tender.
Even if you’ve never made a gratin before, this recipe is foolproof. There’s no sauce to whisk at the stove, no béchamel to stress over. You’ll just warm cream, slice veggies, and layer. I’ve tested it on busy weeknights and holiday feasts alike—it always comes out perfect. The 10-minute rest at the end is your margin for error: it lets the cream set up so you can serve beautiful squares. Follow my step-by-step notes and you’ll have a healthy holiday side dish that tastes like you spent all day in the kitchen, when really it’s deceptively simple.
Root Vegetable Gratin Ingredients
Every time I visit the Union Square Greenmarket, I find myself drawn to the heaps of jewel-toned root vegetables. For this gratin, I pick organic sweet potatoes with deep orange flesh, firm parsnips, and beets that are heavy for their size. The cream and milk are from a local dairy that reminds me of the crème fraîche I adored in France. Here’s what you’ll need—all standard US measurements—to create this showstopping side.
Ingredients List
- 2 tablespoons unsalted butter, softened, for the dish
- 2 cloves garlic, minced
- 1 cup heavy cream
- 1 cup whole milk
- 1 teaspoon fresh thyme leaves
- 1 teaspoon salt
- ½ teaspoon black pepper
- 1 large sweet potato (about 12 oz), peeled and thinly sliced (⅛ inch)
- 2 large parsnips (about 8 oz each), peeled and thinly sliced (⅛ inch)
- 2 large beets (about 8 oz each), peeled and thinly sliced (slightly thinner, about 1/10 inch)
- 1 cup grated Gruyère cheese (optional—see note)
Ingredient Spotlight
Sweet Potato: The natural sweetness and creamy texture of sweet potatoes anchor this dish. Look for firm, smooth-skinned ones without soft spots. They break down slightly during baking, adding body to the cream. If you’re out, butternut squash slices work beautifully—just expect a slightly less sweet result.
Parsnips: My Parisian chef instructor once said parsnips are “the unsung hero of winter.” Their subtle, nutty earthiness balances the sweetness of the other vegetables. Choose medium parsnips—if they’re too thick, the cores can be woody. A good swap is celery root (celeriac), sliced thin; it lends a similar mild, earthy flavor with a touch more starch.
Beets: Beets lend that dramatic red-purple hue and a deep, mineral sweetness. Red beets are classic, but golden beets are a stunning, less-staining alternative. They must be sliced thin enough to cook through—slightly thinner than the others. In a pinch, you could substitute turnips, though you’ll lose the vibrant color.
Heavy Cream & Whole Milk: The duo creates a sauce that’s rich yet not cloying. Whole milk lightens it, keeping the gratin from being too dense. If you need a lighter version, half-and-half can replace both, but the result will be a bit less luscious.
Gruyère (optional): This Swiss cheese melts into a nutty, creamy cap that browns beautifully. I skip it when I want a purely vegetable-forward dish. Comté or Emmental are perfect stand-ins; for a dairy-free version, simply omit it or use a sprinkle of nutritional yeast for a savory note.
| Original Ingredient | Best Substitution | Flavor / Texture Impact |
|---|---|---|
| Sweet potato | Butternut squash (same thickness) | Slightly less sweet, equally creamy when baked |
| Parsnips | Celery root (celeriac), peeled and thinly sliced | Mild earthy flavor with a slightly starchy, tender bite |
| Beets | Golden beets or turnips | Golden beets: same sweetness, less color bleed; Turnips: milder, no color |
| Heavy cream + whole milk | Half-and-half (use 2 cups total) OR full-fat coconut milk | Half-and-half: lighter, slightly less rich; Coconut milk: dairy-free, subtle sweetness |
| Gruyère cheese | Comté, Emmental, or omit | Similar nutty, meltable quality; omitting yields a pure vegetable cream gratin |
How to Make Root Vegetable Gratin — Step-by-Step
I’ve broken this down so even a first-timer can nail the layers. Take your time with the slicing, and remember: the oven does most of the work.
Step 1: Preheat Oven
Set your oven to 375°F. This temperature is the sweet spot—hot enough to caramelize the edges but gentle enough to cook the root vegetables through without scorching the cream. Position a rack in the middle.
💡 Lalybeth’s Pro Tip: I always check my oven temperature with an independent thermometer. If your oven runs hot, the cream can break; if too cool, the vegetables may stay crunchy. 375°F consistently gives me that tender, golden perfection.
Step 2: Butter the Baking Dish
Use the 2 tablespoons of softened butter to generously grease a 9×13-inch baking dish. Get into the corners—this prevents sticking and adds a subtle buttery flavor to the bottom layer.
⚠️ Common Mistake to Avoid: Skipping this step and relying on cooking spray. Butter not only prevents sticking but also contributes to the browning of the vegetable edges that touch the dish. It makes a difference.
Step 3: Infuse the Cream Mixture
In a medium saucepan, combine the heavy cream, whole milk, minced garlic, fresh thyme leaves, salt, and pepper. Place over medium heat and bring just to a simmer—you’ll see tiny bubbles at the edges. Immediately remove from heat. Let it steep while you layer; this extracts the thyme’s essential oils without boiling harshness.
💡 Lalybeth’s Pro Tip: For an even deeper flavor, I sometimes add a smashed garlic clove and a sprig of thyme while heating, then strain them out before pouring. It’s a little extra step I learned in Paris for a more delicate infusion.
Step 4: Layer Half the Vegetables
Arrange half of the sweet potato, parsnip, and beet slices in the prepared dish, overlapping them slightly—think of shingling a roof. Don’t just dump them in; the uneven layers create that striking cross-section. Alternate the colors for a beautiful striped effect.
⚠️ Common Mistake to Avoid: Piling vegetables too thickly. Overlap is fine, but if you stack them more than two layers deep in any spot, the cream won’t penetrate evenly. Keep the layer about ½ inch thick.
Step 5: Repeat Layers and Pour Remaining Cream
Add the second half of the vegetables, again arranging them carefully. Slowly pour the infused cream mixture evenly over everything. Use a spatula to press down gently so the liquid seeps into all the nooks.
💡 Lalybeth’s Pro Tip: Before pouring, I often strain the cream through a fine-mesh sieve if I want a silkier texture (removing any thyme leaves). Sometimes I leave the leaves in for a more rustic look—both are delicious.
Step 6: Sprinkle Cheese (if using)
If you’re using Gruyère, sprinkle it evenly over the top layer of vegetables. The cheese will melt into a golden, savory crust. For a dairy-free version, just skip it—the cream will still brown.
⚠️ Common Mistake to Avoid: Adding the cheese too early or in a single clump. An even sprinkling ensures a uniform crust. If you pile it in one spot, it may not melt evenly and could burn in patches.
Step 7: Cover and Bake, Then Uncover
Cover the dish tightly with aluminum foil. Bake for 45 minutes. Then remove the foil and continue baking for 20–25 minutes more, until the vegetables are fork-tender and the top is bubbly and golden brown. The beets will have softened and the edges may look slightly caramelized.
💡 Lalybeth’s Pro Tip: If the top isn’t browning as much as you’d like, switch the oven to broil for the last 2–3 minutes—but watch it like a hawk! The cheese or cream can go from golden to burnt in seconds.
Step 8: Rest and Serve
Remove the gratin from the oven and let it rest for 10 minutes. This is crucial—it allows the cream to set up slightly so the slices hold their shape. Use a spatula to serve generous squares, showing off the colorful layers.
⚠️ Common Mistake to Avoid: Cutting into the gratin immediately. The cream will be too runny, and the layers will slide apart. Patience rewards you with a picture-perfect serving.
| Step | Action | Duration | Key Visual Cue |
|---|---|---|---|
| 1 | Preheat oven | 10 min | Oven at 375°F |
| 2 | Butter dish | 2 min | Even butter coating everywhere |
| 3 | Infuse cream | 5 min | Small bubbles at pan edge |
| 4 | Layer half veggies | 5 min | Shingled, alternating colors |
| 5 | Repeat & pour cream | 3 min | Cream just covers veggies |
| 6 | Sprinkle cheese (opt) | 1 min | Even layer of Gruyère |
| 7 | Cover & bake, then uncover | 45 + 20–25 min | Tender fork, golden top |
| 8 | Rest & serve | 10 min | Cream set, clean slices |
Serving & Presentation
I like to bring this gratin straight to the table in its baking dish—the colorful stripes are too pretty to hide. For a plated presentation, cut neat squares with a metal spatula, lifting carefully to keep the layers intact. A scattering of fresh thyme leaves or finely chopped parsley adds a pop of green that reminds me of Moroccan herb gardens. This dish shines on a holiday table next to roasted turkey or a simple roast chicken, but it’s equally at home as a meatless main with a bright side salad.
To round out the meal, I often serve a crisp green salad with a lemon vinaigrette to cut through the richness, or some steamed haricots verts—a nod to my Paris days. For larger gatherings, a basket of warm crusty bread for sopping up every drop of sauce is a must. The flavors also pair beautifully with a dollop of tangy crème fraîche or a swirl of harissa-spiked yogurt, bridging my Moroccan roots.
| Pairing Type | Suggestions | Why It Works |
|---|---|---|
| Side Dish | Roast turkey, glazed ham, herb-roasted chicken | Rich and creamy gratin complements lean proteins perfectly |
| Sauce / Dip | Crème fraîche, horseradish cream, harissa yogurt | Cool tanginess or spicy kick balances the sweet, earthy veggies |
| Beverage | Chardonnay, Pinot Noir, sparkling water with lemon | White wine matches the creaminess; light red picks up the earthiness |
| Garnish | Fresh thyme, chopped parsley, crunchy toasted walnuts | Herbs brighten each bite; nuts add a contrasting texture |
Make-Ahead, Storage & Reheating
New York life moves fast, so I’m all about strategic meal prep. This gratin is wonderfully flexible—you can assemble it the night before (covered in the fridge) and bake it fresh the next day, or fully bake it up to two days ahead and reheat. I often make it on a Sunday and re-warm slices for quick weeknight dinners; the flavors actually meld and deepen.
| Method | Container | Duration | Reheating Tip |
|---|---|---|---|
| Refrigerator | Covered with foil or in airtight container | Up to 4 days | Reheat in 350°F oven for 15-20 minutes, covered |
| Freezer | Wrap tightly in plastic then foil, or freezer-safe dish | Up to 2 months | Thaw overnight; bake covered at 350°F until hot, then uncover to crisp |
| Make-Ahead | Assembled unbaked gratin in the baking dish, covered | Up to 24 hours in advance | Let sit at room temp 30 min, then bake as directed (add 5-10 min) |
When reheating, I find the oven is best to recapture that golden top. If you’re only warming a single serving, the microwave works, but the crust won’t be as crisp. A quick pass under the broiler can fix that in a snap. And if the gratin seems a little dry after storage, drizzle a tablespoon of milk or cream over the top before reheating—it revives the creaminess beautifully.
I’ve learned not to freeze a gratin that contains purely beets and sweet potatoes without parsnips, as the texture can turn slightly watery upon thawing. But this combination freezes surprisingly well, likely thanks to the starchy parsnips helping bind it all together. Just make sure it’s tightly wrapped to avoid freezer burn.
Variations & Easy Swaps
| Variation | Key Change | Best For | Difficulty Impact |
|---|---|---|---|
| Moroccan Spice Gratin | Add ½ tsp cumin & ¼ tsp cinnamon to cream; swap thyme for cilantro | Lovers of warm, earthy spices | No extra difficulty |
| Dairy-Free Coconut Gratin | Use full-fat coconut milk + 1 tbsp cornstarch; omit cheese | Dairy-free, vegan (if also omit cheese) | Slightly more involved (cornstarch slurry) |
| Autumn Harvest Gratin | Sub 1 parsnip with 1 apple; add a handful of dried cranberries | Festive, slightly sweet twist | No extra difficulty |
Moroccan Spice Gratin
Channel the flavors of my mother’s kitchen by adding ground cumin and a touch of cinnamon to the cream mixture. The cumin brings a subtle warmth that highlights the earthiness of the beets and parsnips, while cinnamon adds a gentle sweetness that’s not overpowering. I swap the thyme for fresh cilantro, stirred in just before serving, and sometimes top with a crumble of toasted almonds for crunch. This version is especially lovely alongside roast lamb or a tagine.
Dairy-Free Coconut Gratin
For a completely dairy-free and vegan root vegetable casserole, replace the heavy cream and milk with two cups of full-fat coconut milk. Whisk in 1 tablespoon of cornstarch to help it thicken—it won’t set exactly the same way, but it’ll be wonderfully creamy. Skip the butter and cheese; instead, brush the dish with coconut oil. The gratin will have a mild tropical undertone that actually pairs beautifully with the sweet potatoes. I’ve tested this version for a friend with dairy sensitivity, and it was a hit at a potluck.
Autumn Harvest Gratin
When the first cool days of fall arrive and the NYC farmers markets overflow with apples, I like to swap one parsnip for a firm, tart apple like Granny Smith. Thinly sliced, it softens brilliantly and adds a delicate fruitiness that contrasts with the root veggies. I also scatter a handful of dried cranberries among the layers—they plump up in the cream and give little bursts of sweetness. It’s a beautiful, slightly festive version perfect for Thanksgiving.
FAQs: Your Root Vegetable Gratin Questions Answered
Do I need to peel sweet potatoes, parsnips, and beets before making a root vegetable gratin?
Yes, I recommend peeling all three. The skin of sweet potatoes can be tough and chewy when baked in a gratin, and parsnip skins have a slight bitterness. Beets absolutely need peeling because their skin is fibrous and dirt can hide in crevices. Use a vegetable peeler for clean slices; I learned in Paris that a uniform, thin surface ensures even cooking. If you’re using golden beets, the skins are thinner, but I still peel them for the smoothest texture.
Can I prepare root vegetable gratin ahead of time and reheat it the next day?
Absolutely, and I often do. Assemble the gratin completely up to 24 hours ahead, cover and refrigerate. When ready, let it sit at room temperature for 30 minutes, then bake as directed—you may need an extra 5–10 minutes of covered baking time. Or bake it fully, cool, refrigerate, and reheat slices in a 350°F oven covered with foil until hot (15–20 minutes). The flavors meld overnight, making it even more delicious. Just avoid holding it for more than 2 days before baking, as the beets may bleed excess color.
What can I use instead of heavy cream in a root vegetable gratin to make it lighter?
For a lighter gratin, replace the heavy cream with half-and-half, keeping the whole milk as is. The sauce will be slightly thinner but still rich enough. You can also use a combination of whole milk plus 2 tablespoons of flour whisked into the milk to give it body. Another option is a mix of evaporated milk and an equal part of milk; it’s creamier than plain milk but lower in fat. Avoid using only skim milk—it will make the gratin watery. My mother in Morocco would approve of using full-fat yogurt thinned with a little water, though it lends a tangy note.
How long should I bake a gratin with sweet potatoes, parsnips, and beets so the vegetables are tender but not mushy?
The key is the two-stage baking. Covered at 375°F for 45 minutes steams the root veggies, then uncovering for 20–25 minutes evaporates excess moisture and browns the top. Check for doneness with a fork after the uncovered phase—the vegetables should feel tender with slight resistance, not falling apart. If they’re still firm, cover again and bake in 10-minute increments. I slice the beets slightly thinner to match the cooking rate of the sweet potatoes and parsnips; this prevents mushiness. A 10-minute rest after baking also helps avoid a waterlogged texture.
Why did my beet gratin turn the whole dish pink?
Red beets naturally bleed their vibrant pigment into the cream. To reduce this, pat the beet slices dry with paper towels before layering—this removes some surface juice. You can also quickly blanch the beet slices in boiling water for 1 minute, then drain and pat dry; this sets the color and lessens bleeding. I don’t mind the pink hue, but if you want distinct stripes, use golden beets or layer the beets only in the middle, away from the edges. And never stir after the cream is poured—that mixes the colors.
Can I make this gratin vegan and gluten-free?
Easily! To make it vegan and gluten-free, use full-fat coconut milk (from a can) mixed with 1 tablespoon cornstarch instead of the dairy cream/milk. Swap butter for coconut oil or vegan buttery spread. Omit the cheese. The gratin will be creamy and slightly sweet; the coconut flavor is subtle behind the root vegetables. It’s deliciously rich. Ensure your cornstarch is whisked in with the cold coconut milk, then heated to activate. This substitution works beautifully and is a Thanksgiving lifesaver for mixed-diet tables.
Do I need a mandoline to slice the vegetables thinly?
A mandoline makes slicing fast and uniform, but a sharp chef’s knife works too if you’re patient. For even cooking, consistency matters. I use the ⅛-inch setting on my mandoline for sweet potatoes and parsnips, and a hair thinner for beets. If you don’t have a mandoline, use a knife and focus on keeping slices no thicker than ¼ inch. The gratin will still be delicious, just check for doneness a little earlier—thicker slices may need extra covered baking time.
Can I add other vegetables to this gratin?
Absolutely. Thinly sliced Yukon Gold potatoes, turnips, or celery root can be swapped in for part of any root. Onions or leeks layered in add sweetness. My rule is to keep total vegetable volume the same and maintain a balance of starchy and moist veggies so the cream doesn’t get overwhelmed. I’ve added thin fennel slices for an anise note—very Provençal. Just be mindful that wetter vegetables like zucchini will release water, so I’d avoid those unless pre-salted and drained.
What’s the best way to reheat this gratin without drying it out?
Reheat in a 350°F oven, covered with foil, for 15–20 minutes (if already baked and cold). The foil traps steam and prevents the top from over-browning while the inside warms. For a single portion, the microwave is fine, but I then pop it under the broiler for 2 minutes to re-crisp the surface. Always add a splash of milk or cream to the top if it looks dry before reheating. I’ve reheated leftovers in a skillet with a lid and a drop of water on the stovetop—surprisingly good.
Can I freeze unbaked gratin and cook it later?
Yes, but with a slight adaptation. Assemble completely, cover tightly with plastic wrap then foil, and freeze. Thaw in the refrigerator overnight. Before baking, let it come to room temperature for 30 minutes. You may need to add extra liquid (a splash of milk) because freezing can dry out dairy. Bake covered for the first hour, then uncover to brown. The texture might be slightly softer, but it’s still very good. I prefer baking fresh or refrigerated over frozen, but it works in a pinch.
Share Your Version!
I can’t wait to see how your root vegetable gratin turns out—whether you stuck to the classic herb cream or gave it a Moroccan spice twist. When you make it, tag me on Instagram @cookingwithlalyta so I can share in the beauty of those striped layers. And if you try the dairy-free version, I’d love to hear how the coconut milk worked for you—it’s one of my favorite pantry swaps.
Scroll down and leave a star rating and a comment below. Tell me: which root vegetable shone the brightest in your gratin? Did you add cheese, or did you let the vegetables speak for themselves? Your feedback helps me create more recipes you’ll love. From my NYC kitchen to yours — I hope this recipe brings as much warmth to your table as it does to mine. — Lalybeth 🧡
Love This Recipe? Save It to Pinterest!
If you enjoyed this Root Vegetable Gratin with Sweet Potatoes, Parsnips, and Beets recipe, don’t let it get lost in your browser tabs! 😄 Pin it now so you can find it again anytime — and explore hundreds more tried-and-tested recipes waiting for you on my Pinterest boards.
👉 Follow Lalybeth on Pinterest @cookingwithlalyta
📌 Pin this recipe · 🔁 Re-pin your favorites · 💬 Tag me when you make it — I love seeing your creations!
Did You Try This Recipe?
I’d be thrilled to hear how it went! Drop a comment below with your questions, twists, or serving suggestions. And if you share a photo on Instagram, use #CookingWithLalyta so I can repost your creation. Let’s cook together!

Root Vegetable Gratin with Sweet Potatoes, Parsnips, and Beets
- Total Time: 1 hour 25 minutes
- Yield: 8 servings 1x
Description
This colorful and cozy root vegetable gratin is layered with sweet potatoes, parsnips, and beets, then baked in a creamy herb sauce until tender and golden.
Ingredients
- 2 tablespoons unsalted butter
- 2 cloves garlic, minced
- 1 cup heavy cream
- 1 cup whole milk
- 1 teaspoon fresh thyme leaves
- 1 teaspoon salt
- 1/2 teaspoon black pepper
- 1 large sweet potato, peeled and thinly sliced
- 2 large parsnips, peeled and thinly sliced
- 2 large beets, peeled and thinly sliced
- 1 cup grated Gruyère cheese (optional)
Instructions
- Preheat oven to 375°F.
- Butter a 9×13-inch baking dish.
- In a medium saucepan, combine cream, milk, garlic, thyme, salt, and pepper. Heat until simmering, then remove from heat.
- Layer half of the sweet potato, parsnip, and beet slices in the dish, overlapping slightly. Pour half of the cream mixture over.
- Repeat with remaining vegetables and cream mixture.
- Sprinkle with cheese if using.
- Cover with foil and bake for 45 minutes. Uncover and bake for 20-25 minutes more until vegetables are tender and top is golden.
- Let rest for 10 minutes before serving.
Notes
You can use any combination of root vegetables. For a dairy-free version, use coconut milk and omit cheese.
- Prep Time: 20 minutes
- Cook Time: 1 hour 5 minutes
- Method: Side Dish
- Cuisine: American
Nutrition
- Calories: 280 calories
- Sugar: 8g
- Fat: 18g
- Carbohydrates: 25g
- Protein: 6g
Tried This Recipe? Leave a Comment!
Did you make this recipe? I’d love to hear how it turned out! Please leave a comment and a rating below. Your feedback helps other home cooks and supports cookingwithlalyta.com!
For more delicious inspiration, follow me on Pinterest!